| Card |
|---|
| default | true |
|---|
| id | 1 |
|---|
| label | Price List Maintenance |
|---|
| Find the area specified for price list maintenance at the top of the screen. Click the down arrow to view and/or select from the options: - Display All;
- Active Price Lists;
- Inactive Price Lists;
When you select one of the options above, the system updates the data registered onscreen. The following options are also available, which depend on settings upon activation. - Create View;
- Manage Views.
On this page, click F12 to set the following parameters: - Display by? Select between List or Product;
- Product? Use the magnifying glass next to the field or the F3 key to access the default query and select the product;
- Save list by? Enter whether the list should be saved by product code or by grid reference, when lists are displayed by product (MV_PAR01=2);
|
| Card |
|---|
| Note that when you access the routine, all registered items are displayed. When you select this option at the top of the main screen, the system displays the branch selection screen. Select the branch and click OK to continue. Fill out the data in accordance with the instructions described in Main Fields. The system will not let you duplicate the list code. See also the features available in Other Actions. | Nota |
|---|
| For each Register export, a control sequence is generated in field Exp. Seq. and saved in Field Exp Dt (the date of the last export). Only follow this procedure to register price lists not of types Standard and Promotional. |
|
| Card |
|---|
| Press the [F12] key to perform maintenance in Price Lists. Set parameters in accordance with completion instructions: - Display by? - The options are Product, or List.
When you choose List, all the data on the list selected for editing is displayed (default option). When you choose Product, all the lists containing this product are displayed. - Product? If the option is Display Product, enter the code of the product you wish to view when editing.
Confirm parameter settings and click Edit to continue. A window is displayed for editing, in accordance with parameter settings. Configure and confirm the changes. Adjust the information according to the instructions described in Main Fields. See also the features available in Other Actions. |
| Card |
|---|
| default | true |
|---|
| id | 4 |
|---|
| label | Search |
|---|
| Other Actions / Search Allows the use of filters to order data based on the index selected, considering, for example, branch+code. 
|
| Card |
|---|
| Other Actions / View Place the cursor in the item, then click View to continue. See also the features available in Other Actions. |
| Card |
|---|
| default | true |
|---|
| id | 6 |
|---|
| label | Delete |
|---|
| Other Actions / Delete To delete a registered item, place the cursor to continue and access Other Actions / Delete. View the screen with the message on top saying Are you sure you want to delete the item below? You cannot reverse the confirmation for this action. To complete the deletion, click Confirm. |
| Card |
|---|
| Other Actions / Copy Use this option to create new price lists that have items in common, as well as to register lists with similar characteristics, such as items in common, to avoid retyping them. The system displays all fields in accordance with the settings of a given list, already selected in the maintenance window, so you can copy it. When you activate this option, the system automatically fills out the field List Code with the next numbering available, only duplicating the items on the list, so you need to adjust the header at each duplication. In the search window, enter the item to be copied and confirm it. The system displays the addition screen showing all the fields filled in the same manner as in the list selected. Enter the code and description of the new list and edit/fill out any fields if needed. Check the data and confirm the addition. |
| Card |
|---|
| default | true |
|---|
| id | 8 |
|---|
| label | Generate |
|---|
| Other Actions / Generate Use this option to create a price list based on the Product Register. Select the branch and confirm it. Select the Products, the Groups and also the Types. In the price list items, the system fetches all the data on products already entered; however, you must also enter the list header items. In the Validity parameter you can set the date from which the item on the list is valid, though this field is not required. For price list validity purposes, the system always takes into account the data found in fields Start Date and End Date; however, the list items may have later validity dates. Check and confirm the data. |
| Card |
|---|
| default | true |
|---|
| id | 9 |
|---|
| label | Adjustment |
|---|
| Other Actions / Adjustment Use this option to apply a multiplication factor to adjust the prices of products from lists specified in parameters. Access the option, view the message from the system and click Parameters. Although setting this option's parameters is self-explanatory, you should pay attention to the following data: - Initial Product and Final Product. Use the magnifying glass next to the field or the F3 key to access the default query and define the products.
- Initial Group and Final Group. Likewise, access default query and select the groups.
- Initial Type and Final Type. Access default query and select the types.
- Initial List and Final List. Access default query and select the lists.
- Adjustment Factor? In this field, enter the adjustment factor to be applied.
- Number of decimal places? Enter how many decimal places will be used when saving the new price.
Example: If you enter 0 and the calculation of the new value is 46.74, the system saves 46,00 disregarding the cents. - Orders in Portfolio? Select between Maintain or Update (option Update lets you update all pending Sales Orders).
- Reapply Factor? Define between Base Price or List Price, given that:
In base price, the following formula is applied: Base Price x Multiplication Factor x Factor (base price multiplied by the multiplication factor and multiplied by the factor). In list price, the following formula is applied: Sales Price x Multiplication Factor (sales price multiplied by the multiplication factor). - Update Base Price (product)? Select between Yes or No.
- Initial Grid Reference and Final Grid Reference? Define the initial and final grids to be considered.
Check the data and confirm the list adjustment. The system adjusts the lists in accordance with parameter settings. Use of Price Spreadsheet in Adjustment: - Price list products to be adjusted (Initial Product / Final Product);
- Price list product groups to be adjusted (Initial Group / Final Group);
- Price list product types to be adjusted (Initial Type / Final Type);
- Price Lists to be adjusted (Initial List / Final List);
- Adjustment Factor to be used (Adjustment Factor). - Adjustment to be applied
- Number of decimal places for rounding of adjustment calculation (Number of Decimal Places);
- Your orders already saved must be adjusted (Orders in Portfolio);
- If the adjustment is applied to the base list (Product Register) or the Price List (Reapply Factor).
- Name of pricing spreadsheet in which the adjustment takes place (Spreadsheet).
- Whether the base price of the product register is updated or not (Update Base Price (product))
- Product Grids of the price list to be adjusted (Initial Grid Reference / Final Grid Reference).
In parameter "Spreadsheet" you need to enter the code of the Pricing Spreadsheet you want to use. If you need to adjust prices in the list, you can make the Automatic Adjustment from a Pricing Spreadsheet (MATC010) by executing the following process:
PRICING SPREADSHEET (MATC010) In the Pricing Spreadsheet (MATC010), there must be a line referencing the code and description of the Price List (OMSA010) to be adjusted:

You also need to add the formula to set the price to be moved to the Price List (OMSA010): *The Description field of the Pricing line must contain: #code, space and the name of the pricelist. 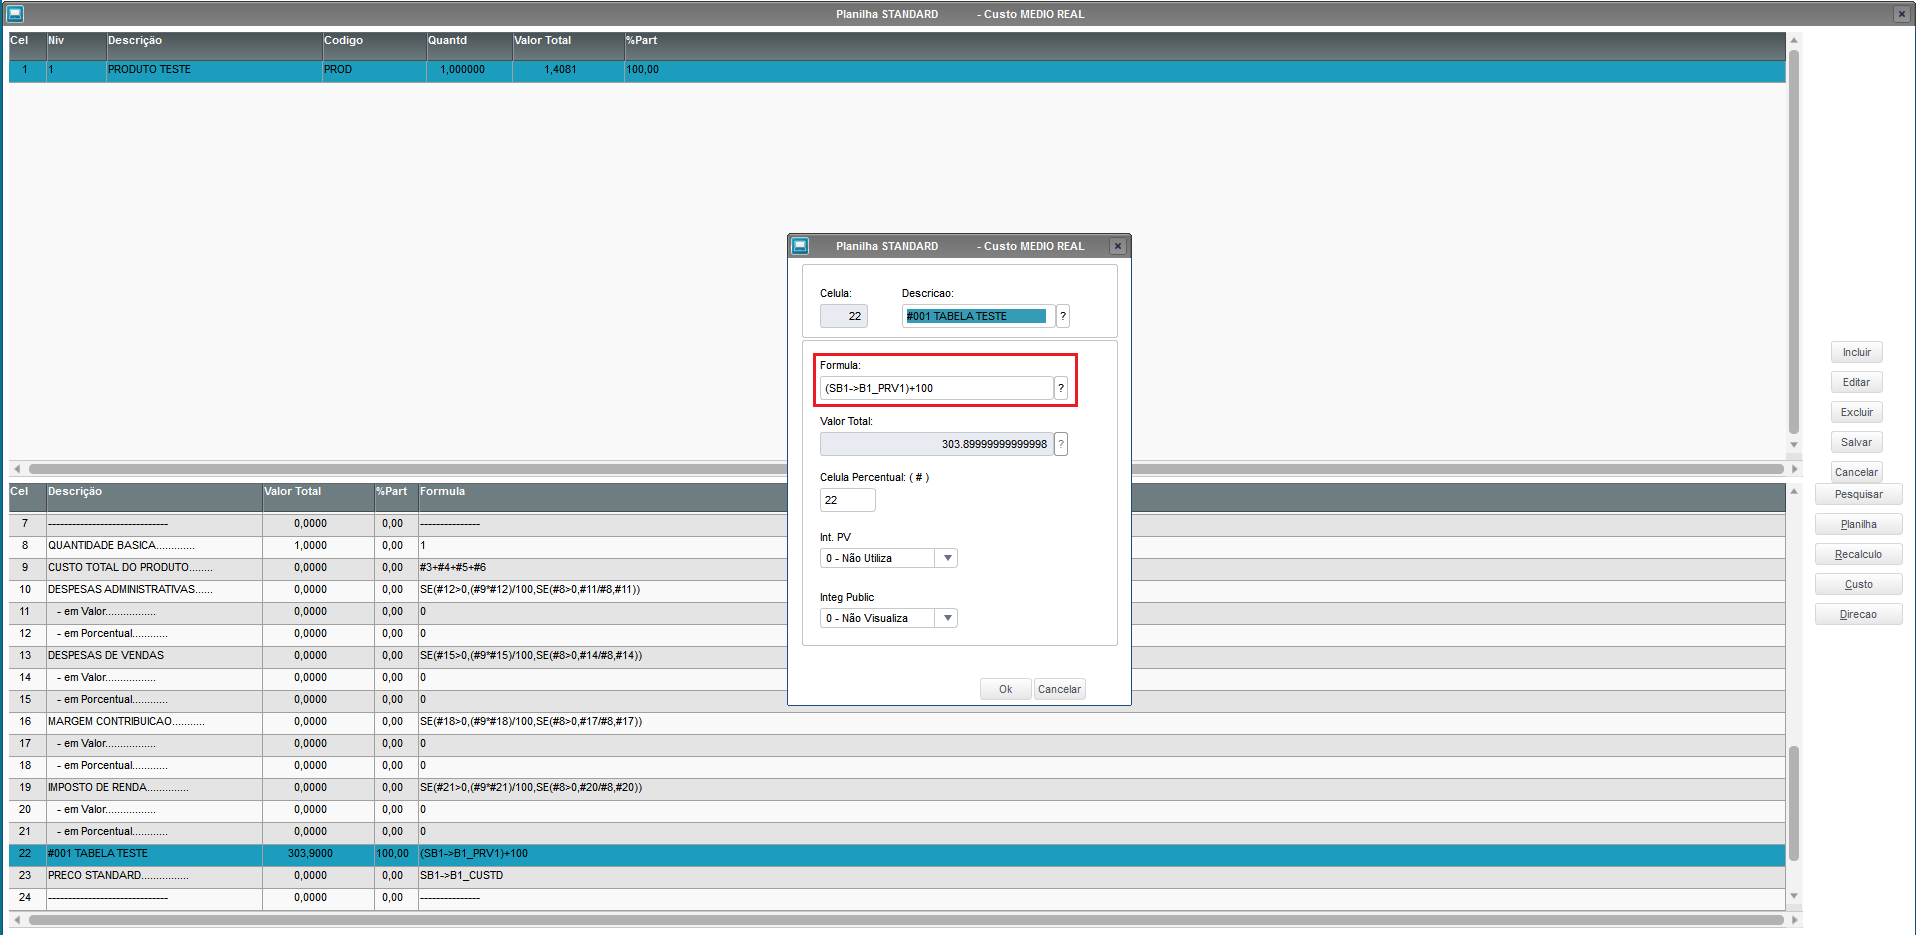
NOTE: If you need Help to register the Pricing Spreadsheet (MATC010), contact the TOTVS Stock/Costs Support.
PRICELIST (OMSA010) Access the routine Price List (OMSA010), select the Price List you want to adjust and access "Other Actions" → "Adjustment": 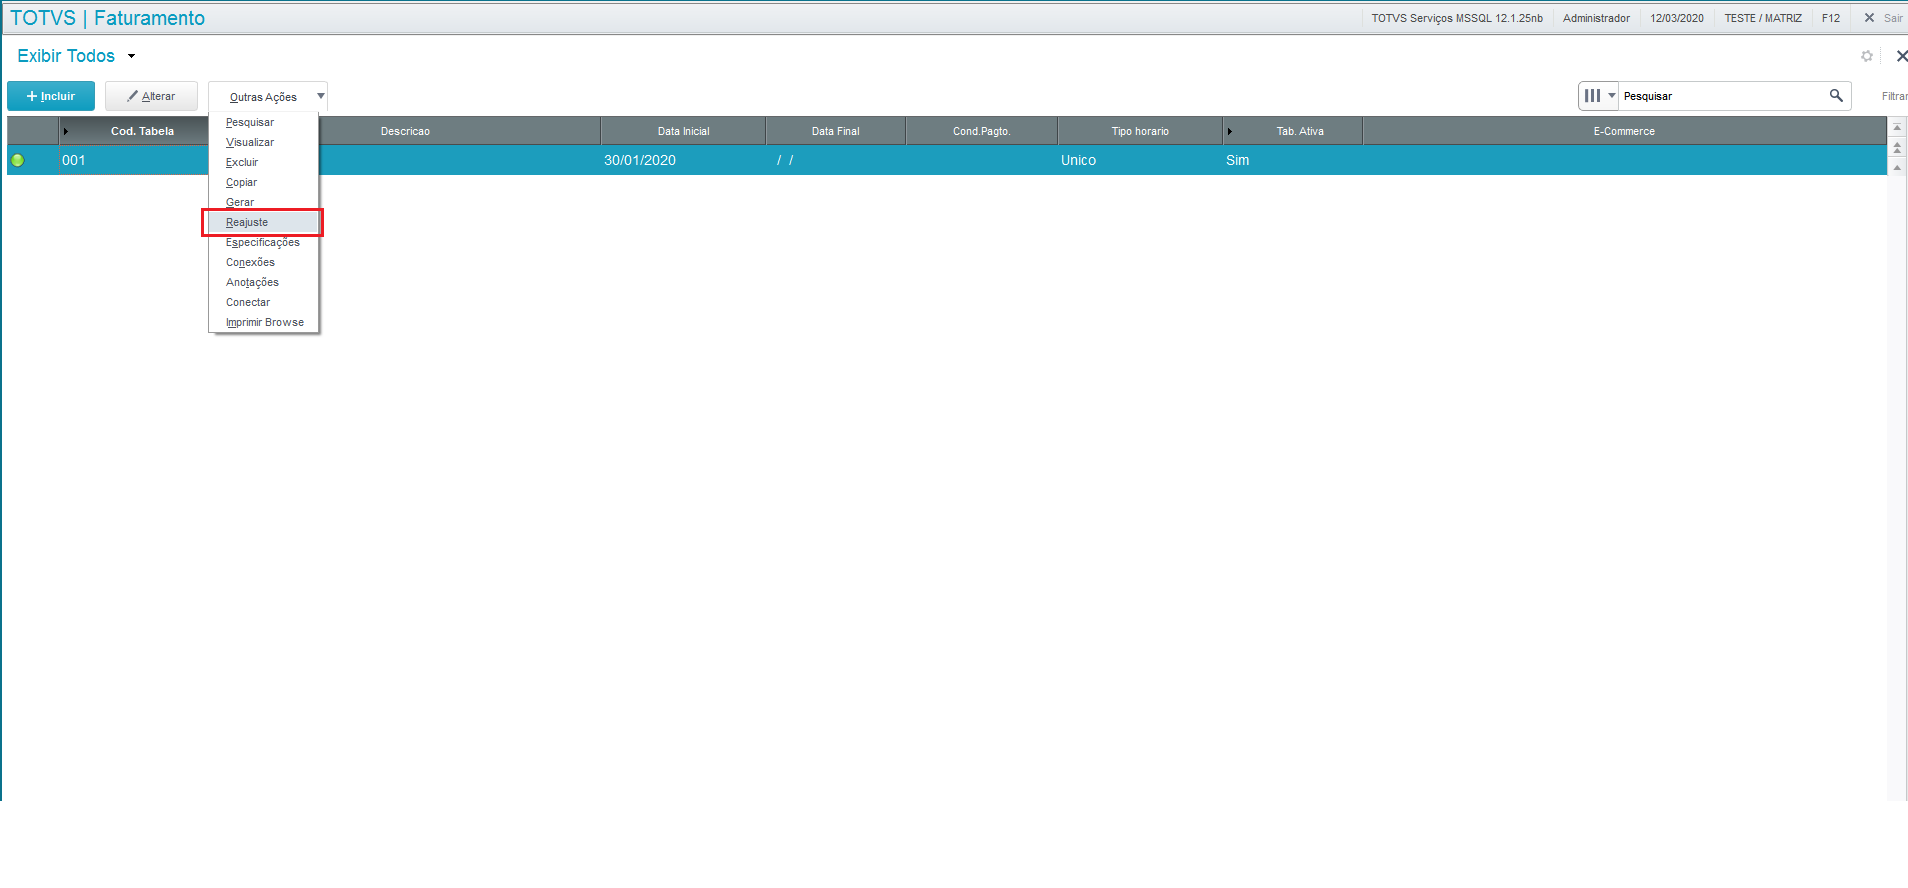
After clicking "Adjustment", select the option "Parameters" to configure the adjustment:
Among the parameters, you can select: - Price list products to be adjusted (Initial Product / Final Product);
- Price list product groups to be adjusted (Initial Group / Final Group);
- Price list product types to be adjusted (Initial Type / Final Type);
- Price Lists to be adjusted (Initial List / Final List);
- Adjustment Factor to be used (Adjustment Factor). - If you do not enter the adjustment value, the system will only update the sales price of the price list in case the values found between the price list and the price spreadsheet are different, and parameter (Reapply Factor) is set to List Price. If parameter (Reapply Factor) is set to Base Price, the system does not make any adjustment, also disregarding the parameter (Update Base Price (product)).
- in accordance with the value found in the Spreadsheet if they are different.
- Number of decimal places for rounding of adjustment calculation (Number of Decimal Places);
- Your orders already saved must be adjusted (Orders in Portfolio);
- If the adjustment is applied to the base list (Product Register) or the Price List (Reapply Factor).
- Name of pricing spreadsheet in which the adjustment takes place (Spreadsheet).
- Whether the base price of the product register is updated or not (Update Base Price (product))
- Product Grids of the price list to be adjusted (Initial Grid Reference / Final Grid Reference).
In parameter "Spreadsheet", enter the code of the Pricing Spreadsheet you want to use. In this example, we use the code "STANDARD": 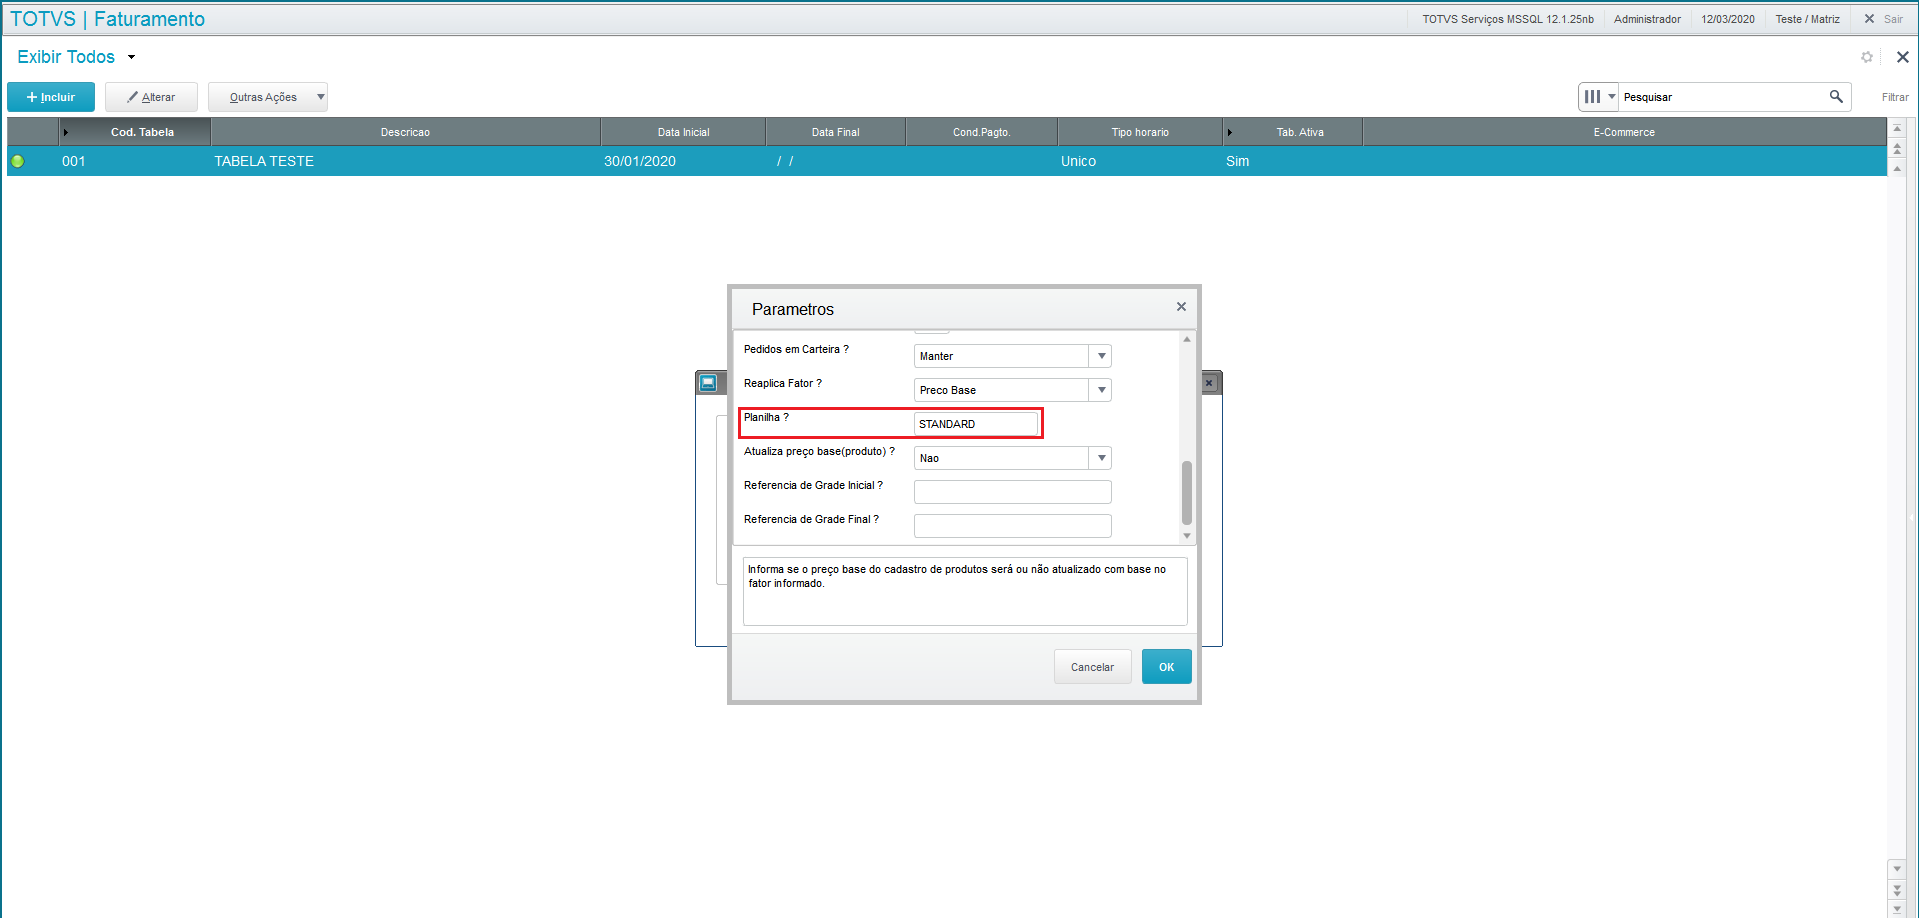
After entering the data, click "OK". The system will make the adjustment and fill out the adjusted price: 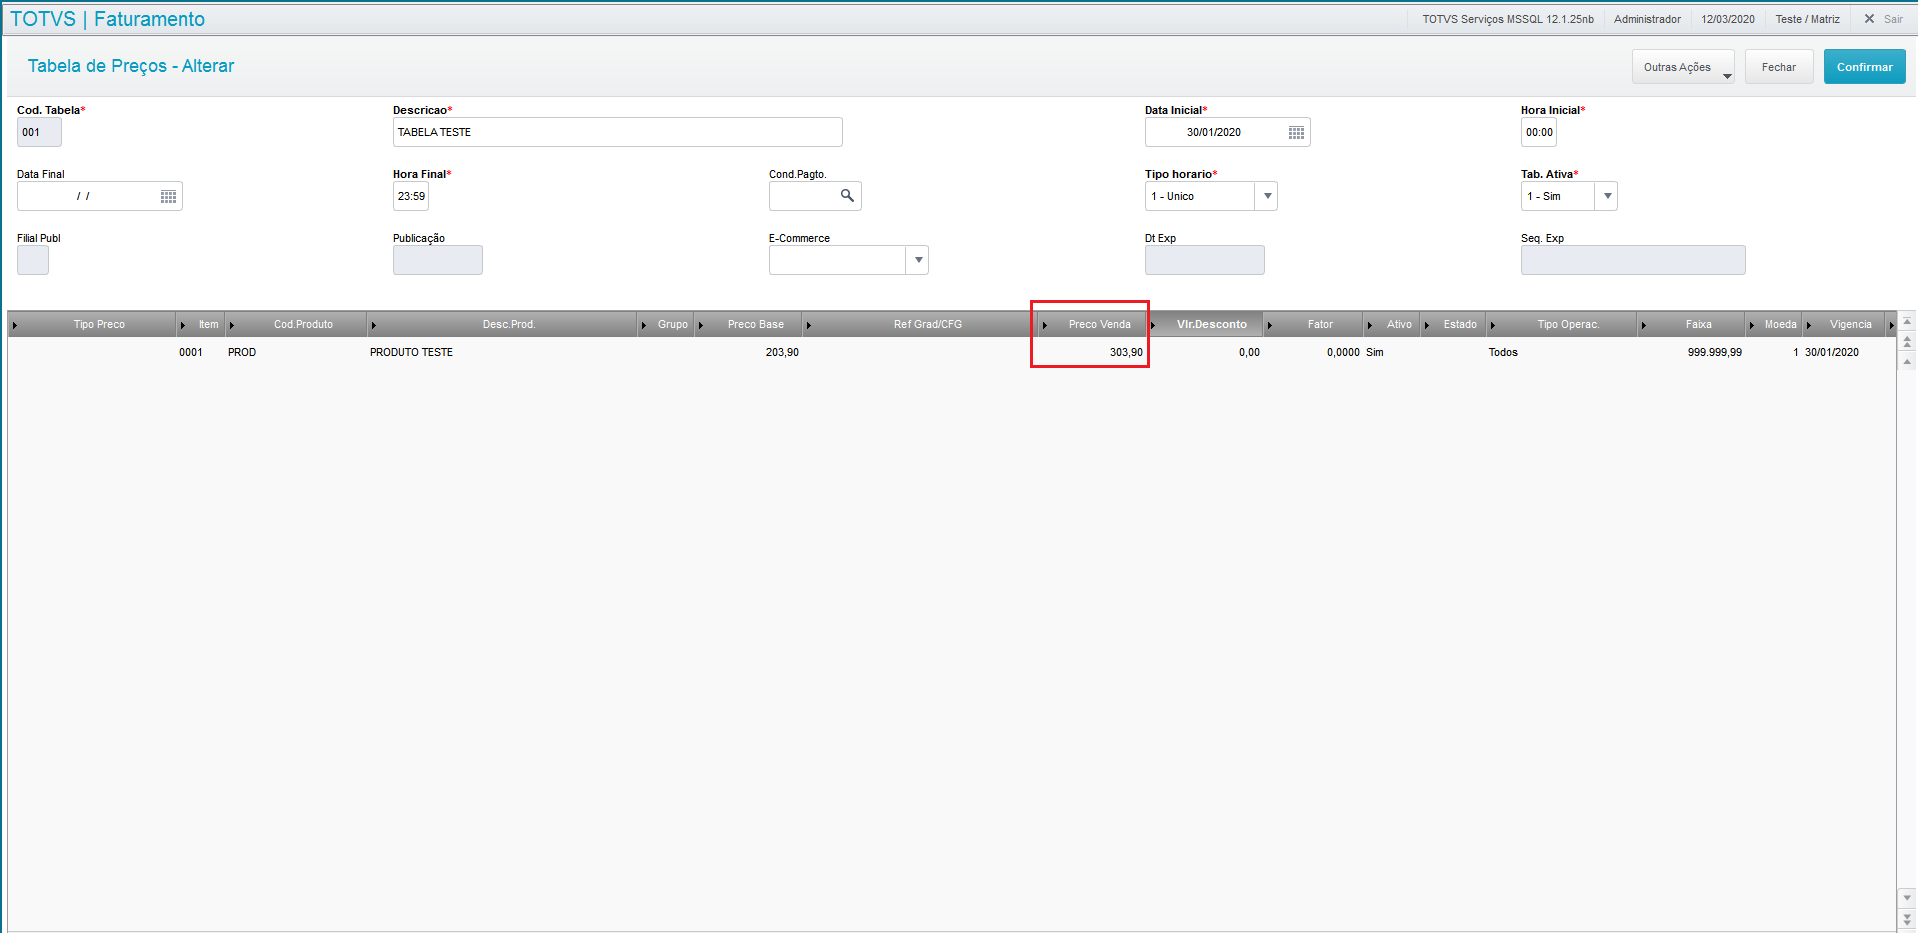
|
| Card |
|---|
| default | true |
|---|
| id | 10 |
|---|
| label | Specifications |
|---|
| Other Actions / Specifications When you access this option, the system displays the specifications registered. The options at the top of the screen are: Click this option and view the screen. The grids are: Specifications and Entities (in this area, the structure is displayed in tree format). This option does not allow editing. |
| Card |
|---|
| default | true |
|---|
| id | 11 |
|---|
| label | Connections |
|---|
| Other Actions / Connections Use this feature to identify the relationship between the records created in CRM, which are suspect, prospect, customer, contacts, competitors, suppliers, partners, opportunities, proposals, sales orders, invoices, products, price lists, sales process, sales representatives, business unit, sales team, promotions and events. The connection centralizes data on the relationship between an entity and another, making it easier to query them. Once you activate this option in Other Actions / Connections, you can view the options onscreen, as follows: - Add, when you choose to add a new connection, the system first displays the screen for you to select the branch.
Select the branch and confirm it to continue. The next screen pertains the Connections Register, with data on entity, code and name of the connector, which are loaded automatically. In the grid Connect To, enter: Field | Description | Entity | Use the magnifying glass next to the field or the F3 key to access the default query and select the item. Example: AC3 - Competitors | Code | Use the magnifying glass next to the field or the F3 key to access the default query and select the item. Enter the code of the entity Connected. | Function | Use the magnifying glass next to the field or the F3 key to access the default query and select the item. | Status | Use the down arrow next to the field to view the options available, which are: 1-Inactive or 2-Active. |
In the grid Connect From, enter: Field | Description | Function | Use this option to link data from one customer to another, entering the function of the connection. Example: Partner, Associate, Influencer, etc. When you cannot find a feature that best represents your needs, register other connection features and associate them with the corresponding features; that is, when you register the feature Uncle/Aunt, the corresponding feature will be Nephew/Niece. | Initial Date | Use the calendar option next to the field or enter the date in DDMMYYYY format. | Final Date | Use the calendar option next to the field or enter the date in DDMMYYYY format. |
|
| Card |
|---|
| Other Actions / Notes Use this register to add, edit and delete comments or notes related to records of the following CRM entities: Suspects, Customers, Prospects, Contacts, Competitors, Sales Representatives, Opportunities, Proposals, Orders, Suppliers, Partners, Products, Price List, Sales Process, Business Unit, Sales Team, Promotion and Events. The note is comprised of its title, contents, and you can attach files to it. The menu offers these options: - Add. Click this option to select and confirm the branch before viewing the add screen.
Then fill out the following fields: Field | Description | Owner | Use the magnifying glass next to the field or the F3 key to access the default query and select the owner of the record. | Title | Enter a title for the note at issue. | Status | Use the down arrow next to the field and select between: 1-Inactive or 2-Active. | Contents | In this field, enter information pertaining the note. |
- Edit,
- Search, and
- Other Actions.
- View;
- Delete;
- Copy;
- Attach;
- View Attachment.
|
| Card |
|---|
| default | true |
|---|
| id | 13 |
|---|
| label | Connect |
|---|
| Other Actions / Connect The next screen pertains the Connections Register, with data on entity, code and name of the connector, which are loaded automatically. In the grid Connect To, enter:
Field | Description | Entity | Use the magnifying glass next to the field or the F3 key to access the default query and select the item. Example: AC3 - Competitors | Code | Use the magnifying glass next to the field or the F3 key to access the default query and select the item. Enter the code of the entity Connected. | Function | Use the magnifying glass next to the field or the F3 key to access the default query and select the item. | Status | Use the down arrow next to the field to view the options available, which are: 1-Inactive or 2-Active. |
In the grid Connect From, enter: Field | Description | Function | Use this option to link data from one customer to another, entering the function of the connection. Example: Partner, Associate, Influencer, etc. When you cannot find a feature that best represents your needs, register other connection features and associate them with the corresponding features; that is, when you register the feature Uncle/Aunt, the corresponding feature will be Nephew/Niece. | Initial Date | Use the calendar option next to the field or enter the date in DDMMYYYY format. | Final Date | Use the calendar option next to the field or enter the date in DDMMYYYY format. |
Click Save to confirm it. |
| Card |
|---|
| default | true |
|---|
| id | 14 |
|---|
| label | Create Views |
|---|
| This option is available in the access screen of the routine in Price List Maintenance. Click the down arrow to select this option. To the left - Configurations. This screen is divided by the grids described below
- Name of View - Name the view you are creating.
- Order of Records - Select between the indexes:
List Code Active List + Start Date + End Date Double-click to make the view public. Click Confirm to continue or Close to exit and/or return to the previous screen. - Fields. View two frames called thus:
Fields available for your view - to the left Place the cursor in the fields you wish to display in the view being configured and use arrow > to move it to the right. Use arrows < and > to move the fields from one side of the frames to the other. Fields currently in use - to the right When moving fields, viewing takes place in this frame. Click Confirm to continue or Close to exit and/or return to the previous screen. Select filters to apply to the list. To create a new filter, click the option Create Filter. Access Other Actions to view and/or select from the options: In the same screen, you can Delete and/or Copy an existing field. To continue, click Confirm; or, to exit without adjustments, click Close. |
| Card |
|---|
| default | true |
|---|
| id | 15 |
|---|
| label | Manage Views |
|---|
| This option is available in the access screen of the routine in Price List Maintenance. Click the down arrow to select this option. At the lower area of the screen displayed by the system, view the options: Other Actions / Restore Default View Configure Edit - use this option to edit an existing view. Delete - use this option to delete an existing view. Add - use this option to add a new view. Follow the instructions described in Create Views. Set to Default - use this option to set a view to default. Select one from the existing views and confirm it. To exit without saving, click Close; or, to keep this configuration, click Confirm. |
| Card |
|---|
| default | true |
|---|
| id | 16 |
|---|
| label | Registration of Flash Sales |
|---|
| The routines involved in flash sales registration are: Bonus and Discount Rules. | Nota |
|---|
| When you open a sale, the system checks all currently active Price Lists, so you do not need to query active Lists every time a new product is launched. The system will only check again for the existence of other active Price Lists after you open a new sale. This is why parameter MV_LJRETVL is an index in List DA0. This new parameter is configured only with values 1 or 2, value 1 being intended for capturing the lowest price of a product among the active Price Lists, and value 2 for the highest price. |
The price list can register the following data: DA0 – Header - Start Date and Time / End date and Time of Validity
- Time Type - Single / Recurring
- List Active - Yes / No
DA1 – Items - Product or Product Group
- Base Price (automatically returns the value used in field Sales Price)
- Sales Price (value to be effectively used in sale)
- Discount / Factor (to be applied in field Sales Price)
- Active (if this product is active in grid)
- State
- Type of Operation (State / Interstate, etc.)
- Range / Currency
- Validity
As the payment method and terms are only set at the end of the concomitant sales process, in modules Store Control and Point of Sales, only price lists that lack definitions for these data are taken into account. The fields for payment method and terms become hidden in the Store Control module on the Price List registration screen. In Assisted Sales and Point of Sales, only the State operation type is handled.
Possible Scenarios | Description | Action | A single price list with product entered at sale. | The rule set in the price list is used and applied to the value of the product item. | The product exists in more than one active price list. | It is set by the parameter that defines whether the product value must be selected by the criterion of highest or of lowest value found in the search and applied to the value of the product item. | No active price list is found for the product. | The sale value of the product is the one registered in the product (field Sale Price). | There is no price list available for the product and the sale price registered in the product is ZERO. | The application notifies that this product cannot be registered, because it lacks a set sale value. |
|
| Card |
|---|
| default | true |
|---|
| id | 17 |
|---|
| label | Product Grid Interface |
|---|
| The grid resource speeds up the registration of products that vary only in a few aspects, keeping their main characteristics. Thus, you do not need to register the same product multiple time only because the product has various characteristics; that is, you only need to register the main product and all its variants, such as: color, model, etc. This enables Protheus to automatically register all product variants. | Nota |
|---|
| To use the Product Grid resource, you need to set parameter MV_GRADE to T, thus activating the use of the product grid. |
|
| Card |
|---|
| default | true |
|---|
| id | 18 |
|---|
| label | Product Grid in Sales Price List |
|---|
| Select the option Price List and add a price list for a grid reference product. To check the application of the price list, select the option Sales Orders and add a sales order to a product (full code) of the related grid family. Enter the list code in the header of the order. |
| Card |
|---|
| default | true |
|---|
| id | 19 |
|---|
| label | Caption |
|---|
| Place the cursor on one of the registered Price Lists and double-click the colored sphere to the left for the system to display a frame with the meaning of the caption, as follows:  Inactive Price List; Inactive Price List;
 Active Price List; Active Price List;
 Special Active Price List. Special Active Price List.
|
|
