...
Index
| Índice |
|---|
| maxLevel | 5 | outline | true |
|---|
| indent | 8.1.1 |
|---|
| exclude | .*ndice |
|---|
| style | none |
|---|
|
Objetivo
Permite a configuração e manutenção de uma Tabela de Preço que definirá as formas de comercialização, considerando um ou mais produtos ou condições específicas de venda, utilizando para isso, critérios diferenciados como a região e a faixa de preços.
O preço de venda sugerido para um produto da Tabela de Preço, a princípio, terá como base o Preço de Venda (Campo B1_PRV1 da Tabela SB1 - Cadastro de Produto). O percentual ou o valor de desconto, na Tabela de Preços, somente deverão ser informados, se o preço de venda sugerido pelo Cadastro de Produtos estiver previamente cadastrado. Caso contrário, sua aplicação não ocorrerá.
Exemplo de aplicação de uma Tabela de Preços:
...
Item
...
Cód. Produto
...
Desc. Produto
...
Preço Base
...
Preço de Venda
...
Vlr. Desconto
...
Fator
...
Estado
...
Faixa
...
001
...
000001
...
Computador
...
1.000,00
...
900,00
...
100,00
...
0,90
...
SP
...
500,00
...
002
...
000001
...
Computador
...
1.000,00
...
850,00
...
150,00
...
0,85
...
SP
...
999.999,99
No exemplo acima, o produto Computador tem um desconto de 10% sobre seu preço base quando comercializadas 500 unidades, para o Estado de São Paulo, e acima de 500 unidades, o desconto é de 15%.
Além de definir os itens da Tabela conforme exemplificado acima, o sistema permite determinar os períodos de vigência, por intervalo de data e hora, assim como também, especificar uma condição de pagamento.
As Tabelas de Preços são sinalizadas por uma legenda, sendo:
 Image RemovedTabela Ativa - As tabelas ativas são aquelas que estão dentro do período selecionado.
 Image RemovedTabela Inativa - Uma tabela torna-se inativa quando sua data de vencimento for ultrapassada.
 Image RemovedTabela Ativa Especial - Indica que o vencimento da tabela foi alterado manualmente pelo usuário.
Mapa Mental
Conheça neste diagrama as informações que contemplam as funcionalidades da rotina:
Na página principal da rotina, estão disponíveis as opções:
 Image Removed
...
Purpose
Use this routine to configure and maintain a Price List that defines the selling methods, involving one or more products or specific sales terms, applying distinct criteria such as region and price range.
The suggested sales price for a Price List is initially based on the Sales Price (Field B1_PRV1 of table SB1 - Product Register). You should only enter the percentage or discount value in the Price List if the sales price suggested by the Product Register has already been registered. Otherwise, it will not be applied.
Example of Price List application:
Item | Product Code | Product Disc. | Base Price | Sale Price | Discount Val. | Factor | State | Range |
001 | 000001 | Computer | 1,000.00 | 900.00 | 100.00 | 0.90 | SP | 500.00 |
002 | 000001 | Computer | 1,000.00 | 850.00 | 150.00 | 0.85 | SP | 999,999.99 |
In the example above, the Computer product has a 10% discount on its base price when 500 units are sold to the State of Sao Paulo, and a 15% discount when exceeding 500 units.
Besides defining List items as shown above, you can also use the system to determine the validity periods, by date and time intervals, as well as specify a payment term.
Price Lists are marked by a caption, as follows:
- Image AddedActive List - Active lists are those within the period selected.
- Image AddedInactive List - A list becomes inactive when its expiration date is exceeded.
- Image AddedSpecial Active List - Indicates that the user has changed the expiration of the list.
Mental Map
In this diagram, the data refer to the features of the routine:
In the main page of the routine, the following options are available:
Image Added
In the main page of the routine, the following options are available:
486px522
| Deck of Cards |
|---|
| effectDuration | 0.5 |
|---|
| history | false |
|---|
| id | samples |
|---|
| effectType | fade |
|---|
|
| Card |
|---|
| default | true |
|---|
| id | 1 |
|---|
| label | Manutenção da Tabela de Preço | Price List Maintenance |
|---|
| Find the area specified for price list maintenance at the top of the screen. Click the down arrow to view and/or select from the options: - Display All;
- Active Price Lists;
- Inactive Price Lists;
When you select one of the options above, the system updates the data registered onscreen. The following options are also available, which depend on settings upon activation. - Create View;
- Manage Views.
On this page, click F12 to set the following parameters: - Display by? Select between List or Product;
- Product? Use the magnifying glass next to the field or the F3 key to access the default query and select the product;
- Save list by? Enter whether the list should be saved by product code or by grid reference, when lists are displayed by product
No alto da tela visualize a área indicativa para manutenção da tabela de preço. Clique na seta para baixo para visualizar e/ou selecionar entre as opções: - Exibir Todos;
- Tabelas de Preços Ativas;
- Tabelas de Preços Inativas;
Ao selecionar uma destas opções acima, o sistema atualiza na tela, as informações cadastradas. Também estão disponíveis as opções a seguir que dependem de configuração assim que acionadas. - Criar Visão;
- Gerenciar Visões.
Nesta página clique na tecla F12 para configurar os parâmetros sendo: - Demonstrar por? Selecione entre Tabela ou Produto;
- Produto? Utilize a lupa ao lado do campo ou a tecla F3 para acessar a consulta padrão e selecionar o produto;
- Gravação da tabela por? Informe se a gravação da tabela deve ser feita por código do produto ou pela referência de grade, quando da demonstração de tabelas por produto (MV_PAR01=2);
|
| Card |
|---|
| default | true |
|---|
| id | 2 |
|---|
| label | Incluir | Add |
|---|
| Note that when you access the routine, all registered items are displayed. When you select this option at the top of the main screen, the system displays the branch selection screen. Select the branch and click OK to continue. Fill out the data in accordance with the instructions described in Main Fields. The system will not let you duplicate the list code. Veja que no acesso à rotina são apresentados todos os itens já cadastrados. Ao fazer esta opção na tela principal e na parte superior, a tela que o sistema apresenta é a de seleção de filiais. Selecione a filial e para prosseguir clique em OK. Preencha as informações de acordo com as orientações descritas em Principais Campos. O sistema não permite duplicar o código da tabela. Veja também as funcionalidades disponíveis em Outras AçõesSee also the features available in Other Actions . | Nota |
|---|
| title | ImportanteImportant: |
|---|
| For each Register export, a control sequence is generated in field Exp. Seq. and saved in Field Exp Dt (the date of the last export). Only follow this procedure to register price lists not of types Standard and Promotional Para cada exportação de Cadastro, uma sequência de controle é gerada no Campo Seq. Exp e gravado no Campo Dt Exp (data da última exportação). Realize este procedimento somente para o cadastro de tabelas de preço que não sejam do tipo Padrão e Promocional. |
|
| Card |
|---|
| default | true |
|---|
| id | 3 |
|---|
| label | Alterar | Edit |
|---|
| Press the [F12] key to perform maintenance in Price Lists. Set parameters in accordance with completion instructions: - Display by? - The options are Product, or List.
When you choose List, all the data on the list selected for editing is displayed (default option). When you choose Product, all the lists containing this product are displayed. - Product? If the option is Display Product, enter the code of the product you wish to view when editing.
Confirm parameter settings and click Edit to continue. A window is displayed for editing, in accordance with parameter settings. Configure and confirm the changes. Adjust the information according to the instructions described in Main Fields. See also the features available in Other Actions Esta opção compreende efetuar a manutenção em Tabela de Preços e com este propósito, primeiramente clique na tecla [F12]. Configure os parâmetros, observando a seguir as orientações para preenchimento: - Demonstrar por? - As opções são Produto, ou Tabela.
Ao selecionar Tabela, na alteração são apresentados todos os dados da tabela posicionada para edição (opção padrão). Ao selecionar Produto, na alteração são relacionadas todas as tabelas que possuírem este produto. - Produto? Se a opção for Demonstrar por Produto, informe o código do produto que deseja visualizar na alteração.
Confirme a parametrização e para prosseguir clique em Alterar. É apresentada a janela para alteração, conforme a parametrização definida. Configure as alterações e confirme. Ajuste as informações de acordo com as orientações descritas no item Principais Campos. Veja também as funcionalidades disponíveis em Outras Ações. |
| Card |
|---|
| default | true |
|---|
| id | 4 |
|---|
| label | PesquisarSearch |
|---|
| | Outras Ações Other Actions / PesquisarPermite a pesquisa de informações com a utilização de filtros que as ordenam, baseado no índice selecionado considerando por exemplo, a filial+códigoSearch Allows the use of filters to order data based on the index selected, considering, for example, branch+code. 
|
| Card |
|---|
| default | true |
|---|
| id | 5 |
|---|
| label | VisualizarView |
|---|
| | Outras Ações Other Actions / VisualizarView Posicione o cursor no item e para prosseguir clique em Visualizar. Veja também as funcionalidades disponíveis em Outras AçõesPlace the cursor in the item, then click View to continue. See also the features available in Other Actions. |
| Card |
|---|
| default | true |
|---|
| id | 6 |
|---|
| label | ExcluirDelete |
|---|
| | Outras Ações Other Actions / ExcluirPara excluir um item cadastrado, posicione o cursor para prosseguir e acesse Outras Ações / Excluir. Visualize a tela com a mensagem no alto dizendo Tem certeza que deseja excluir o item abaixo? A confirmação para esta ação não pode ser revertida. Para prosseguir com a exclusão clique em ConfirmarDelete To delete a registered item, place the cursor to continue and access Other Actions / Delete. View the screen with the message on top saying Are you sure you want to delete the item below? You cannot reverse the confirmation for this action. To complete the deletion, click Confirm. |
| Card |
|---|
| default | true |
|---|
| id | 7 |
|---|
| label | CopiarCopy |
|---|
| | Outras Ações Other Actions / CopiarEsta opção permite a criação de novas tabelas de preço, quando estas possuam itens em comum, além disso facilita o cadastramento de tabelas com características semelhantes, tais como itens em comum, para que não seja necessário redigitá-los. O sistema apresenta todos os campos, de acordo com a configuração para uma determinada tabela previamente selecionada, na janela de manutenção, possibilitando copia-la. Ao ativar esta opção o sistema preenche automaticamente o campo Cód.Tabela com a próxima numeração disponível e apenas duplica os itens da tabela, deste modo é necessário ajustar o cabeçalho a cada duplicação. Na janela de pesquisa, informe o item a copiar e confirme. O sistema exibe a tela de inclusão apresentando todos os campos preenchidos da mesma forma como foram preenchidos para a tabela selecionada. Informe o código e a descrição da nova tabela e, se necessário altere/preencha os campos que desejar. Copy Use this option to create new price lists that have items in common, as well as to register lists with similar characteristics, such as items in common, to avoid retyping them. The system displays all fields in accordance with the settings of a given list, already selected in the maintenance window, so you can copy it. When you activate this option, the system automatically fills out the field List Code with the next numbering available, only duplicating the items on the list, so you need to adjust the header at each duplication. In the search window, enter the item to be copied and confirm it. The system displays the addition screen showing all the fields filled in the same manner as in the list selected. Enter the code and description of the new list and edit/fill out any fields if needed. Check the data and confirm the additionConfira os dados e confirme a inclusão. |
| Card |
|---|
| default | true |
|---|
| id | 8 |
|---|
| label | GerarGenerate |
|---|
| | Outras Ações Other Actions / GerarEsta opção permite criar uma tabela de preços baseada no Cadastro de Produtos. Selecione a filial e confirme. Selecione os Produtos, os Grupos e também os Tipos. O sistema traz nos itens da tabela de preços, todos os dados dos produtos já preenchidos, no entanto, informe também os itens do cabeçalho da tabela. O parâmetro Vigência tem como finalidade a informação da data, a partir da qual o item da tabela é válido, no entanto este não é um campo obrigatório. O sistema sempre considera para efeito de vigência da tabela de preços, a informação contida nos campos Data Inicial e Data Final, no entanto, os itens da tabela podem ter datas de vigência posteriores. Generate Use this option to create a price list based on the Product Register. Select the branch and confirm it. Select the Products, the Groups and also the Types. In the price list items, the system fetches all the data on products already entered; however, you must also enter the list header items. In the Validity parameter you can set the date from which the item on the list is valid, though this field is not required. For price list validity purposes, the system always takes into account the data found in fields Start Date and End Date; however, the list items may have later validity dates. Check and confirm the dataConfira os dados e confirme. |
| Card |
|---|
| default | true |
|---|
| id | 9 |
|---|
| label | ReajusteAdjustment |
|---|
| | Outras Ações Other Actions / ReajusteEsta opção permite aplicar um fator de multiplicação para reajustar os preços dos produtos das tabelas indicadas na parametrização. Acesse a opção, visualize a mensagem do sistema e clique em Parâmetros. Os parâmetros desta opção possuem preenchimento autoexplicativo, no entanto, devem ser observados os seguintes dados: - Produto Inicial e Produto Final utilize a lupa ao lado do campo ou a tecla F3 para acessar a consulta padrão e definir os produtos.
- Grupo Inicial e Grupo Final, do mesmo modo acesse a consulta padrão e selecione os grupos.
- Tipo Inicial e Tipo Final, acesse a consulta padrão e selecione os tipos.
- Tabela Inicial e Tabela Final acesse a consulta padrão e selecione as tabelas.
- Fator de Reajuste? Informe neste campo qual é o fator de reajuste a ser aplicado.
- Número de decimais? Informe quantas casas decimais a considerar pra gravar o novo preço.
Exemplo: Se informado 0 e o cálculo do novo valor for 46,74, será gravado 46,00, desconsiderando os centavos. Pedidos em Carteira? Selecione entre Manter ou Atualizar (a opção Atualizar permite atualizar todos os Pedidos de Venda em aberto). Reaplica Fator? Defina entre Preço Base ou Preço Tabela, sendo que:Adjustment Use this option to apply a multiplication factor to adjust the prices of products from lists specified in parameters. Access the option, view the message from the system and click Parameters. Although setting this option's parameters is self-explanatory, you should pay attention to the following data: - Initial Product and Final Product. Use the magnifying glass next to the field or the F3 key to access the default query and define the products.
- Initial Group and Final Group. Likewise, access default query and select the groups.
- Initial Type and Final Type. Access default query and select the types.
- Initial List and Final List. Access default query and select the lists.
- Adjustment Factor? In this field, enter the adjustment factor to be applied.
- Number of decimal places? Enter how many decimal places will be used when saving the new price.
Example: If you enter 0 and the calculation of the new value is 46.74, the system saves 46,00 disregarding the cents. - Orders in Portfolio? Select between Maintain or Update (option Update lets you update all pending Sales Orders).
- Reapply Factor? Define between Base Price or List Price, given that:
In base price, the following formula is applied: Base Price x Multiplication Factor x Factor (base price multiplied by the multiplication factor and multiplied by the factor). In list price, the following formula is applied: Sales Price x Multiplication Factor (sales price multiplied by the multiplication factor). - Update Base Price (product)? Select between Yes or No.
- Initial Grid Reference and Final Grid Reference? Define the initial and final grids to be considered.
Check the data and confirm the list adjustment. The system adjusts the lists in accordance with parameter settings. Use of Price Spreadsheet in Adjustment: - Price list products to be adjusted (Initial Product / Final Product);
- Price list product groups to be adjusted (Initial Group / Final Group);
- Price list product types to be adjusted (Initial Type / Final Type);
- Price Lists to be adjusted (Initial List / Final List);
- Adjustment Factor to be used (Adjustment Factor). - Adjustment to be applied
- Number of decimal places for rounding of adjustment calculation (Number of Decimal Places);
- Your orders already saved must be adjusted (Orders in Portfolio);
- If the adjustment is applied to the base list (Product Register) or the Price List (Reapply Factor).
- Name of pricing spreadsheet in which the adjustment takes place (Spreadsheet).
- Whether the base price of the product register is updated or not (Update Base Price (product))
- Product Grids of the price list to be adjusted (Initial Grid Reference / Final Grid Reference).
In parameter "Spreadsheet" you need to enter the code of the Pricing Spreadsheet you want to use. If you need to adjust prices in the list, you can make the Automatic Adjustment from a Pricing Spreadsheet (MATC010) by executing the following process:
PRICING SPREADSHEET (MATC010) In the Pricing Spreadsheet (MATC010), there must be a line referencing the code and description of the Price List (OMSA010) to be adjusted:
 Image Added Image Added
You also need to add the formula to set the price to be moved to the Price List (OMSA010): *The Description field of the Pricing line must contain: #code, space and the name of the pricelist. 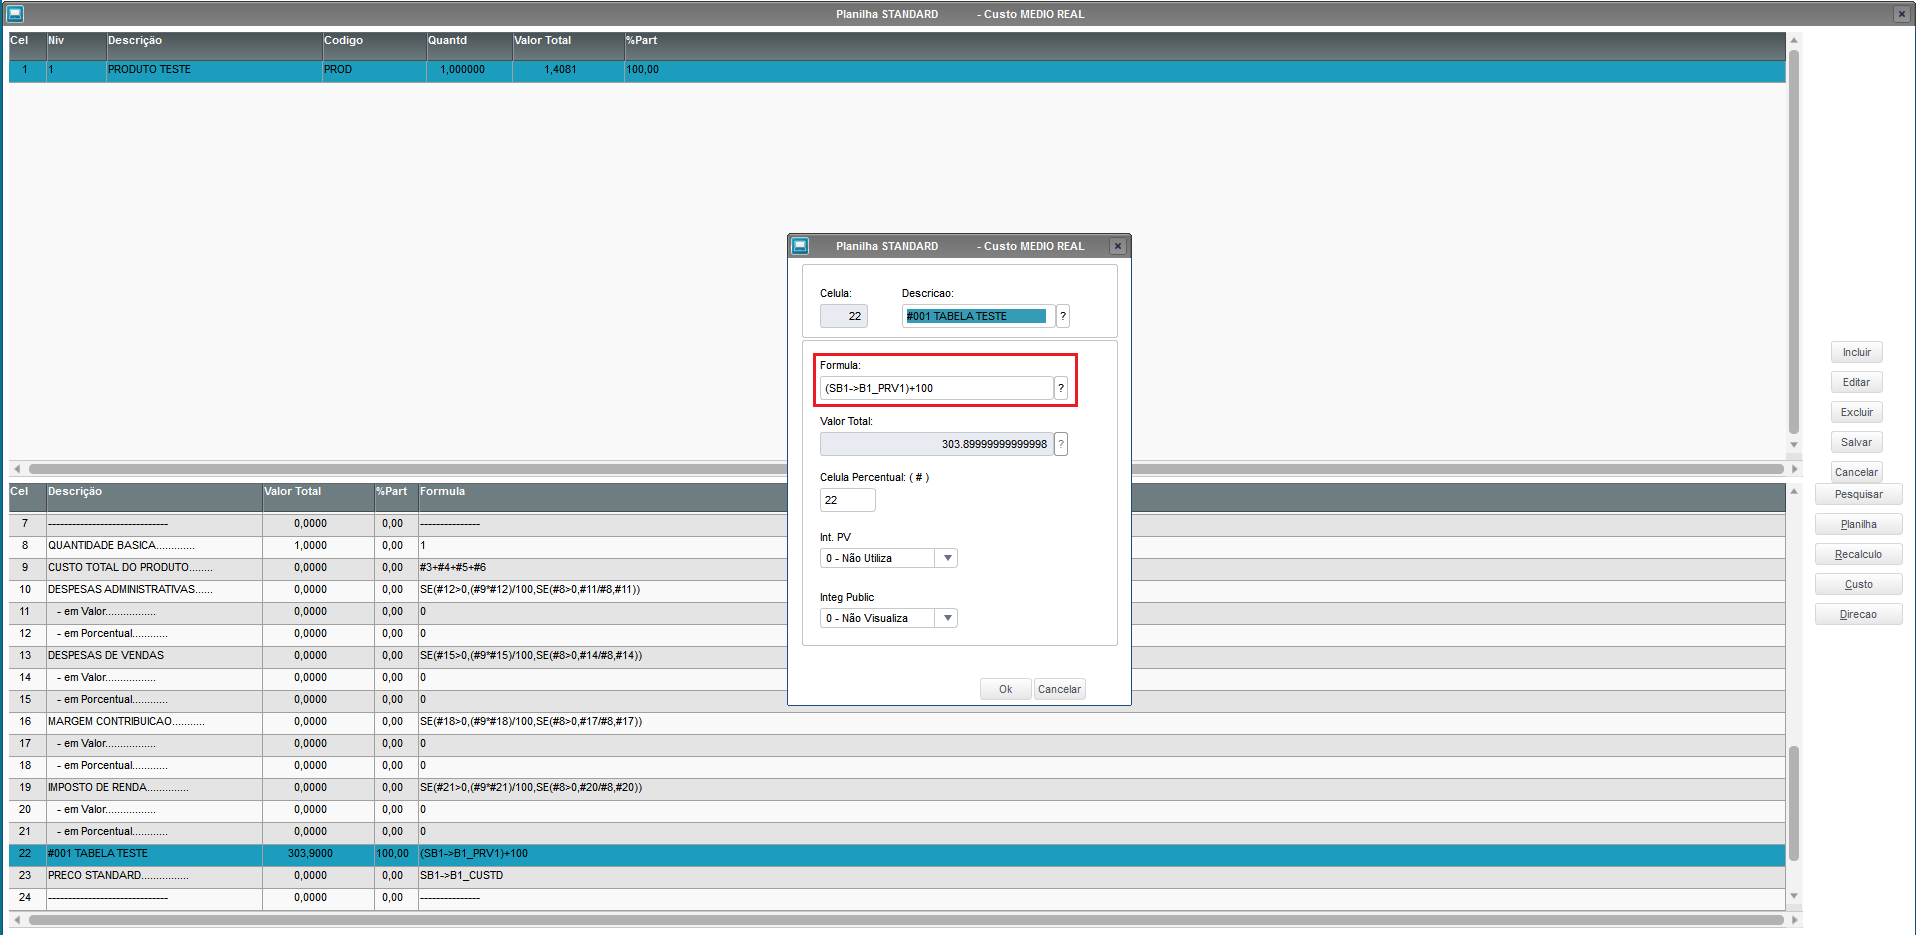 Image Added Image Added
NOTE: If you need Help to register the Pricing Spreadsheet (MATC010), contact the TOTVS Stock/Costs Support.
PRICELIST (OMSA010) Access the routine Price List (OMSA010), select the Price List you want to adjust and access "Other Actions" → "Adjustment": 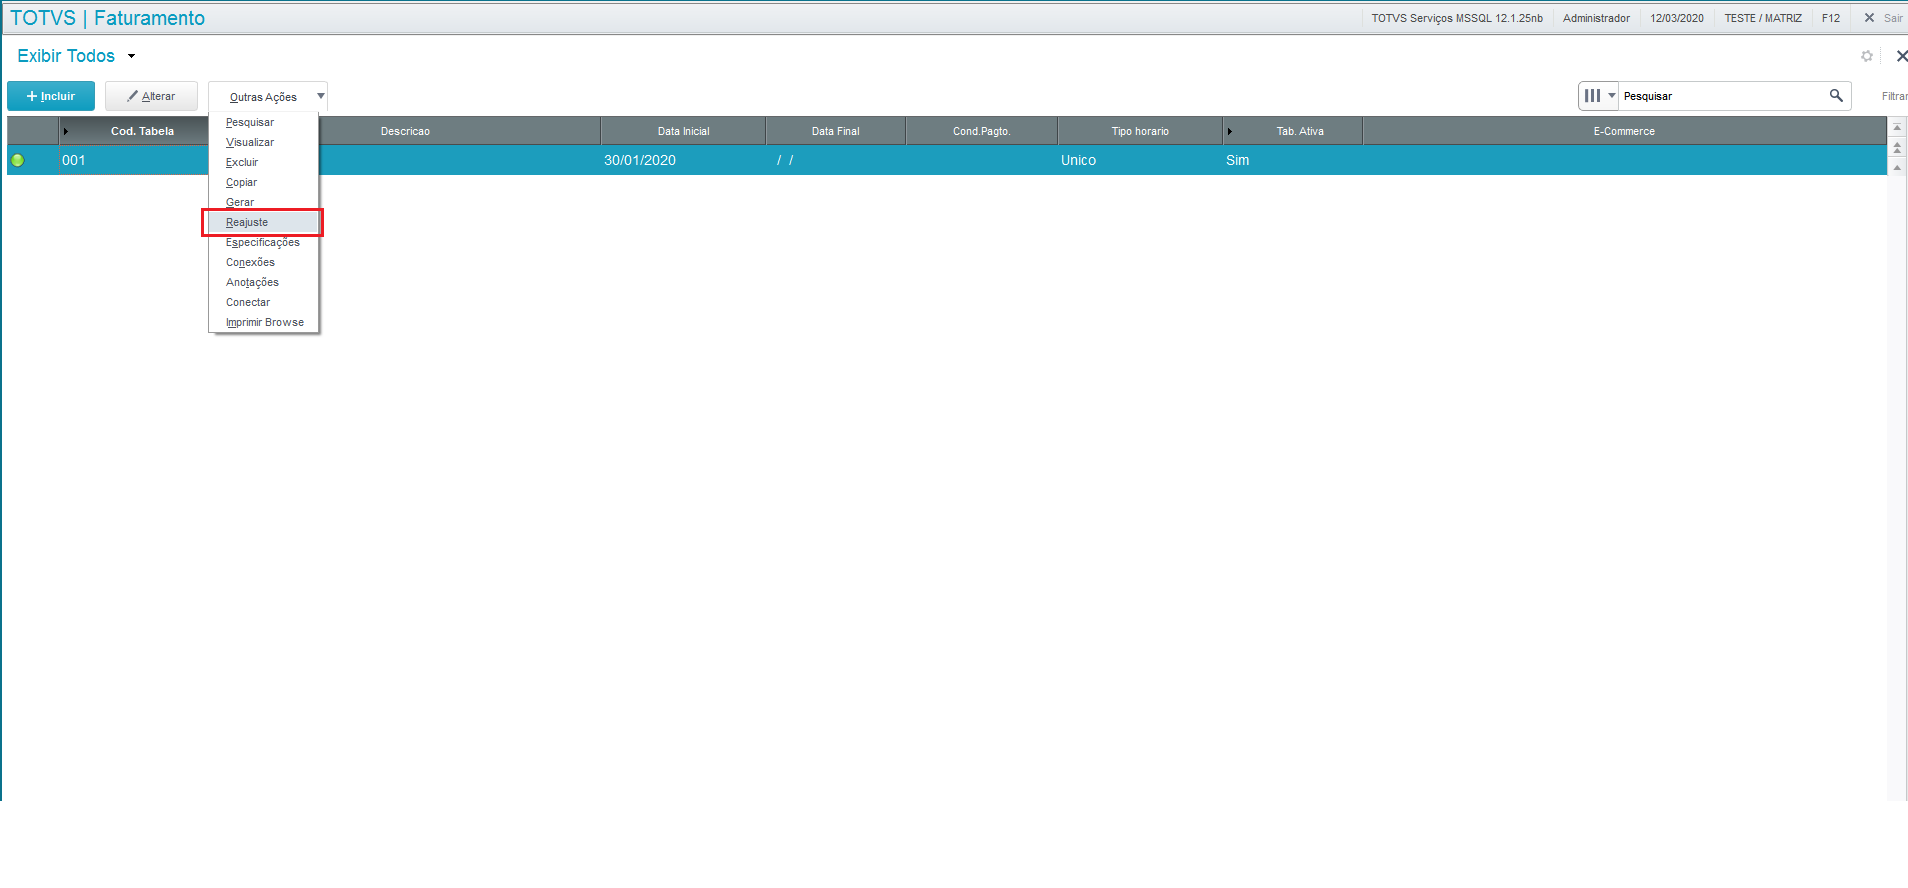 Image Added Image Added
After clicking "Adjustment", select the option "Parameters" to configure the adjustment:
Among the parameters, you can select: - Price list products to be adjusted (Initial Product / Final Product);
- Price list product groups to be adjusted (Initial Group / Final Group);
- Price list product types to be adjusted (Initial Type / Final Type);
- Price Lists to be adjusted (Initial List / Final List);
- Adjustment Factor to be used (Adjustment Factor). - If you do not enter the adjustment value, the system will only update the sales price of the price list in case the values found between the price list and the price spreadsheet are different, and parameter (Reapply Factor) is set to List Price. If parameter (Reapply Factor) is set to Base Price, the system does not make any adjustment, also disregarding the parameter (Update Base Price (product)).
- in accordance with the value found in the Spreadsheet if they are different.
- Number of decimal places for rounding of adjustment calculation (Number of Decimal Places);
- Your orders already saved must be adjusted (Orders in Portfolio);
- If the adjustment is applied to the base list (Product Register) or the Price List (Reapply Factor).
- Name of pricing spreadsheet in which the adjustment takes place (Spreadsheet).
- Whether the base price of the product register is updated or not (Update Base Price (product))
- Product Grids of the price list to be adjusted (Initial Grid Reference / Final Grid Reference).
In parameter "Spreadsheet", enter the code of the Pricing Spreadsheet you want to use. In this example, we use the code "STANDARD": 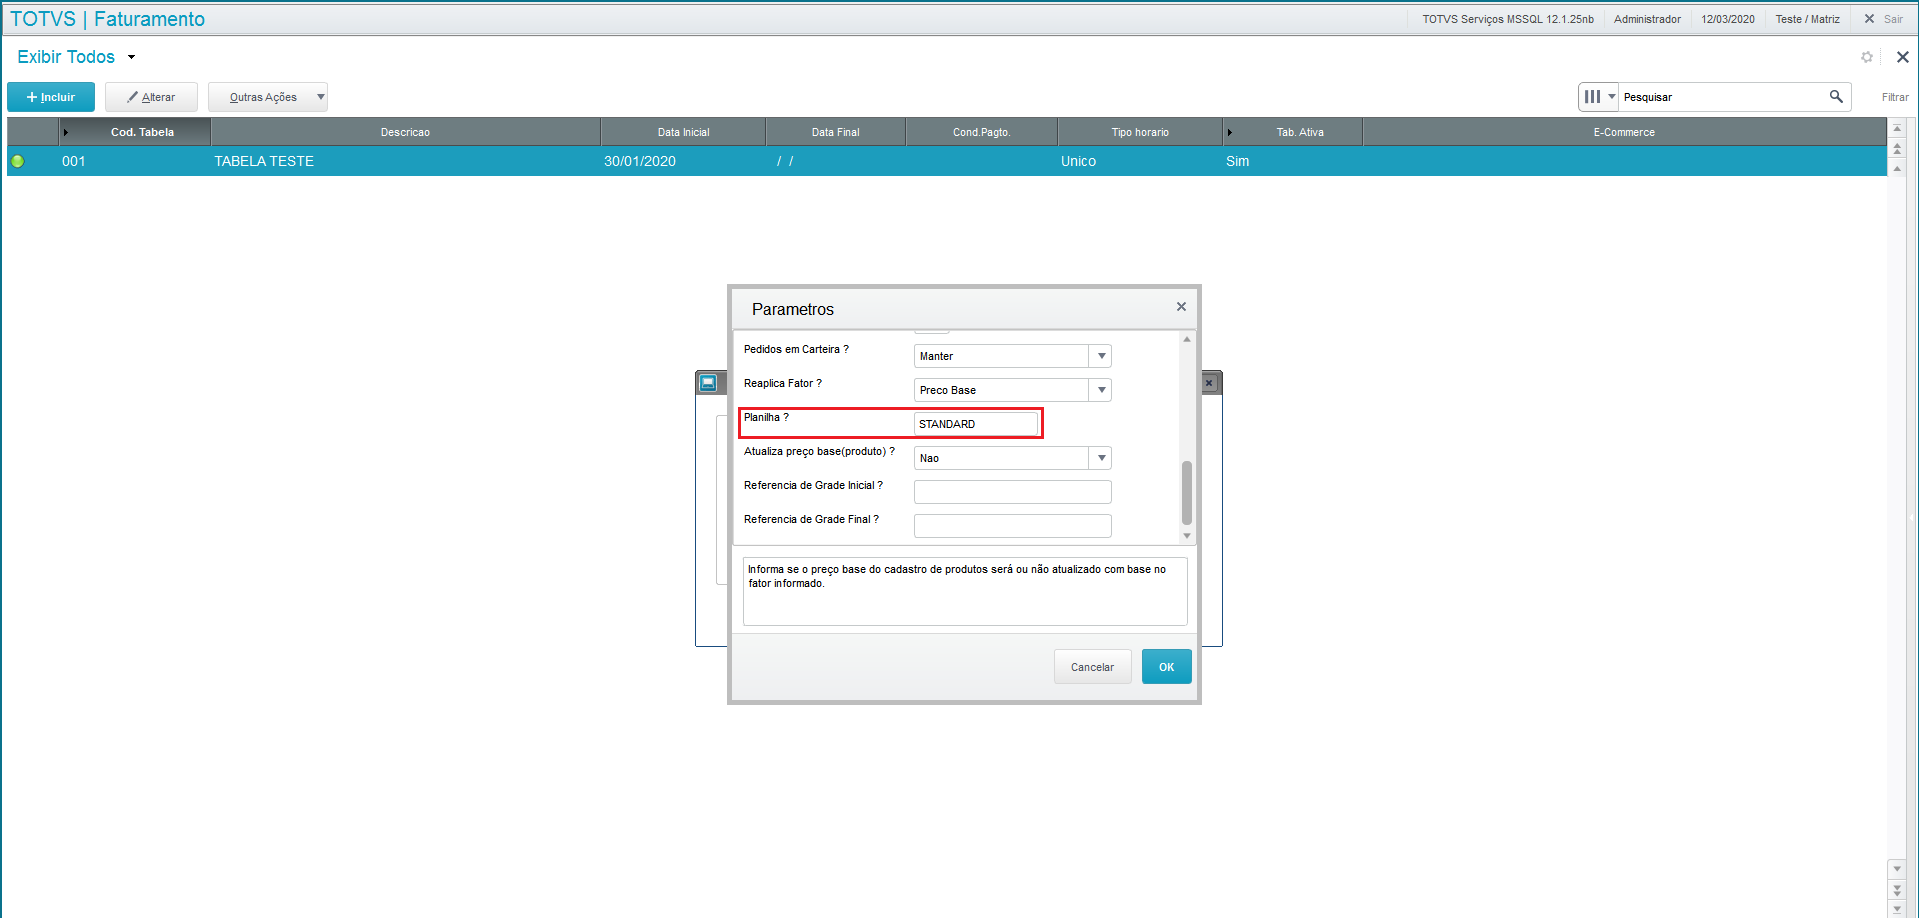 Image Added Image Added
After entering the data, click "OK". The system will make the adjustment and fill out the adjusted price No preço base é aplicada a fórmula: Preço base x Fator de Multiplicação x Fator (preço base multiplicado pelo fator de multiplicação e multiplicado pelo fator). No preço tabela é aplicada a fórmula: Preço de Venda x Fator de Multiplicação (preço de venda multiplicado pelo fator de multiplicação). - Atualiza Preço Base (produto)? Selecione entre Sim ou Não.
- Referência de grade Inicial e Referência de grade Final? Defina quais serão as grades inicial e final a considerar.
Confira os dados e confirme o reajuste da tabela. O sistema reajusta as tabelas conforme parametrização configurada. Utilização da Planilha de preços no Reajuste: No parâmetro "Planilha" é necessário informar o código da Planilha de Formação de Preços que deseja utilizar. Caso seja necessário reajustar os preços da tabela, é possível realizar o Reajuste Automático e este reajuste pode ser realizado a partir de uma Planilha de Formação de Preços (MATC010), para isso realize o seguinte processo: PLANILHA DE FORMAÇÃO DE PREÇOS (MATC010) Na Planilha de Formação de Preços (MATC010), é necessário que possua uma linha referenciando o código e descrição da Tabela de Preços (OMSA010) que será reajustada:
Image Removed Também é necessário que inclua a fórmula para formação do preço a ser levado para a Tabela de Preços (OMSA010): *O campo da Descrição da linha da Formação de Preço precisa conter: #código, espaço e o nome da tabela de preço. Image Removed OBSERVAÇÃO: Caso necessite de Auxílio no cadastro da Planilha de Formação de Preços (MATC010), entre em contato com o Suporte Estoque/Custos da TOTVS. TABELA DE PREÇOS (OMSA010) Acesse a rotina Tabela de Preços (OMSA010), selecione a Tabela de Preços que deseja reajustar e acesse "Outras Ações" → "Reajuste": Image Removed Após clicar em "Reajuste", selecione a opção "Parâmetros" para configurar o reajuste:Entre os parâmetros é possível selecionar: No parâmetro "Planilha" é necessário informar o código da Planilha de Formação de Preços que deseja utilizar, neste exemplo utilizamos o código "STANDARD": Image Removed Após os preenchimentos basta clicar em "OK", o sistema executará o reajuste e preencherá o preço reajustado: 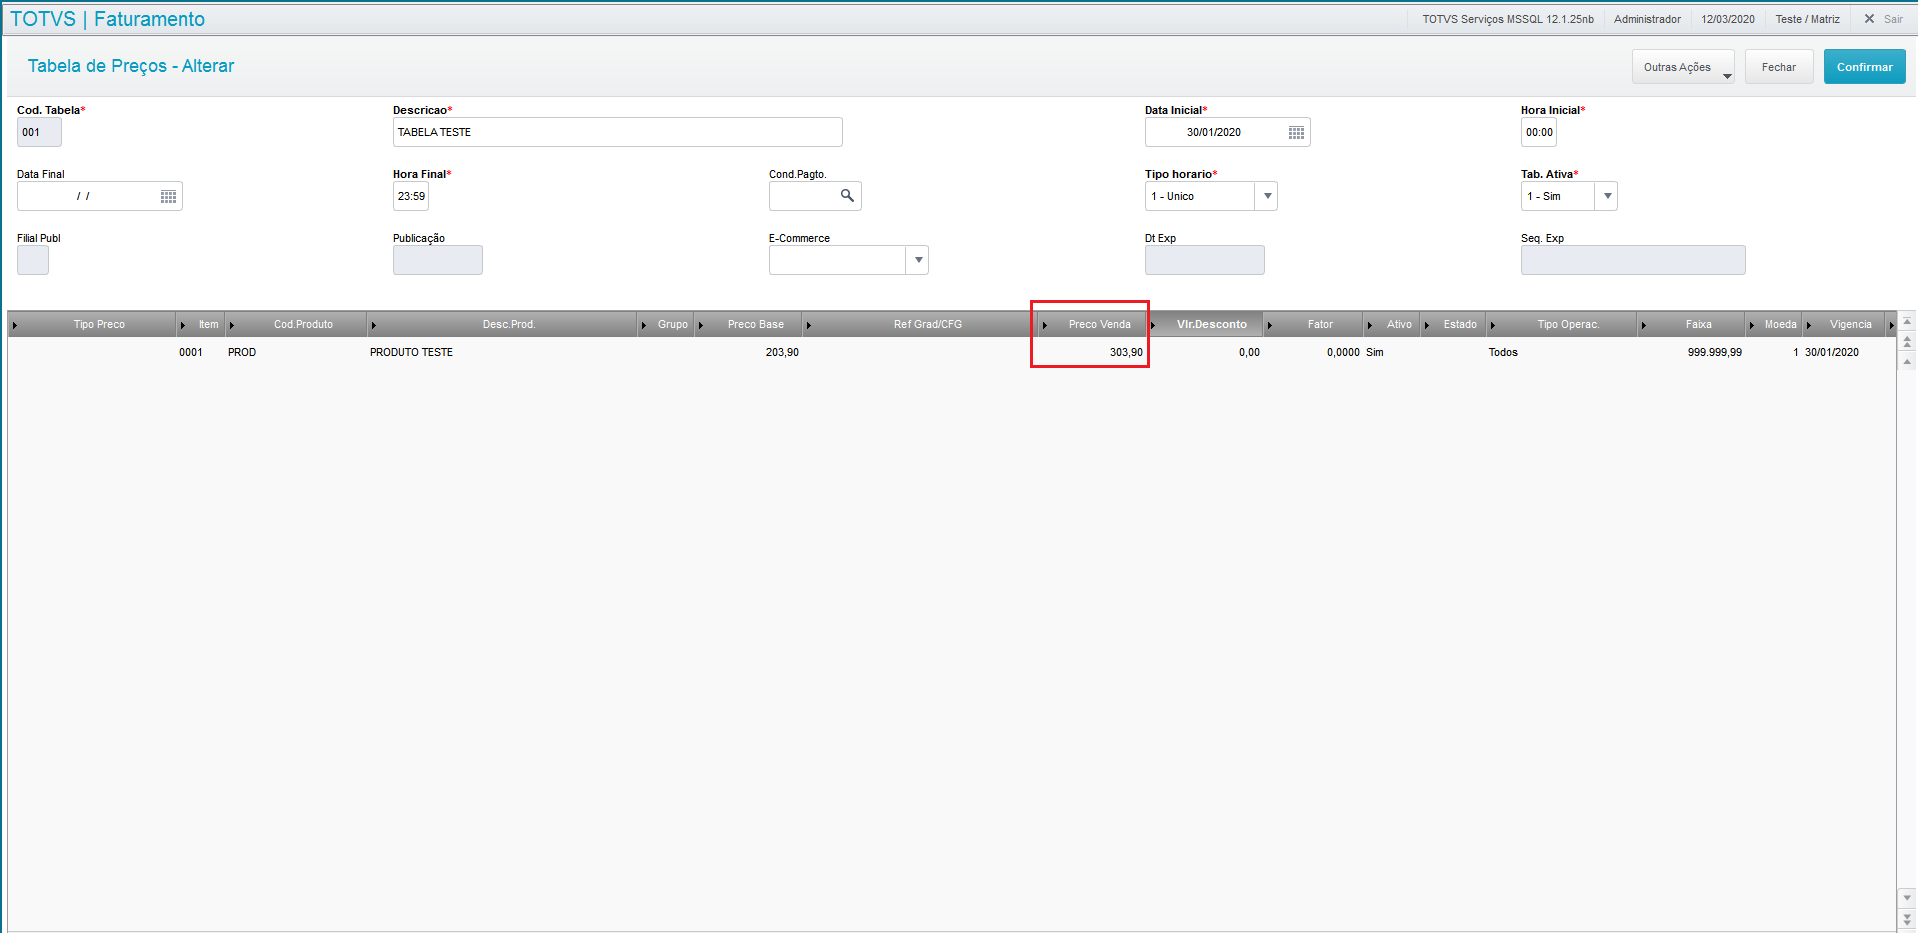
|
| Card |
|---|
| default | true |
|---|
| id | 10 |
|---|
| label | EspecificaçõesSpecifications |
|---|
| | Outras Ações Other Actions / EspecificaçõesAo acessar esta opção o sistema exibe as especificações cadastradas. As opções no alto da tela são: Clique nesta opção e visualize a tela. Os grids são: Especificações e Entidades (nesta área apresenta-se a estrutura com formato em árvore). Esta opção não permite efetuar alterações. Specifications When you access this option, the system displays the specifications registered. The options at the top of the screen are: Click this option and view the screen. The grids are: Specifications and Entities (in this area, the structure is displayed in tree format). This option does not allow editing. - Other Actions
- Search
- Outras Ações
- Pesquisar
|
| Card |
|---|
| default | true |
|---|
| id | 11 |
|---|
| label | ConexõesConnections |
|---|
| | Outras Ações Other Actions / ConexõesConnections Use this feature to identify the relationship between the records created in CRM, which are Esta funcionalidade permite identificar o relacionamento entre os cadastros efetuados no CRM, sendo eles de suspect, prospect, clientecustomer, contatoscontacts, concorrentescompetitors, fornecedoressuppliers, parceirospartners, oportunidadesopportunities, propostas, pedidos de vendas, notas fiscais, produtos, tabelas de preço, processo de vendas, vendedores, unidade de negócio, equipe de vendas, campanhas e eventos. A conexão centraliza informações sobre o relacionamento de uma entidade com outra e facilita as consultas. Uma vez acionada esta opção em Outras Ações / Conexões visualize as opções na tela, sendo: - Incluir, ao optar por incluir uma nova conexão, o sistema exibe primeiro a tela para seleção da filial.
Selecione a filial e confirme para prosseguir. A próxima tela é a de Cadastro de Conexões com os dados de entidade, código e nome do conector são carregados automaticamente. No grid Conectar a informe: | | Campo | Descrição |
|---|
| Entidade | Utilize a lupa ao lado do campo ou utilize a tecla F3 para ter acesso à consulta padrão e assim poder selecionar este item. Exemplo: AC3 - Concorrentes | | Código | Utilize a lupa ao lado do campo ou utilize a tecla F3 para ter acesso à consulta padrão e assim poder selecionar este item. Informa o código da entidade Conectada. | | Função | Utilize a lupa ao lado do campo ou utilize a tecla F3 para ter acesso à consulta padrão e assim poder selecionar este item. | | Status | Utilize a seta para baixo ao lado do campo para visualizar as opções disponibilizadas entre: 1-Inativo ou 2- Ativo. | proposals, sales orders, invoices, products, price lists, sales process, sales representatives, business unit, sales team, promotions and events. The connection centralizes data on the relationship between an entity and another, making it easier to query them. Once you activate this option in Other Actions / Connections, you can view the options onscreen, as follows: - Add, when you choose to add a new connection, the system first displays the screen for you to select the branch.
Select the branch and confirm it to continue. The next screen pertains the Connections Register, with data on entity, code and name of the connector, which are loaded automatically. In the grid Connect To, enter: Field | Description | Entity | Use the magnifying glass next to the field or the F3 key to access the default query and select the item. Example: AC3 - Competitors | Code | Use the magnifying glass next to the field or the F3 key to access the default query and select the item. Enter the code of the entity Connected. | Function | Use the magnifying glass next to the field or the F3 key to access the default query and select the item. | Status | Use the down arrow next to the field to view the options available, which are: 1-Inactive or 2-Active. |
In the grid Connect From, enter: Field | Description | Function | Use this option to link data from one customer to another, entering the function of the connection. Example: Partner, Associate, Influencer, etc. When you cannot find a feature that best represents your needs, register other connection features and associate them with the corresponding features; that is, when you register the feature Uncle/Aunt, the corresponding feature will be Nephew/Niece. | Initial Date | Use the calendar option next to the field or enter the date in DDMMYYYY format. | Final Date | Use the calendar option next to the field or enter the date in DDMMYYYY format. |
No grid Conectar de informe: | Campo | Descrição |
|---|
| Função | Esta opção permite atrelar informações de um cliente para outro, informando a função da conexão. Exemplo: Parceiro, Sócio, Influenciador, etc. Quando não localize uma função que melhor represente a sua necessidade, efetue o cadastro de outras funções de conexão e relacione-as com as funções correspondentes, ou seja, ao cadastrar a função Tio/Tia a função correspondente será Sobrinho/Sobrinha. | | Data Inicio | Utilize a opção calendário ao lado do campo ou digite a data no formato DDMMAAAA. | | Data Final | Utilize a opção calendário ao lado do campo ou digite a data no formato DDMMAAAA. | - Alterar
- Visualizar
- Outras Ações
| Card |
|---|
| | Outras Ações Other Actions / AnotaçõesEste cadastro possibilita a inclusão, a alteração e a exclusão de comentários ou observações relativas aos registros das seguintes entidades do CRM: Suspects, Clientes, Prospects, Contatos, Concorrentes, Vendedores, Oportunidades, Propostas, Pedidos, Fornecedores, Parceiros, Produtos, Tabela de Preço, Processo de Venda, Unidade de negócio, Equipe de Vendas, Campanha e Eventos. A anotação é composta por título, conteúdo e permite anexar arquivos. O menu apresenta estas opções: - Incluir, ao clicar nesta opção, primeiramente selecione a filial e confirme para visualizar a tela inclusão.
E preencha os campos a seguir: | | Campo | Descrição |
|---|
| Proprietário | Utilize a lupa ao lado do campo ou a tecla F3 para ter acesso à consulta padrão e assim selecionar o proprietário do registro. | | Título | Informe um título para a anotação em execução. | | Status | Utilize a seta para baixo ao lado do campo e selecione entre: 1-Inativo ou 2-Ativo. | | Conteúdo | Informe uma informação neste campo relacionada com a anotação. | Notes Use this register to add, edit and delete comments or notes related to records of the following CRM entities: Suspects, Customers, Prospects, Contacts, Competitors, Sales Representatives, Opportunities, Proposals, Orders, Suppliers, Partners, Products, Price List, Sales Process, Business Unit, Sales Team, Promotion and Events. The note is comprised of its title, contents, and you can attach files to it. The menu offers these options: - Add. Click this option to select and confirm the branch before viewing the add screen.
Then fill out the following fields: Field | Description | Owner | Use the magnifying glass next to the field or the F3 key to access the default query and select the owner of the record. | Title | Enter a title for the note at issue. | Status | Use the down arrow next to the field and select between: 1-Inactive or 2-Active. | Contents | In this field, enter information pertaining the note. |
- Edit,
- Search, and
- Other Actions.
- View;
- Delete;
- Copy;
- Attach;
- View Attachment
- Visualizar;
- Excluir;
- Copiar;
- Anexar;
Visualizar Anexo
| Card |
|---|
| default | true |
|---|
| id | 13 |
|---|
| label | ConectarConnect |
|---|
| | Outras Ações Other Actions / ConectarA próxima tela é a de Cadastro de Conexões com os dados de entidade, código e nome do conector são carregados automaticamente. No grid Conectar a informe: | Campo | Descrição |
|---|
| Entidade | Utilize a lupa ao lado do campo ou utilize a tecla F3 para ter acesso à consulta padrão e assim poder selecionar este item. Exemplo: AC3 - Concorrentes | | Código | Utilize a lupa ao lado do campo ou utilize a tecla F3 para ter acesso à consulta padrão e assim poder selecionar este item. Informa o código da entidade Conectada. | | Função | Utilize a lupa ao lado do campo ou utilize a tecla F3 para ter acesso à consulta padrão e assim poder selecionar este item. | | Status | Utilize a seta para baixo ao lado do campo para visualizar as opções disponibilizadas entre: 1-Inativo ou 2- Ativo. |
No grid Conectar de informe: | | Campo | Descrição |
|---|
| Função | Esta opção permite atrelar informações de um cliente para outro, informando a função da conexão. Exemplo: Parceiro, Sócio, Influenciador, etc. Quando não localize uma função que melhor represente a sua necessidade, efetue o cadastro de outras funções de conexão e relacione-as com as funções correspondentes, ou seja, ao cadastrar a função Tio/Tia a função correspondente será Sobrinho/Sobrinha. | | Data Inicio | Utilize a opção calendário ao lado do campo ou digite a data no formato DDMMAAAA. | | Data Final | Utilize a opção calendário ao lado do campo ou digite a data no formato DDMMAAAA. | Connect The next screen pertains the Connections Register, with data on entity, code and name of the connector, which are loaded automatically. In the grid Connect To, enter:
Field | Description | Entity | Use the magnifying glass next to the field or the F3 key to access the default query and select the item. Example: AC3 - Competitors | Code | Use the magnifying glass next to the field or the F3 key to access the default query and select the item. Enter the code of the entity Connected. | Function | Use the magnifying glass next to the field or the F3 key to access the default query and select the item. | Status | Use the down arrow next to the field to view the options available, which are: 1-Inactive or 2-Active. |
In the grid Connect From, enter: Field | Description | Function | Use this option to link data from one customer to another, entering the function of the connection. Example: Partner, Associate, Influencer, etc. When you cannot find a feature that best represents your needs, register other connection features and associate them with the corresponding features; that is, when you register the feature Uncle/Aunt, the corresponding feature will be Nephew/Niece. | Initial Date | Use the calendar option next to the field or enter the date in DDMMYYYY format. | Final Date | Use the calendar option next to the field or enter the date in DDMMYYYY format. |
Click Save to confirm itPara confirmar clique em Salvar.
| Card |
|---|
| default | true |
|---|
| id | 14 |
|---|
| label | Criar Visões | Create Views |
|---|
| This option is available in the access screen of the routine in Price List Maintenance. Click the down arrow to select this option. To the left - Configurations. This screen is divided by the grids described below
- Name of View - Name the view you are creating.
- Order of Records - Select between the indexes:
List Code Active List + Start Date + End Date Double-click to make the view public. Click Confirm to continue or Close to exit and/or return to the previous screen. - Fields. View two frames called thus:
Fields available for your view - to the left Place the cursor in the fields you wish to display in the view being configured and use arrow > to move it to the right. Use arrows < and > to move the fields from one side of the frames to the other. Fields currently in use - to the right When moving fields, viewing takes place in this frame. Click Confirm to continue or Close to exit and/or return to the previous screen. Select filters to apply to the list. To create a new filter, click the option Create Filter. Access Other Actions to view and/or select from the options: In the same screen, you can Delete and/or Copy an existing field. To continue, click Confirm; or, to exit without adjustments, click Close Esta opção estádisponível na tela de acesso à rotina em Manutenção da Tabela de Preços, clique com a seta para baixo para selecionar esta opção.À esquerda - Configurações, esta tela está dividida pelos grids que descrevemos a seguir
- Nome da Visão - Atribua um nome para a visão que se está criando.
- Ordem dos Registros - Selecione entre os índices:
Cod. Tabela Tabela Ativa + Data Inicial + Data Final Marque com duplo clique se deseja tornar publica a visão. Para prosseguir clique em Confirmar ou para sair e/ou retornar à tela anterior,clique em Fechar. - Campos, visualize duas caixas assim denominadas:
Campos disponíveis para a sua visão - à esquerda Posicione o cursor nos campos que deseja visualizar na visão em configuração e com a seta > movimente-o para a direita. As setas < e > permitem movimentar os campos de um lado para o outro dos quadros. Campos sendo utilizados atualmente - à direita Quando movimentados os campos, a visualização é feita neste quadro. Para prosseguir clique em Confirmar ou para sair e/ou retornar à tela anterior,clique em Fechar. Selecione os filtros para aplicar à tabela. Para criar um novo filtro, clique na opção Criar Filtro. Acesse Outras Ações e visualizee/ou selecione entre as opções:- Copiar
- Expressão
- Relacionar
O sistema nesta mesma tela permite Excluir e/ou Copiar um filtro existente. Para prosseguir clique em Confirmar ou para sair sem ajustes clique em Fechar. |
| Card |
|---|
| default | true |
|---|
| id | 15 |
|---|
| label | Gerenciar VIsões | Manage Views |
|---|
| This option is available in the access screen of the routine in Price List Maintenance. Click the down arrow to select this option. At the lower area of the screen displayed by the system, view the options: Other Actions / Restore Default View Configure Edit - use this option to edit an existing view. Delete - use this option to delete an existing view. Add - use this option to add a new view. Follow the instructions described in Create Views. Set to Default - use this option to set a view to default. Select one from the existing views and confirm it. To exit without saving, click Close; or, to keep this configuration, click Confirm Esta opção estádisponível na tela de acesso à rotina em Manutenção da Tabela de Preços, clique com a seta para baixo para selecionar esta opção.Visualize a tela apresentada pelo sistema, tendo na parte inferior as opções: Outras Ações / Restaurar Visão Padrão Configurar Alterar Utilize esta opção quando desejar alterar alguma Visão existente. Excluir - Utilize esta opção para excluir alguma visão existente. Incluir - Utilize esta opção para incluir uma nova visão. Siga as orientações descritas em Criar Visões. Definir como Padrão - Para selecionar uma visão como padrão, selecione entre as visões existentes e confirme nesta opção. Para sair sem salvar clique em Fechar ou para manter esta configuração clique em Confirmar. |
| Card |
|---|
| default | true |
|---|
| id | 16 |
|---|
| label | Cadastramento de promoções relâmpago | Registration of Flash Sales |
|---|
| The routines involved in flash sales registration are: Bonus and Discount RulesAs rotinas envolvidas no cadastramento de promoções relâmpago são: Regras de Descontos e Bonificação. | Nota |
|---|
| title | ImportanteImportant: |
|---|
| Ao abrir uma venda, o sistema verifica todas as Tabelas de Preço ativas naquele momento, excluindo a necessidade de consulta às Tabelas ativas sempre que um novo produto for lançado. Somente após a abertura de uma nova venda, o sistema consultará novamente a existência de outras Tabelas de Preço ativas. Para tanto, o parâmetro MV_LJRETVL e um índice na Tabela DA0. Este novo parâmetro é configurado somente com os valores 1 ou 2, sendo o valor 1 para o sistema captar o menor preço de um produto entre as Tabelas de Preço ativas, e o valor 2, para o maior preço. |
A tabela de preço tem a possibilidade de registrar as seguintes informações: DA0 – Cabeçalho - Data e hora inicial / Data de hora final de validade
- Tipo de hora – Único / Recorrente
- Tab. Ativa – Sim / Não
DA1 – Itens - Produto ou Grupo de Produtos
- Preço Base (retorna automaticamente o valor praticado no campo Preço Venda)
- Preço de Venda (valor que efetivamente será praticado na venda)
- Desconto / Fator (serão aplicados no campo Preço de Venda)
- Ativo (se este produto está ativo na grade)
- Estado
- Tipo de Operação (Estadual / Interestadual e etc)
- Faixa / Moeda
- Vigência
Devido à condição e forma de pagamento serem definidas apenas no final do processo da venda concomitante, nos módulos Controle de Loja e Front Loja, somente as tabelas de preço que não possuem estas informações definidas são consideradas. Os campos de forma e condição de pagamento ficam inibidos no módulo Controle de Loja para a tela de cadastro de Tabela de Preços. Na Venda Assistida e Front Loja é tratado apenas o tipo de operação Estadual. | Possíveis cenários | Descrição | Ação | Uma única tabela de preço, que tenha produto informado na venda. | É utilizada a regra definida na tabela de preço e aplicada ao valor do item do produto. | O produto existe em mais de uma tabela de preço ativa. | É definido pelo parâmetro que identifica se o valor do produto deve ser escolhido com o critério do maior ou menor valor encontrado na busca e aplicado ao valor do item do produto. | Não encontrar nenhuma tabela de preço ativa para o produto. | O valor de venda do produto é o cadastrado no produto (campo Preço Venda). | When you open a sale, the system checks all currently active Price Lists, so you do not need to query active Lists every time a new product is launched. The system will only check again for the existence of other active Price Lists after you open a new sale. This is why parameter MV_LJRETVL is an index in List DA0. This new parameter is configured only with values 1 or 2, value 1 being intended for capturing the lowest price of a product among the active Price Lists, and value 2 for the highest price. |
The price list can register the following data: DA0 – Header - Start Date and Time / End date and Time of Validity
- Time Type - Single / Recurring
- List Active - Yes / No
DA1 – Items - Product or Product Group
- Base Price (automatically returns the value used in field Sales Price)
- Sales Price (value to be effectively used in sale)
- Discount / Factor (to be applied in field Sales Price)
- Active (if this product is active in grid)
- State
- Type of Operation (State / Interstate, etc.)
- Range / Currency
- Validity
As the payment method and terms are only set at the end of the concomitant sales process, in modules Store Control and Point of Sales, only price lists that lack definitions for these data are taken into account. The fields for payment method and terms become hidden in the Store Control module on the Price List registration screen. In Assisted Sales and Point of Sales, only the State operation type is handled.
Possible Scenarios | Description | Action | A single price list with product entered at sale. | The rule set in the price list is used and applied to the value of the product item. | The product exists in more than one active price list. | It is set by the parameter that defines whether the product value must be selected by the criterion of highest or of lowest value found in the search and applied to the value of the product item. | No active price list is found for the product. | The sale value of the product is the one registered in the product (field Sale Price). | There is no price list available for the product and the sale price registered in the product is ZERO. | The application notifies that this product cannot be registered, because it lacks a set sale value. |
Não existe nenhuma tabela de preço disponível para o produto e o valor de venda cadastrado no produto é ZERO. | O aplicativo informa que este produto não pode ser registrado, pois, não tem valor de venda definido.
| Card |
|---|
| default | true |
|---|
| id | 17 |
|---|
| label | Product Grid Interface para Grade de Produtos |
|---|
| The grid resource speeds up the registration of products that vary only in a few aspects, keeping their main characteristics. Thus, you do not need to register the same product multiple time only because the product has various characteristics; that is, you only need to register the main product and all its variants, such as: color, model, etc. This enables Protheus to automatically register all product variants O recurso de grade agiliza o trabalho de cadastramento de produtos que variam em apenas alguns aspectos, mantendo a sua característica principal. Desta forma, não é preciso cadastrar o mesmo produto diversas vezes apenas pelo produto ter uma variedade de características, ou seja, o usuário apenas precisa cadastrar o produto principal e todas as suas variáveis, tais como: cor, modelo etc. Isso permitirá que o Protheus gere automaticamente todos os cadastramentos dos produtos variáveis. | Nota |
|---|
| title | ImportanteImportant: |
|---|
| Para utilizar o recurso de Grade de Produtos, é necessário configurar o parâmetro To use the Product Grid resource, you need to set parameter MV_GRADE= T, ativando assim, o uso da grade de produtos to T, thus activating the use of the product grid. |
|
| Card |
|---|
| default | true |
|---|
| id | 18 |
|---|
| label | Grade de Produtos na Tabela de Preços de Vendas | Product Grid in Sales Price List |
|---|
| Select the option Price List and add a price list for a grid reference product. To check the application of the price list, select the option Sales Orders and add a sales order to a product (full code) of the related grid family. Enter the list code in the header of the order Selecione a opção Tabela de Preço e inclua uma tabela de preço para um produto referência de grade. Para verificar a aplicação da tabela de preços, selecione a opção Pedidos de Venda e inclua um pedido de venda para um produto (código completo) da família de grade relacionada. Informe o código da tabela no cabeçalho do pedido. |
| Card |
|---|
| default | true |
|---|
| id | 19 |
|---|
| label | Legenda |
|---|
| Posicione em uma das Tabelas de Preço cadastrada, faça duplo clic sobre a esfera colorida à esquerda e o sistema exibe o quadro com o significado da legenda, sendo: Image Removed Tabela de Preços Inativa; Image Removed Tabela de Preços Ativa; Image Removed Tabela de Preços Ativa Especial. |
|
...
Campo:
...
Descrição
...
Campo alfanumérico que permite definir um código para a Tabela de Preços que se está incluindo.
...
Exemplo:
A12
...
Campo descritivo que identifica a tabela incluída e/ou a incluir.
Exemplo:
Tabela padrão do mês.
...
Defina nestes campos quais são as datas de início e de término da vigência da tabela de preços.
Exemplo:
01/01/2016 a
...
Informe nestes campos os horários de vigência da Tabela de Preços cadastrada. Esta informação é bastante utilizada por empresas que realizam Promoções Relâmpago.
Exemplo:
Uma empresa tenha determinado uma promoção que vale no dia 20/09/03, das 9h às 10h, deve ter o campo Hora Inicial preenchido com 09:00 e o campo Hora Final com 10:00. As vendas efetuadas a partir das 10h 01min não participam mais da promoção desta Tabela de Preço.
...
Informe a condição de pagamento válida para aplicação desta tabela de preços. Desta forma, na inclusão do Pedido de Vendas, o sistema somente verificará a condição de pagamento informada na Tabela de Preços, caso contrário, emite um aviso de que a condição é inválida para a Tabela selecionada.
Utilize a lupa ao lado do campo ou a tecla F3 para acessar a consulta padrão e deste modo selecionar a condição de pagamento.
Exemplo:
A vista.
...
Grupo
...
Este campo permite o controle da tabela de preço por produto, ou grupo de produtos.
Para fazer o controle por grupo é necessário que tenha sido informado, no Cadastro de Produtos, o grupo ao qual ele pertence. Se for informado na tabela, o preço do produto e o preço para o grupo ao qual ele pertence, o sistema assume o preço do produto, e não o do grupo.
Lembrando que o campo possui gatilho, e se informado grupo o produto é apagado. Tendo que informar um ou outro.
 Image Removed
...
Tipo de Horário
...
Utilize a seta para baixo posicionada ao lado do campo, para selecionar entre:
1-Único - A Tabela de Preços vale da data de início (hora inicial), até a data final (hora final). Neste caso, supondo que a Tabela foi cadastrada para vigorar de 17/09 às 10:00 até 20/09 até as 20:00 hs, todos os pedidos de venda que entrarem neste período podem utilizar esta tabela.
2-Recorrente - A tabela vale entre as duas datas somente entre a hora inicial e a hora final. Usando o exemplo anterior, os pedidos somente podem utilizar a tabela nos dias do período, dentro do horário informado, ou seja, de 17/09 10:00 até 20/09 às 20:00. Se a emissão do pedido for dia 18/09 às 21:00 hs, o sistema não aceita para esta Tabela de Preços.
...
Utilize a seta para baixo para selecionar entre:
| Nota |
|---|
|
Caso tenha uma tabela de preço gravada no pedido de venda em aberto e inative a tabela de preço, os pedidos já gravados em aberto ira considerar o valor da tabela de preço registrada na SC6, porem para os próximos pedidos a tabela não estará ativa. |
...
O preço base da venda de um produto é definido no seu cadastro, por meio do campo Preço Venda.
Na inclusão da Tabela de Preços o sistema disponibiliza o preço base preenchido, sendo que os campos Preço de Venda e Valor do Desconto sempre tomam como referência, o preço base do produto. No entanto, caso não esteja cadastrado, informe-o diretamente no campo Preço de Venda.
...
Informe o preço de venda praticado para um produto na Tabela de Preços, a partir dos descontos e fatores aplicados.
Exemplo:
O cadastro de uma tabela de preços com a seguinte situação:
Produto Computador; Preço Base $ 1.000,00 e Valor do Desconto $100,00, nesta situação o Preço de Venda é $ 900,00 (Preço Base - Valor Desconto)
...
Valor Desconto
...
Informe o valor do desconto para aplicar sobre o Preço Base do produto. Ao informar este campo o sistema calcula automaticamente o campo Preço de Venda.
| Nota |
|---|
|
O sistema permite aplicar o valor do desconto ou o fator, mas nunca um sobre o outro. |
Exemplo:
O cadastro de uma tabela de preços com a seguinte situação: Produto Computador; Preço Base $1.000,00; Valor do Desconto $ 100,00; Fator 0,90 (10% de desconto sobre o preço base); Preço de Venda $ 900,00 (Preço Base - Valor Desconto)
O valor do desconto determina o preço de venda, pois é calculado sobre o Preço Base do produto.
...
Este campo determina o fator sobre o Preço Base do produto; é informado ou calculado pelo sistema quando o campo Valor do Desconto é preenchido.Quando informado, o sistema calcula o preço de venda baseado no fator. Ao informar o fator é calculado o preço de venda.
...
Estado
...
Informe o Estado no qual a Tabela de Preços cadastrada tem vigência.
| Nota |
|---|
|
Para os campos Estado e Tp. Operação, existe uma regra de prioridade. Ao informar o Estado o sistema desconsidera o campo Tp. Operação, independente do seu conteúdo. Portanto, para que as informações contidas no campo Tp.Operação tenham valor, deixe o campo Estado em branco. |
...
Neste campo selecione o tipo de operação realizada:
1-Estadual - Indica que a Tabela de Preço vale apenas para clientes dentro do Estado definido no parâmetro MV_ESTADO.
2-Interestadual - Indica que a Tabela de Preço vale para todos os Estados, exceto o Estado definido no parâmetro MV_ESTADO.
3-Norte e Nordeste Indica que a Tabela de Preços vale apenas para as regiões Norte e Nordeste.
4-Todos - Indica que a Tabela de Preço vale para todos os Estados da tabela 12 - Unidade Federativa.
| Nota |
|---|
|
Para os campos Estado e Tp. Operação, existe uma regra de prioridade. Ao informar o Estado o sistema desconsidera o campo Tp. Operação, independente do seu conteúdo. Portanto, para que as informações contidas no campo Tp.Operação tenham valor, deixe o campo Estado em branco. |
...
Informe qual a quantidade máxima de produtos para uma determinada tabela de preços. Esta informação é útil quando se quer vincular o preço a uma quantidade definida de venda.
Exemplo:
Quanto maior a quantidade de produtos vendidos, menor o preço.
...
O objetivo do campo reservado denominado Status, é permitir a ativação ou a desativação de registros, evitando que os inativos fiquem em uso na aplicação.
1. A inicialização do campo é sempre como Ativo e apresenta as opções Ativo e Inativo.
2. Quando o conteúdo do campo está definido como Inativo, significa que o registro está bloqueado e é exibido no browse com uma cor diferente.
...
Implementada a opção de envio de múltiplas tabelas de preço para E-commerce CiaShop, mediante a sinalização do campo e-commerce
| Nota |
|---|
|
O cadastro do cabeçalho, onde se definem as regras para uso da tabela na venda, é realizada no E-Commerce CiaShop. A integração envia os produtos associados à tabela, assim como os respectivos preços. Utilize essa funcionalidade se deseja ter uma tabela de preço diferenciada por regra. Os procedimentos para o cadastro da tabela de Preço Padrão e Promocional mantém-se inalterados. |
...
Utilize a lupa ou a tecla F3 para visualizar a consulta padrão e assim definir o código do produto.
Exemplo:
Produto Padrão
...
Utilize a lupa ou a tecla F3 para visualizar a consulta padrão e assim definir o código do produto.
Exemplo:
0002
Lembrando que o campo possui gatilho, e se informado grupo o produto é apagado. Tendo que informar um ou outro.
Image Removed
...
O código da família Referência de grade permite uso prático da rotina, diminuindo a necessidade de cadastramento repetitivo para produtos com a mesma Referência de Grade / Configurador.
...
| Place the cursor on one of the registered Price Lists and double-click the colored sphere to the left for the system to display a frame with the meaning of the caption, as follows: Image Added Inactive Price List; Image Added Active Price List; Image Added Special Active Price List. |
|
Main Fields
Field: | Description |
| List Code | Alphanumeric field for specifying a code for the Price List being added. When the option is Copy using the option by Others Actions, the system assumes the next available code for the copy. Example: A12 |
| Description | Descriptive field that identifies the list added and/or yet to be added. Example: Default list for the month. |
| Start Date / End Date | In these fields, set the start and end dates of price list validity. Example: 1/1/2016 to |
| Start Time/End Time | In these fields, enter validity schedule of the Price List registered. This information is often used by companies that practice Flash Sales. Example: A given company has decided on a promotion valid on 9/20/2003, from 9:00 AM to 10:00 AM, must set field Start Time to 09:00 and field End Time to 10:00. Sales made from 10:01 AM forward would no longer use this Price List. |
| Paymt Term | Enter the payment term valid for applying this price list. Thus, when adding the Sales Order, the system only checks the payment terms entered in the Price List; otherwise, it notifies that the terms are not valid for the List selected. Use the magnifying glass next to the field or the F3 key to access the default query and thus select the payment term. Example: Prompt payment. |
Group | Use this field to control the price list by product or by product group. To control it by group, in the Product register, enter the group to which the product belongs. If you enter, in the list, the price of the product as well as the price for the group to which it belongs, the system assumes the price of the product, not that of the group. Be mindful that the field has a trigger. If you fill out the group, the product is erased. You must enter either one or the other. Image Added |
Type of Schedule | Use the down arrow beside the field to select between: 1-Single - The Price List is valid from the start date (start time) to the end date (end time). In this case, if you register the Price List to be valid from 10:00 AM on 9/17 to 8PM on 9/20, then all sales orders entered in this period can use this list. 2-Recurring - The list is valid between the two dates only between the start time and the end time. Using the previous example, the orders can only use the list during the days of the period, within the time entered; that is, from 10:00 AM on 9/17 to 8:00 PM on 9/20. If the order is issued for 9/18 at 9:00 PM, the system does not accept it for this Price List. |
| Active List | Use the down arrow to select between: | Nota |
|---|
| The system lets you apply the factor or the discount value, but never one atop the other. |
|
| Base Price | The base sale price of a product is defined in its register, through field Sales Price. When you add a Price List, the system offers the base price entered, and fields Sales Price and Discount Value always use the base price of the product as reference. However, if it has not been registered, enter it directly in field Sales Price. |
| Sales Price | Enter the sales price used for a product in the Price List, from the applied factors and discounts. Example: A price list is registered in the following situation: Product Computer; Base Price $1,000.00 and Discount Value $100.00. In this situation the Sales Price is $900.00 (Base Price - Discount Value) |
Discount Value | Enter the discount value to be applied to the Base Price of the product. When you fill out this field, the system automatically calculates the Sales Price field. | Nota |
|---|
| The system lets you apply the factor or the discount value, but never one atop the other. |
Example: A price list is registered in the following situation: Product Computer; Base Price $1,000.00; Discount Value $100.00; Factor 0.90 (10% discount on the base price); Sales Price $900.00 (Base Price - Discount Value) The discount value determines the sales price, because it is calculated on the Base Price of the product. |
| Factor | This field determines the factor on the Base Price of the product. The system enters or calculates it when you fill out the field Discount Value. When entered, the system calculates the sales price based on the factor. When the factor is entered, the sales price is calculated. |
State | Enter the State in which the Price List registered is valid. | Nota |
|---|
| For fields State and Operation Tp., a priority rule exists. When you enter the State, the system disregards field Operation Tp., regardless of its contents. Therefore, for the data found in field Operation Tp. to have value, leave field State blank. |
|
| Type of Operation | In this field, select the type of operation performed: 1-State - Determines that the Price List is only valid for customers inside the State defined in parameter MV_ESTADO. 2-Interstate - Determines that the Price List is valid for all States, except the State set in parameter MV_ESTADO. 3-North and Northeast Indicates that the Price List is valid only for regions North and Northeast. 4-All - Indicates that the Price List is valid for all States of table 12 - Federative Unit. | Nota |
|---|
| For fields State and Operation Tp., a priority rule exists. When you enter the State, the system disregards field Operation Tp., regardless of its contents. Therefore, for the data found in field Operation Tp. to have value, leave field State blank. |
|
| Range | Enter the maximum quantity of products for a given price list. This information is useful to link the price to a given sales quantity. Example: The higher the number of products sold, the lower the price. |
| Activation and Deactivation of Records | The purpose of the reserved field called Status is to allow the activation or deactivation of records, preventing the application from using the inactive ones. 1. Field initialization is always as Active and shows the options Active and Inactive. 2. When the content of the field is set to Inactive, it means the record is blocked, and it is shown in the browser with a different color. |
| E-commerce | The option to send multiple price lists to CiaShop E-commerce, is implemented by marking the field e-commerce | Nota |
|---|
| The header registration, in which the rules for using the list in the sale are set, is made in the Cia Shop E-Commerce. The integration sends products related to the list as well as their respective prices. Use this feature to have a price list differentiated by rule. The procedures for registering the Promotional and Default Price list remain the same. |
|
| Product Code | Use the magnifying glass or the F3 key to view the default query and set the product code. Example: Default Product |
| Group | Use the magnifying glass or the F3 key to view the default query and set the product code. Example: 0002 Be mindful that the field has a trigger. If you fill out the group, the product is erased. You must enter either one or the other. Image Added |
| Grid Ref./CFG | The Grid Reference family code lets you use the routine practically, reducing the need to repeatedly register products with the same Grid Reference / Configurator. |
| Validity | Use the calendar next to the field or enter the date in format DD/MM/YYYY with the validity date of the pricelist in use. |
| Maximum Price | Enter the maximum price for the specified price list. |
01. OVERVIEW
Use this routine to configure or perform maintenance on a Price List and compose various sales types, considering specific sales terms for one or for multiple products, using distinct criteria, such as region and price range.
To compose the discounts and sales price to be applied, the System refers to the product price, set in its register through field Sales Price.
Example
Item | Product Code | Product Disc. | Base Price | Sales Price | Discount Val. | Factor | State | Range |
001 | 000001 | Computer | 1,000.00 | 900.00 | 100.00 | 0.90 | SP | 500.00 |
002 | 000001 | Computer | 1,000.00 | 850.00 | 150.00 | 0.85 | SP | 999,999.99 |
In the above example, the Computer product gets a 10% discount on its base price when 500 units are sold, in the State of Sao Paulo. Above 500 units, it gets a 15% discount.
Besides defining List items as shown above, you can also use the System to determine the validity periods, by date and time intervals, as well as specify a payment term.
Price Lists are identified on the grid, Active Tab column, as follows:
- Active List: active lists are those within the period selected.
- Inactive List: a list becomes inactive when its expiration date is exceeded.
- Special Active List: indicates that the user has changed the expiration of the list.
Registration of Short Period Sales
The price list (DA0 and DA1) can register the following information:
DA0 – Header
- Start Date and Time / End Date and Time of Validity;
- Time Type: Single / Recurring;
- List Active: Yes / No.
DA1 – Items
- Product or Product Group;
- Base Price (automatically returns the value used in field Sales Price);
- Sales Price (value to be effectively used in sale);
- Discount / Factor (to be applied in field Sales Price);
- Active (if this product is active in grid);
- State;
- Type of Operation (State / Interstate, and others);
- Range / Currency;
As the payment method and terms are only set at the end of the concomitant sales process, in modules Store Control and Point of Sales, only price lists that lack definitions for these data are taken into account. The fields for payment method and terms become hidden in the Store Control module on the Price List registration screen.
In Assisted Sales and Point of Sales, only the State operation type is handled.
Possible Scenarios |
Description | Action |
A single price list with product being entered at sale. | The rule set in the price list is used and applied to the value of the product item. |
The product exists in more than one active price list. | It is set by the parameter that defines whether the product value must be selected by the criterion of highest or of lowest value found in the search and applied to the value of the product item. |
No active price list is found for the product. | The sale value of the product is the one registered in the product (field Sale Price). |
There is no price list available for the product and the sale price registered in the product is 0 (zero). | The application notifies that this product cannot be registered, because it lacks a set sale value. |
| Informações |
|---|
|
- The routines involved in flash sales registration are Bonus and Discount Rules.
- When you open a sale, the system checks all currently active Price Lists, so you do not need to query active Lists every time a new product is launched.
- The system will only check again for the existence of other active Price Lists after you open a new sale.
- This is why parameter MV_LJRETVL is an index in List DA0. This new parameter is configured only with values 1 or 2, value 1 being intended for the System to capture the lowest price of a product among the active Price Lists, and value 2 for the highest price.
|
Product Grid Interface
The grid resource speeds up the registration of products that vary only in a few aspects, keeping their main characteristics.
Thus, you do not need to register the same product multiple times only because the product has various characteristics; that is, you only need to register the main product and all its variants, such as: color, model, etc. This enables Protheus to automatically register all product variants.
| Informações |
|---|
|
| To use the Product Grid resource, you need to set parameter MV_GRADE = T, thus activating the use of the product grid. |
Activation and Deactivation of Records
The purpose of the reserved field called Status is to allow the activation or deactivation of records, preventing the application from using the inactive ones.
E-Commerce
The option to send multiple price lists to CiaShop E-commerce, is implemented by marking the field E-commerce.
| Informações |
|---|
|
- The registration of the header, in which the rule(s) for using the List are defined is done in the CiaShop E-Commerce. The integration sends products related to the list as well as their respective prices.
- Use this feature if you want to have a Price List differentiated by rule.
- The procedures for registering the Promotional and Default Price List remain the same.
|
Connections
Use this feature to identify the relationship between the records created in CRM, which are Suspect, Prospect, Customer, Contacts, Competitors, Suppliers, Partners, Opportunities, Proposals, Sales Orders, Invoices, Products, Price Lists, Sales Process, Sales Representatives, Business Unit, Sales Team, Promotions and Events.
The connection centralizes data on the relationship between an entity and another, making it easier to query them. Through this feature, you can, for example, link data from one Customer to the other, entering the function of the connection. For example: partner, associate, influencer, etc.
If you cannot find a feature that best fits your needs, you can register other connection features and associate them with the corresponding features; that is, when you register the feature "Uncle/Aunt", the corresponding feature will be "Nephew/Niece".
In the Connections Register you can also set the start and end dates of the connection.
02. EXAMPLE OF USE
Adding a Price List
- In SIGAOMS, access Updates > Sales Scenarios > Price Lists.
- On the Price List screen, press the F12 key to access the Parameters
- On the Parameters screen, note the parameter Display By?. This parameter indicates whether the screen will be displayed by:
- Product: all lists containing the product selected are displayed. This makes maintenance easier, if you need to edit/view the lists in which the product is found.
We must emphasize that you can only use this option to edit/view the list. - List: when you select this option, you can add various products to the Price List.
- Check and confirm the data.
- Then, on the Price List screen, click Add.
- Enter the data required for addition of List.
- Check and confirm the data.
- Press the down arrow to add other products to this Price List.
- You may associate the same product several times in the Price List, generating the application ranges for distinct criteria and prices.
- Press the DEL key to select/deselect an item for deletion.
Editing the Price List
You can edit the Price List for quick editing of prices of a specific product.
- On the Price List screen, press the F12 key to access the Parameters
- On the Parameters screen, enter the required parameters, noting:
- Display By?: defines whether option Edit must be by product or list. If you select List, all the data on the list selected for editing are displayed (default option). If you select Product, all the lists containing this product are displayed.
- Product?- If the option Display by Product is selected, enter the code of the product you want displayed for editing.
- Check and confirm the data.
- Click Edit.
- A window is displayed for editing, in accordance with parameter settings.
- If the editing parameters are set by Product, all lists with which it is associated are listed.
- Configure and confirm the changes.
Copying the Price List
- On the Price List screen, select the List you want to copy.
- Click Other Actions/Copy.
- Then the Price List - Copy screen is displayed, in which all fields are filled out, just as they were filled out for the List selected.
- Enter the Code and Description of the new List you want to add.
- You can also edit the other fields, if needed.
- Check and confirm the data.
Creating a Price List from the Product Register
- On the Price List screen, click Other Actions / Generate.
- On the Parameters screen, select the data to generate the List.
- Check and confirm the data.
Adjusting the Price List
- On the Price List screen, click Other Actions / Adjustment.
- Click Parameters.
- Setting the parameters displayed on the Parameters screen is self-explanatory; however, you should pay attention to the following data.
- Adjustment Factor?: enter the price adjustment factor. You get the new values by applying this factor.
- Number of Decimal Places?: enter the quantity of decimal places to be used when saving the new price.
Example: if you enter 0 (zero) and the calculation of the new value is 46.74, the system saves 46.00 disregarding the cents. - Reapply Factor? Define how to apply the multiplication factor for the adjustment calculation:
- Option Base Price: applies the formula: Base Price x Multiplication Factor x Factor.
- Option Price List: applies the formula: Sales Price x Multiplication Factor.
- Check and confirm the data.
- The lists are adjusted in accordance with parameter settings.
- In Store Control, access Price List and register the Price List, filling out the following fields:
- List Code: enter the contents of field ERP Code registered in E-Commerce.
- E-Commerce: enter whether the list is active or inactive.
- Enter the other fields of the header
- On the grid, fill out the following fields:
- Product Code: enter the code of the E-Commerce product.
- Sales Price: enter the sales price.
- Validity: enter the date of price publication.
- Enter the other information and confirm it.
- Access CiaShop Services Monitor.
- Check whether the Variable Price List service was successfully executed.
- Select the option Log to view the history of the execution of the service and its results.
- Select the option Detail to view the products updated.
| Informações |
|---|
|
- For each Register export, a control sequence is generated in field Seq. and saved in field Exp Dt (the date of the last export).
- Only follow this procedure to register Price Lists not of types Standard and Promotional.
|
Using the Product Grid Resource in Sales Price List
- Select the option Price List and add a Price List for a grid reference product.
- To check the application of the Price List, select the option Sales Orders.
- Add a Sales Order for a product (full code) of the associated grid family.
- Enter the list code in the header of the Order.
| Informações |
|---|
|
| For further details, access: Product Grids (MATA550 - SIGAEST). |
Configuring the Note
- In Related Features, click Notes.
- On the upper menu, you can Filter, Search, Print and Configure.
- The lower menu displays five options: Edit, Add, View, Environment and Related Features.
- When you view a registered note, the data displayed are: Code of Note, Code of User who created the note, User Name, Note Edit Date, Note Addition Date, Title, Contents and Attachments.
Using the Product Grid Resource in Sales Price List
- Select the option Price List.
- Add a Price List for a grid reference product.
- To check the application of the Price List, select the option Sales Orders.
- Add a Sales Order for a product (full code) of the associated grid family.
- Enter the List code in the header of the Order.
Activating/Deactivating Records
- Field initialization is always as Active and shows the options Active and
- When the content of the field is set to Inactive, it means the record is blocked, and it is shown in the browser with a different color.
- In Store Control, access Price List and register the price list, filling out the following fields:
- List Code: enter the contents of field ERP Code registered in E-Commerce.
- E-Commerce: enter whether the list is active or inactive.
- Fill out the other fields of the header
- On the grid, fill out the following fields:
- Product Code: Enter the code of the E-Commerce product;
- Sales Price: Enter the Point of Sale.
- Validity: Enter the date of price publication.
- Enter the other information and confirm it.
- Access CiaShop Services Monitor.
- Check whether the Variable Price List service was successfully executed.
- Select the option Log to view the history of the execution of the service and its results.
- Select the option Detail to view the products updated.
Configuring the Connection
- In Related Features, click Add.
- On the Connections Register screen, the data on entity, code and name of the connector are loaded automatically.
- Fill out the fields Connection Function, Function Description, Connected Entity Type, Entity Type Description, Connected Entity Code, Entity Description, Note and Start and End Dates.
- The field Connection Functions is filled out through a standard query.
- After filling out the function, the field Corresponding Function is automatically filled out. If there is more than one, select the one that best meets your needs.
- If you need to register a new function, click Edit.
- The function code is automatically loaded in sequential form.
- Fill out the fields Name, Category, Note, Status, Relationship with the Entity and Association of Corresponding Function.
- In the corresponding functions register, there is a standard query listing the functions already registered.
- The connections query browser has a Disconnect option, which undoes the relationship links of registro.END.
03. PRICE LIST SCREEN
Other Actions / Related Features
Action | Description |
Add | Allows access to the screen Price List - Add, in which you can add a new record. |
Edit | Allows access to the screen Price List - Edit, in which you can edit the parameters set for the record selected.
If the editing parameters are set by Product, all lists with which it is associated are listed. |
Search Product in List | Use this feature to search a given record in Lists having a large number of items, through any field of the screen. |
Notes | Use this feature to add, edit or delete comments or notes related to records of the following entities:
CRM, Suspects, Customers, Prospects, Contacts, Competitors, Sales Representatives, Opportunities, Proposals, Orders, Suppliers, Partners, Products, Price List, Sales Process, Business Unit, Sales Team, Promotion and Events. |
Other Actions > View | Allows access to the screen Price List - View, which displays the parameters set for the record selected in detail. |
Other Actions > Delete | Use this feature to delete the record selected.
You cannot undo this operation after confirming the deletion. |
Other Actions > Copy | You can access the Price List - Copy, in which you can create new Price Lists from the List selected, when these have items in common. This option enables registration of Lists with similar characteristics like common items, to avoid having to retype them. The system displays all the fields that were configured for a specified list, earlier selected in the maintenance Price List screen, thereby enabling registration of a new list. In this option you may duplicate List items, which requires adjusting the List header at each duplication. |
Other Actions > Generate | Use this feature to access the screen Price List - Generate, in which you can use a record as reference to create another. When you select products on the routine's Parameters screen, the System displays, in Price List items, all product data already entered; however, you must enter the List header items. In the Validity field you can set the date from which the item on the list is valid, though this field is not required. For price list validity purposes, the System always takes into account the data found in fields Start Date/Time and End Date/Time; however, the List items may have later validity dates. |
Other Actions > Adjustment | Use this option to apply a multiplication factor to adjust the prices of products from lists specified in parameters. |
04. PRICE LIST SCREEN - ADD
Main Fields and Parameters
| Field | Description |
|---|
| List Code | Use this code to identify the Price List you are registering. |
| Description | Use this description to identify the Price List you are registering. |
Start Date/Time
End Date/Time | These fields determine the Price List validity schedule and are often used in companies that have Flash Sales. Example: - If a company has determined a sale the validity of which is in 9/20/2018, from 9:00 to 10:00 AM.
- You must fill out field Start Time with 09:00 and field End Time with 10:00. Thus, the products sold after 10:01 AM on 9/20/2018 can no longer be on sale with this Price List.
| Informações |
|---|
| | When you add the Sales Order, the date used for Price List validation is the issue date of the Sales Order, not the base date of the System. |
|
| Paymt Term | Payment term valid for application to the Price List being registered. Thus, when you add the Sales Order, only the payment term entered in the Price List is used. Otherwise, a warning is issued notifying that the term is not valid for the List selected. |
| Schedule Type | Type of schedule to be applied to the Price List, which can be: 1-Single: the Price List is valid from the start date (start time) to the end date (end time).
In this case, suppose the List was saved at 10:00 AM on 09/17 up to 8:00 PM on 09/20, all sale orders entered in this period are part of the list. 2-Recurring: the Price List is valid between the two dates only between the start time and the end time.
Using the example above, the orders can use the List only during the days of the period, within the time entered; that is, 10:00 AM on 09/17 to 8:00 PM on 09/20.
If an order is issued at 9:00 PM on 09/18, the system rejects it for this Price List. |
| Active List | Enter whether the List is active in the system: 1 - Yes2 - No |
| E-Commerce | Enter whether multiple lists will be sent to the CiaShop E-commerce, by marking this field: 1 - Active
2 - Inactive | Informações |
|---|
| - The registration of the header, in which the rule(s) for using the List are defined is done in the CiaShop E-Commerce.
- The integration sends products related to the List as well as their respective prices.
- Use this feature if you want to have a Price List differentiated by rule.
- The procedures for registering the Promotional and Default Price List remain the same.
|
|
| Product Code | Product Code for Price List composition. |
| Group | Use this field to control the Price List by product or by product group. To control it by group, in the Product register, enter the group to which the product belongs. If you enter, in the List, the price of the product as well as the price for the group to which it belongs, the System assumes the price of the product, not that of the group. |
Base Price | The base sale price of a product is defined in its register, through field Sales Price. When you add a Price List, the system offers the base price entered, and fields Sales Price and Discount Value always use the base price of the product as reference. However, you can fill out field Sales Price directly, if it has not been registered already. |
| Grid Ref./CFG | Code of grid reference family, which lets you use the routine practically, reducing the need to repeatedly register products with the same reference of grid/configurator. |
| Sales Price | Sales price used for a product in the Price List, from the applied factors and discounts. Example:
A price list is registered in the following situation: - Product = Computer
- Base Price = 1,000.00
- Discount Value - 100.00
- Sales Price = 900.00 (Base Price - Discount Value)
|
| Discount Val. | Discount value to be applied on the base price of the product. Example:
A price list is registered in the following situation: - Product = Computer
- Base Price = 1,000.00
- Discount Value - 100.00
- Factor = 0.90 (10% discount on base price)
- Sales Price = 900.00 (Base Price - Discount Value)
The discount value determines the sales price, because it is calculated on the base price of the product. | Informações |
|---|
| - When you fill out this field, the System automatically calculates the Sales Price
- The System lets you apply the factor or the discount value. Never one atop the other.
|
|
| Factor | Specifies the factor to be applied on the base price of the product and can be entered or calculated by the system when the field Discount Value is filled out. When entered, the System calculates the Sales Price based on the Factor. |
| Active | Enter whether the factor at issue is: 1 - Active
2 - Inactive |
| State | Federation Unit in which the Price List registered is in effect. | Informações |
|---|
| - For fields State and Operation Tp., a priority rule exists.
- If you fill out the field State, the System disregards the field Operation Tp., regardless or its contents. Hence, for the data found in the latter field to have value, leave the first one blank.
|
|
| Tipo Operac. | The type of operation in which the price is valid: 1 - State: the Price List is valid only for customers within the State, as set in parameter MV_ESTADO.
2-Interstate - the Price List is valid for all States, except the State set in parameter MV_ESTADO.
3-North and Northeast: the Price List is valid only for regions North and Northeast.
4-All: the Price List is valid for all States of table 12 - Federative Unit. | Informações |
|---|
| - For fields State and Operation Tp., a priority rule exists.
- If you fill out the field State, the system disregards the field Operation Tp., regardless or its contents. Hence, for the data found in the latter field to have value, leave the first one blank.
|
|
| Range | Maximum quantity of products for which the Price List is valid. Example:
The higher the number of products sold, the lower the price. | Informações |
|---|
| | This information is useful when the price needs to be linked to a sale quantity. |
|
| Currency | Code of valid currency for the Price List. |
| Validity | Validity date of item that composes the Price List. |
| Maximum Price | Maximum price of product. |
| Price Type | Identification of price type, which can be: 1 - Sales Price2 - Consumer Sale
3 - Wholesale
4 - Retail
5 - Consumer Sale |
05. PARAMETERS
Billing Environment
Product Grid
06. TABLES
- DA0 - Price List
- DA1 - Price List Items
- SB1 – Products
- SE4 - Payment Terms
...