Histórico da Página
Index
| Índice | ||||||||||
|---|---|---|---|---|---|---|---|---|---|---|
|
...
Example of Price List application:
Item | Product Code | Product Disc. | Base Price | Sale Price | Discount Val. | Factor | State | Range |
001 | 000001 | Computer | 1,000.00 | 900.00 | 100.00 | 0.90 | SP | 500.00 |
002 | 000001 | Computer | 1,000.00 | 850.00 | 150.00 | 0.85 | SP | 999,999.99 |
...
| Deck of Cards | ||||||||||||||||||||||||||||||||||||||||||||||||||||||||||||||||||||||||||||||||||||||||||||||||||||||||||||||||||||||||||||||||||||||||||||||||||||||||||||||||||||||||||||||||||||||||||||||||||||||||||||||||||||||||||||||||||||||||||||||||||
|---|---|---|---|---|---|---|---|---|---|---|---|---|---|---|---|---|---|---|---|---|---|---|---|---|---|---|---|---|---|---|---|---|---|---|---|---|---|---|---|---|---|---|---|---|---|---|---|---|---|---|---|---|---|---|---|---|---|---|---|---|---|---|---|---|---|---|---|---|---|---|---|---|---|---|---|---|---|---|---|---|---|---|---|---|---|---|---|---|---|---|---|---|---|---|---|---|---|---|---|---|---|---|---|---|---|---|---|---|---|---|---|---|---|---|---|---|---|---|---|---|---|---|---|---|---|---|---|---|---|---|---|---|---|---|---|---|---|---|---|---|---|---|---|---|---|---|---|---|---|---|---|---|---|---|---|---|---|---|---|---|---|---|---|---|---|---|---|---|---|---|---|---|---|---|---|---|---|---|---|---|---|---|---|---|---|---|---|---|---|---|---|---|---|---|---|---|---|---|---|---|---|---|---|---|---|---|---|---|---|---|---|---|---|---|---|---|---|---|---|---|---|---|---|---|---|---|---|---|---|---|---|---|---|---|---|---|---|---|---|---|---|---|
| ||||||||||||||||||||||||||||||||||||||||||||||||||||||||||||||||||||||||||||||||||||||||||||||||||||||||||||||||||||||||||||||||||||||||||||||||||||||||||||||||||||||||||||||||||||||||||||||||||||||||||||||||||||||||||||||||||||||||||||||||||
| ||||||||||||||||||||||||||||||||||||||||||||||||||||||||||||||||||||||||||||||||||||||||||||||||||||||||||||||||||||||||||||||||||||||||||||||||||||||||||||||||||||||||||||||||||||||||||||||||||||||||||||||||||||||||||||||||||||||||||||||||||


...
Main Fields
Field |
...
Campo: | Descrição | Cód. Tabela | ||||
| Descrição | Campo descritivo que identifica a tabela incluída e/ou a incluir. Exemplo: Tabela padrão do mês. | |||||
| Data Inicial / Data Final | Defina nestes campos quais são as datas de início e de término da vigência da tabela de preços. Exemplo: 01/01/2016 a | |||||
| Hora Inicial/Hora Final | Informe nestes campos os horários de vigência da Tabela de Preços cadastrada. Esta informação é bastante utilizada por empresas que realizam Promoções Relâmpago. Exemplo: Uma empresa tenha determinado uma promoção que vale no dia 20/09/03, das 9h às 10h, deve ter o campo Hora Inicial preenchido com 09:00 e o campo Hora Final com 10:00. As vendas efetuadas a partir das 10h 01min não participam mais da promoção desta Tabela de Preço. | |||||
| Cond. Pagto | Informe a condição de pagamento válida para aplicação desta tabela de preços. Desta forma, na inclusão do Pedido de Vendas, o sistema somente verificará a condição de pagamento informada na Tabela de Preços, caso contrário, emite um aviso de que a condição é inválida para a Tabela selecionada. Utilize a lupa ao lado do campo ou a tecla F3 para acessar a consulta padrão e deste modo selecionar a condição de pagamento. Exemplo: A vista. | |||||
Grupo | Este campo permite o controle da tabela de preço por produto, ou grupo de produtos. Para fazer o controle por grupo é necessário que tenha sido informado, no Cadastro de Produtos, o grupo ao qual ele pertence. Se for informado na tabela, o preço do produto e o preço para o grupo ao qual ele pertence, o sistema assume o preço do produto, e não o do grupo. Lembrando que o campo possui gatilho, e se informado grupo o produto é apagado. Tendo que informar um ou outro.
| |||||
Tipo de Horário | Utilize a seta para baixo posicionada ao lado do campo, para selecionar entre: 1-Único - A Tabela de Preços vale da data de início (hora inicial), até a data final (hora final). Neste caso, supondo que a Tabela foi cadastrada para vigorar de 17/09 às 10:00 até 20/09 até as 20:00 hs, todos os pedidos de venda que entrarem neste período podem utilizar esta tabela. 2-Recorrente - A tabela vale entre as duas datas somente entre a hora inicial e a hora final. Usando o exemplo anterior, os pedidos somente podem utilizar a tabela nos dias do período, dentro do horário informado, ou seja, de 17/09 10:00 até 20/09 às 20:00. Se a emissão do pedido for dia 18/09 às 21:00 hs, o sistema não aceita para esta Tabela de Preços. | |||||
| Tab.Ativa | Utilize a seta para baixo para selecionar entre:
| |||||
| Preço Base | O preço base da venda de um produto é definido no seu cadastro, por meio do campo Preço Venda. Na inclusão da Tabela de Preços o sistema disponibiliza o preço base preenchido, sendo que os campos Preço de Venda e Valor do Desconto sempre tomam como referência, o preço base do produto. No entanto, caso não esteja cadastrado, informe-o diretamente no campo Preço de Venda. | |||||
| Preço de Venda | Informe o preço de venda praticado para um produto na Tabela de Preços, a partir dos descontos e fatores aplicados. Exemplo: O cadastro de uma tabela de preços com a seguinte situação: Produto Computador; Preço Base $ 1.000,00 e Valor do Desconto $100,00, nesta situação o Preço de Venda é $ 900,00 (Preço Base - Valor Desconto) | |||||
Valor Desconto | Informe o valor do desconto para aplicar sobre o Preço Base do produto. Ao informar este campo o sistema calcula automaticamente o campo Preço de Venda.
Exemplo: O cadastro de uma tabela de preços com a seguinte situação: Produto Computador; Preço Base $1.000,00; Valor do Desconto $ 100,00; Fator 0,90 (10% de desconto sobre o preço base); Preço de Venda $ 900,00 (Preço Base - Valor Desconto) O valor do desconto determina o preço de venda, pois é calculado sobre o Preço Base do produto. | |||||
| Fator | Este campo determina o fator sobre o Preço Base do produto; é informado ou calculado pelo sistema quando o campo Valor do Desconto é preenchido.Quando informado, o sistema calcula o preço de venda baseado no fator. Ao informar o fator é calculado o preço de venda. | |||||
Estado | Informe o Estado no qual a Tabela de Preços cadastrada tem vigência.
| |||||
| Tipo de Operação | Neste campo selecione o tipo de operação realizada: 1-Estadual - Indica que a Tabela de Preço vale apenas para clientes dentro do Estado definido no parâmetro MV_ESTADO. 2-Interestadual - Indica que a Tabela de Preço vale para todos os Estados, exceto o Estado definido no parâmetro MV_ESTADO. 3-Norte e Nordeste Indica que a Tabela de Preços vale apenas para as regiões Norte e Nordeste. 4-Todos - Indica que a Tabela de Preço vale para todos os Estados da tabela 12 - Unidade Federativa.
| |||||
| Faixa | Informe qual a quantidade máxima de produtos para uma determinada tabela de preços. Esta informação é útil quando se quer vincular o preço a uma quantidade definida de venda. Exemplo: Quanto maior a quantidade de produtos vendidos, menor o preço. | |||||
| Ativação e Inativação de Registros | O objetivo do campo reservado denominado Status, é permitir a ativação ou a desativação de registros, evitando que os inativos fiquem em uso na aplicação. 1. A inicialização do campo é sempre como Ativo e apresenta as opções Ativo e Inativo. 2. Quando o conteúdo do campo está definido como Inativo, significa que o registro está bloqueado e é exibido no browse com uma cor diferente. | |||||
| E-commerce | Implementada a opção de envio de múltiplas tabelas de preço para E-commerce CiaShop, mediante a sinalização do campo e-commerce
| |||||
| Cód.Produto | Utilize a lupa ou a tecla F3 para visualizar a consulta padrão e assim definir o código do produto. Exemplo: Produto Padrão | |||||
| Grupo | Utilize a lupa ou a tecla F3 para visualizar a consulta padrão e assim definir o código do produto. Exemplo: 0002 Lembrando que o campo possui gatilho, e se informado grupo o produto é apagado. Tendo que informar um ou outro.
| |||||
| Ref. Grad/CFG | O código da família Referência de grade permite uso prático da rotina, diminuindo a necessidade de cadastramento repetitivo para produtos com a mesma Referência de Grade / Configurador. | |||||
| Vigência | Utilize o calendário ao lado do campo ou informe a data no formato DD/MM/AAAA com a data de vigência da tabela de preço utilizada. | |||||
| Preço Máximo | Informe o preço máximo para a tabela de preço indicada. |

CONTEÚDO
| Índice | ||||||||
|---|---|---|---|---|---|---|---|---|
|
01. VISÃO GERAL
Essa rotina permite configurar ou manutenir uma Tabela de Preços para compor diversas formas de comercialização, considerando, para um ou diversos produtos, condições específicas de venda, utilizando critérios diferenciados, como região e faixa de preços.
Para compor os descontos e o preço de venda que serão aplicados, o Sistema tem como referência o preço do produto, que é definido no seu cadastro por intermédio do campo Preço Venda.
Exemplo
...
Item
...
Cód. Produto
...
Desc. Produto
...
Preço Base
...
Preço de Venda
...
Vlr. Desconto
...
Fator
...
Estado
...
Faixa
...
001
...
000001
...
Computador
...
1.000,00
...
900,00
...
100,00
...
0,90
...
SP
...
500,00
...
002
...
000001
...
Computador
...
1.000,00
...
850,00
...
150,00
...
0,85
...
SP
...
999.999,99
...
Além da definir os itens da Tabela, conforme exemplificado acima, o Sistema permite determinar os períodos de vigência, por intervalo de data e hora, assim como também, especificar uma condição de pagamento.
As Tabelas de Preços são identificadas na grid, coluna Tab. Ativa, sendo:
- Tabela Ativa: as tabelas ativas são aquelas que estão dentro do período selecionado.
- Tabela Inativa: uma tabela torna-se inativa quando sua data de vencimento for ultrapassada.
- Tabela Ativa Especial: indica que o vencimento da tabela foi alterado manualmente pelo usuário.
Cadastramento de Promoções Relâmpago
A tabela de preço (DA0 e DA1) tem a possibilidade de registrar as seguintes informações:
DA0 – Cabeçalho
Data e hora inicial / Data de hora final de validade;
Tipo de hora: Único / Recorrente;
Tab. Ativa: Sim / Não.
DA1 – Itens
Produto ou Grupo de Produtos;
Preço Base (retorna automaticamente o valor praticado no campo Preço Venda);
Preço de Venda (valor que efetivamente será praticado na venda);
Desconto / Fator (serão aplicados no campo Preço de Venda);
Ativo (se este produto está ativo na grade);
Estado;
Tipo de Operação (Estadual / Interestadual, entre outros);
Faixa / Moeda;
Vigência.
Devido à condição e forma de pagamento serem definidas apenas no final do processo da venda concomitante, nos módulos Controle de Loja e Front Loja, somente as tabelas de preço que não possuírem essas informações definidas serão consideradas. Os campos de forma e condição de pagamento ficarão inibidos no módulo Controle de Loja para a tela de cadastro de Tabela de Preços.
...
Uma única tabela de preço, que tenha produto que está sendo informado na venda.
...
O produto existe em mais de uma tabela de preço ativa.
...
Não encontrar nenhuma tabela de preço ativa para o produto.
...
Não existe nenhuma tabela de preço disponível para o produto e o valor de venda cadastrado no produto é 0 (zero).
...
Description | ||||||
| List Code | Alphanumeric field for specifying a code for the Price List being added. When the option is Copy using the option by Others Actions, the system assumes the next available code for the copy. Example: A12 | |||||
| Description | Descriptive field that identifies the list added and/or yet to be added. Example: Default list for the month. | |||||
| Start Date / End Date | In these fields, set the start and end dates of price list validity. Example: 1/1/2016 to | |||||
| Start Time/End Time | In these fields, enter validity schedule of the Price List registered. This information is often used by companies that practice Flash Sales. Example: A given company has decided on a promotion valid on 9/20/2003, from 9:00 AM to 10:00 AM, must set field Start Time to 09:00 and field End Time to 10:00. Sales made from 10:01 AM forward would no longer use this Price List. | |||||
| Paymt Term | Enter the payment term valid for applying this price list. Thus, when adding the Sales Order, the system only checks the payment terms entered in the Price List; otherwise, it notifies that the terms are not valid for the List selected. Use the magnifying glass next to the field or the F3 key to access the default query and thus select the payment term. Example: Prompt payment. | |||||
Group | Use this field to control the price list by product or by product group. To control it by group, in the Product register, enter the group to which the product belongs. If you enter, in the list, the price of the product as well as the price for the group to which it belongs, the system assumes the price of the product, not that of the group. Be mindful that the field has a trigger. If you fill out the group, the product is erased. You must enter either one or the other.
| |||||
Type of Schedule | Use the down arrow beside the field to select between: 1-Single - The Price List is valid from the start date (start time) to the end date (end time). In this case, if you register the Price List to be valid from 10:00 AM on 9/17 to 8PM on 9/20, then all sales orders entered in this period can use this list. 2-Recurring - The list is valid between the two dates only between the start time and the end time. Using the previous example, the orders can only use the list during the days of the period, within the time entered; that is, from 10:00 AM on 9/17 to 8:00 PM on 9/20. If the order is issued for 9/18 at 9:00 PM, the system does not accept it for this Price List. | |||||
| Active List | Use the down arrow to select between:
| |||||
| Base Price | The base sale price of a product is defined in its register, through field Sales Price. When you add a Price List, the system offers the base price entered, and fields Sales Price and Discount Value always use the base price of the product as reference. However, if it has not been registered, enter it directly in field Sales Price. | |||||
| Sales Price | Enter the sales price used for a product in the Price List, from the applied factors and discounts. Example: A price list is registered in the following situation: Product Computer; Base Price $1,000.00 and Discount Value $100.00. In this situation the Sales Price is $900.00 (Base Price - Discount Value) | |||||
Discount Value | Enter the discount value to be applied to the Base Price of the product. When you fill out this field, the system automatically calculates the Sales Price field.
Example: A price list is registered in the following situation: Product Computer; Base Price $1,000.00; Discount Value $100.00; Factor 0.90 (10% discount on the base price); Sales Price $900.00 (Base Price - Discount Value) The discount value determines the sales price, because it is calculated on the Base Price of the product. | |||||
| Factor | This field determines the factor on the Base Price of the product. The system enters or calculates it when you fill out the field Discount Value. When entered, the system calculates the sales price based on the factor. When the factor is entered, the sales price is calculated. | |||||
State | Enter the State in which the Price List registered is valid.
| |||||
| Type of Operation | In this field, select the type of operation performed: 1-State - Determines that the Price List is only valid for customers inside the State defined in parameter MV_ESTADO. 2-Interstate - Determines that the Price List is valid for all States, except the State set in parameter MV_ESTADO. 3-North and Northeast Indicates that the Price List is valid only for regions North and Northeast. 4-All - Indicates that the Price List is valid for all States of table 12 - Federative Unit.
| |||||
| Range | Enter the maximum quantity of products for a given price list. This information is useful to link the price to a given sales quantity. Example: The higher the number of products sold, the lower the price. | |||||
| Activation and Deactivation of Records | The purpose of the reserved field called Status is to allow the activation or deactivation of records, preventing the application from using the inactive ones. 1. Field initialization is always as Active and shows the options Active and Inactive. 2. When the content of the field is set to Inactive, it means the record is blocked, and it is shown in the browser with a different color. | |||||
| E-commerce | The option to send multiple price lists to CiaShop E-commerce, is implemented by marking the field e-commerce
| |||||
| Product Code | Use the magnifying glass or the F3 key to view the default query and set the product code. Example: Default Product | |||||
| Group | Use the magnifying glass or the F3 key to view the default query and set the product code. Example: 0002 Be mindful that the field has a trigger. If you fill out the group, the product is erased. You must enter either one or the other.
| |||||
| Grid Ref./CFG | The Grid Reference family code lets you use the routine practically, reducing the need to repeatedly register products with the same Grid Reference / Configurator. | |||||
| Validity | Use the calendar next to the field or enter the date in format DD/MM/YYYY with the validity date of the pricelist in use. | |||||
| Maximum Price | Enter the maximum price for the specified price list. |
01. OVERVIEW
Use this routine to configure or perform maintenance on a Price List and compose various sales types, considering specific sales terms for one or for multiple products, using distinct criteria, such as region and price range.
To compose the discounts and sales price to be applied, the System refers to the product price, set in its register through field Sales Price.
Example
Item | Product Code | Product Disc. | Base Price | Sales Price | Discount Val. | Factor | State | Range |
001 | 000001 | Computer | 1,000.00 | 900.00 | 100.00 | 0.90 | SP | 500.00 |
002 | 000001 | Computer | 1,000.00 | 850.00 | 150.00 | 0.85 | SP | 999,999.99 |
In the above example, the Computer product gets a 10% discount on its base price when 500 units are sold, in the State of Sao Paulo. Above 500 units, it gets a 15% discount.
Besides defining List items as shown above, you can also use the System to determine the validity periods, by date and time intervals, as well as specify a payment term.
Price Lists are identified on the grid, Active Tab column, as follows:
- Active List: active lists are those within the period selected.
- Inactive List: a list becomes inactive when its expiration date is exceeded.
- Special Active List: indicates that the user has changed the expiration of the list.
Registration of Short Period Sales
The price list (DA0 and DA1) can register the following information:
DA0 – Header
- Start Date and Time / End Date and Time of Validity;
- Time Type: Single / Recurring;
- List Active: Yes / No.
DA1 – Items
- Product or Product Group;
- Base Price (automatically returns the value used in field Sales Price);
- Sales Price (value to be effectively used in sale);
- Discount / Factor (to be applied in field Sales Price);
- Active (if this product is active in grid);
- State;
- Type of Operation (State / Interstate, and others);
- Range / Currency;
As the payment method and terms are only set at the end of the concomitant sales process, in modules Store Control and Point of Sales, only price lists that lack definitions for these data are taken into account. The fields for payment method and terms become hidden in the Store Control module on the Price List registration screen.
In Assisted Sales and Point of Sales, only the State operation type is handled.
Possible Scenarios | |
Description | Action |
A single price list with product being entered at sale. | The rule set in the price list is used and applied to the value of the product item. |
The product exists in more than one active price list. | It is set by the parameter that defines whether the product value must be selected by the criterion of highest or of lowest value found in the search and applied to the value of the product item. |
No active price list is found for the product. | The sale value of the product is the one registered in the product (field Sale Price). |
There is no price list available for the product and the sale price registered in the product is 0 (zero). | The application notifies that this product cannot be registered, because it lacks a set sale value. |
| Informações | ||
|---|---|---|
| ||
|
Product Grid Interface
The grid resource speeds up the registration of products that vary only in a few aspects, keeping their main characteristics.
Thus, you do not need to register the same product multiple times only because the product has various characteristics; that is, you only need to register the main product and all its variants, such as: color, model, etc. This enables Protheus to automatically register all product variants.
| Informações | ||
|---|---|---|
| ||
| To use the Product Grid resource, you need to set parameter MV_GRADE = T, thus activating the use of the product grid. |
Activation and Deactivation of Records
The purpose of the reserved field called Status is to allow the activation or deactivation of records, preventing the application from using the inactive ones.
E-Commerce
The option to send multiple price lists to CiaShop E-commerce, is implemented by marking the field E-commerce.
| Informações | ||
|---|---|---|
| ||
|
Connections
Use this feature to identify the relationship between the records created in CRM, which are Suspect, Prospect, Customer, Contacts, Competitors, Suppliers, Partners, Opportunities, Proposals, Sales Orders, Invoices, Products, Price Lists, Sales Process, Sales Representatives, Business Unit, Sales Team, Promotions and Events.
The connection centralizes data on the relationship between an entity and another, making it easier to query them. Through this feature, you can, for example, link data from one Customer to the other, entering the function of the connection. For example: partner, associate, influencer, etc.
If you cannot find a feature that best fits your needs, you can register other connection features and associate them with the corresponding features; that is, when you register the feature "Uncle/Aunt", the corresponding feature will be "Nephew/Niece".
In the Connections Register you can also set the start and end dates of the connection.
02. EXAMPLE OF USE
Adding a Price List
- In SIGAOMS, access Updates > Sales Scenarios > Price Lists.
- On the Price List screen, press the F12 key to access the Parameters
- On the Parameters screen, note the parameter Display By?. This parameter indicates whether the screen will be displayed by:
- Product: all lists containing the product selected are displayed. This makes maintenance easier, if you need to edit/view the lists in which the product is found.
We must emphasize that you can only use this option to edit/view the list. - List: when you select this option, you can add various products to the Price List.
- Product: all lists containing the product selected are displayed. This makes maintenance easier, if you need to edit/view the lists in which the product is found.
- Check and confirm the data.
- Then, on the Price List screen, click Add.
- Enter the data required for addition of List.
- Check and confirm the data.
- Press the down arrow to add other products to this Price List.
- You may associate the same product several times in the Price List, generating the application ranges for distinct criteria and prices.
- Press the DEL key to select/deselect an item for deletion.
Editing the Price List
You can edit the Price List for quick editing of prices of a specific product.
- On the Price List screen, press the F12 key to access the Parameters
- On the Parameters screen, enter the required parameters, noting:
- Display By?: defines whether option Edit must be by product or list. If you select List, all the data on the list selected for editing are displayed (default option). If you select Product, all the lists containing this product are displayed.
- Product?- If the option Display by Product is selected, enter the code of the product you want displayed for editing.
- Check and confirm the data.
- Click Edit.
- A window is displayed for editing, in accordance with parameter settings.
- If the editing parameters are set by Product, all lists with which it is associated are listed.
- Configure and confirm the changes.
Copying the Price List
- On the Price List screen, select the List you want to copy.
- Click Other Actions/Copy.
- Then the Price List - Copy screen is displayed, in which all fields are filled out, just as they were filled out for the List selected.
- Enter the Code and Description of the new List you want to add.
- You can also edit the other fields, if needed.
- Check and confirm the data.
Creating a Price List from the Product Register
- On the Price List screen, click Other Actions / Generate.
- On the Parameters screen, select the data to generate the List.
- Check and confirm the data.
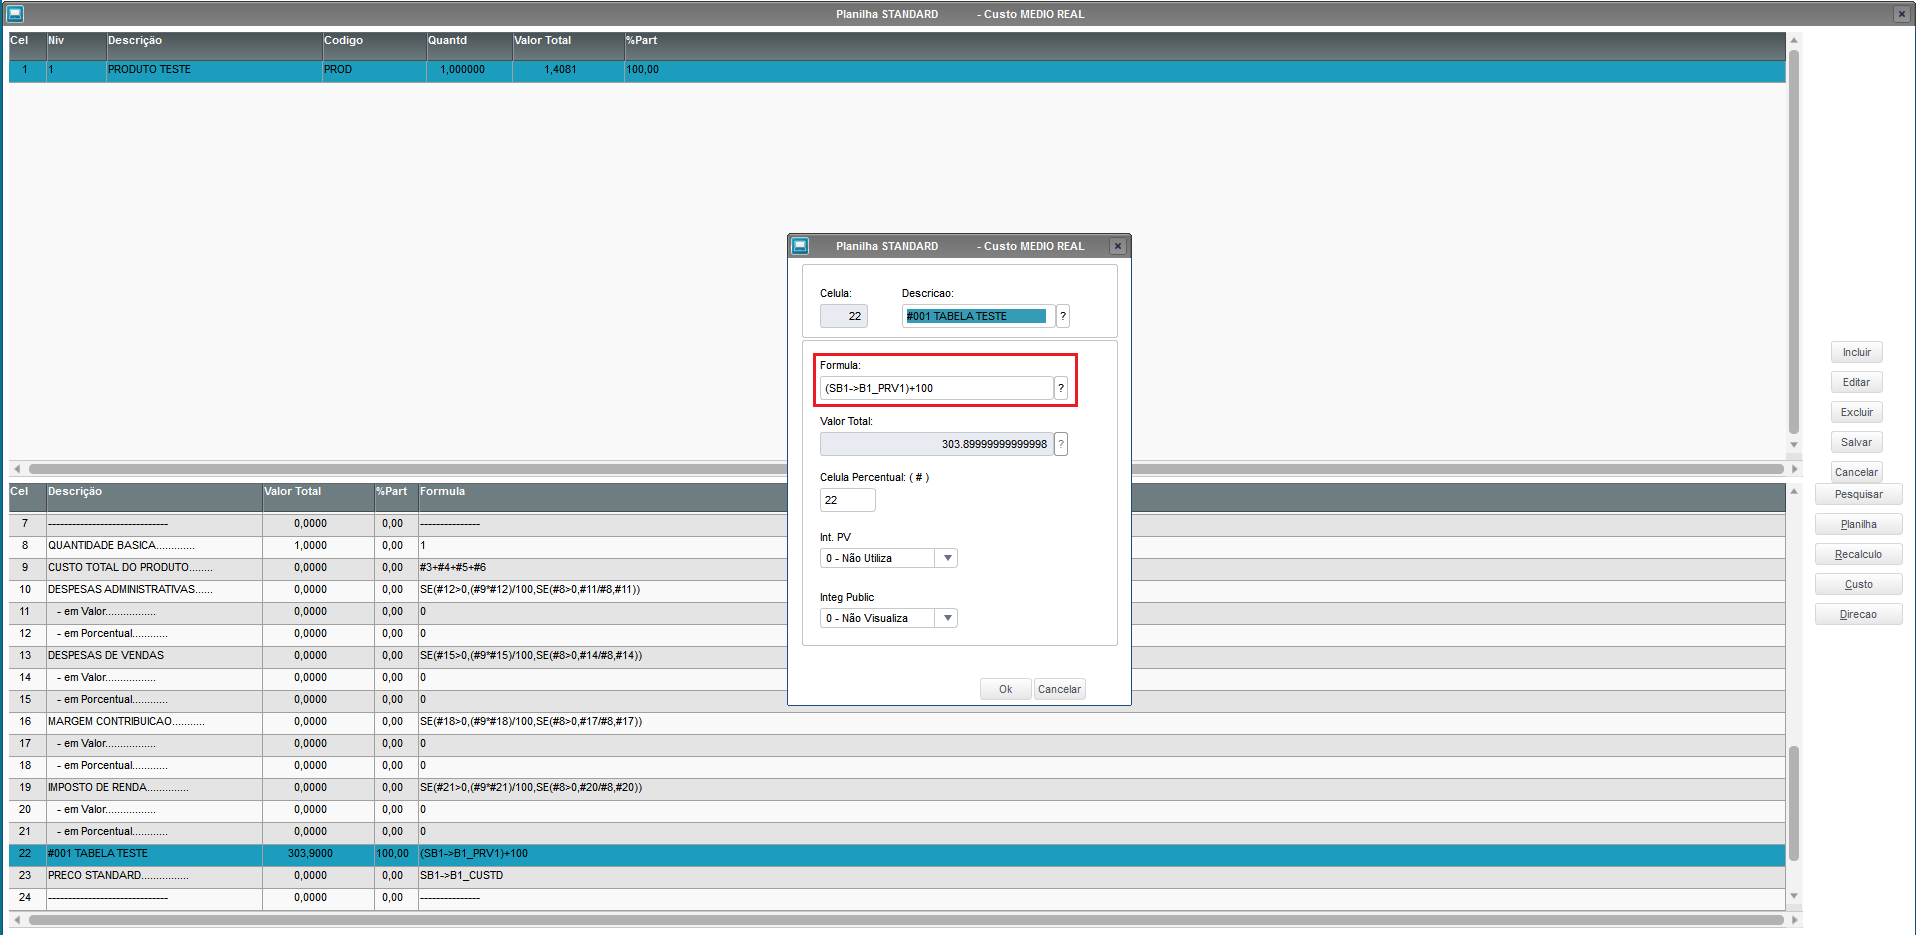
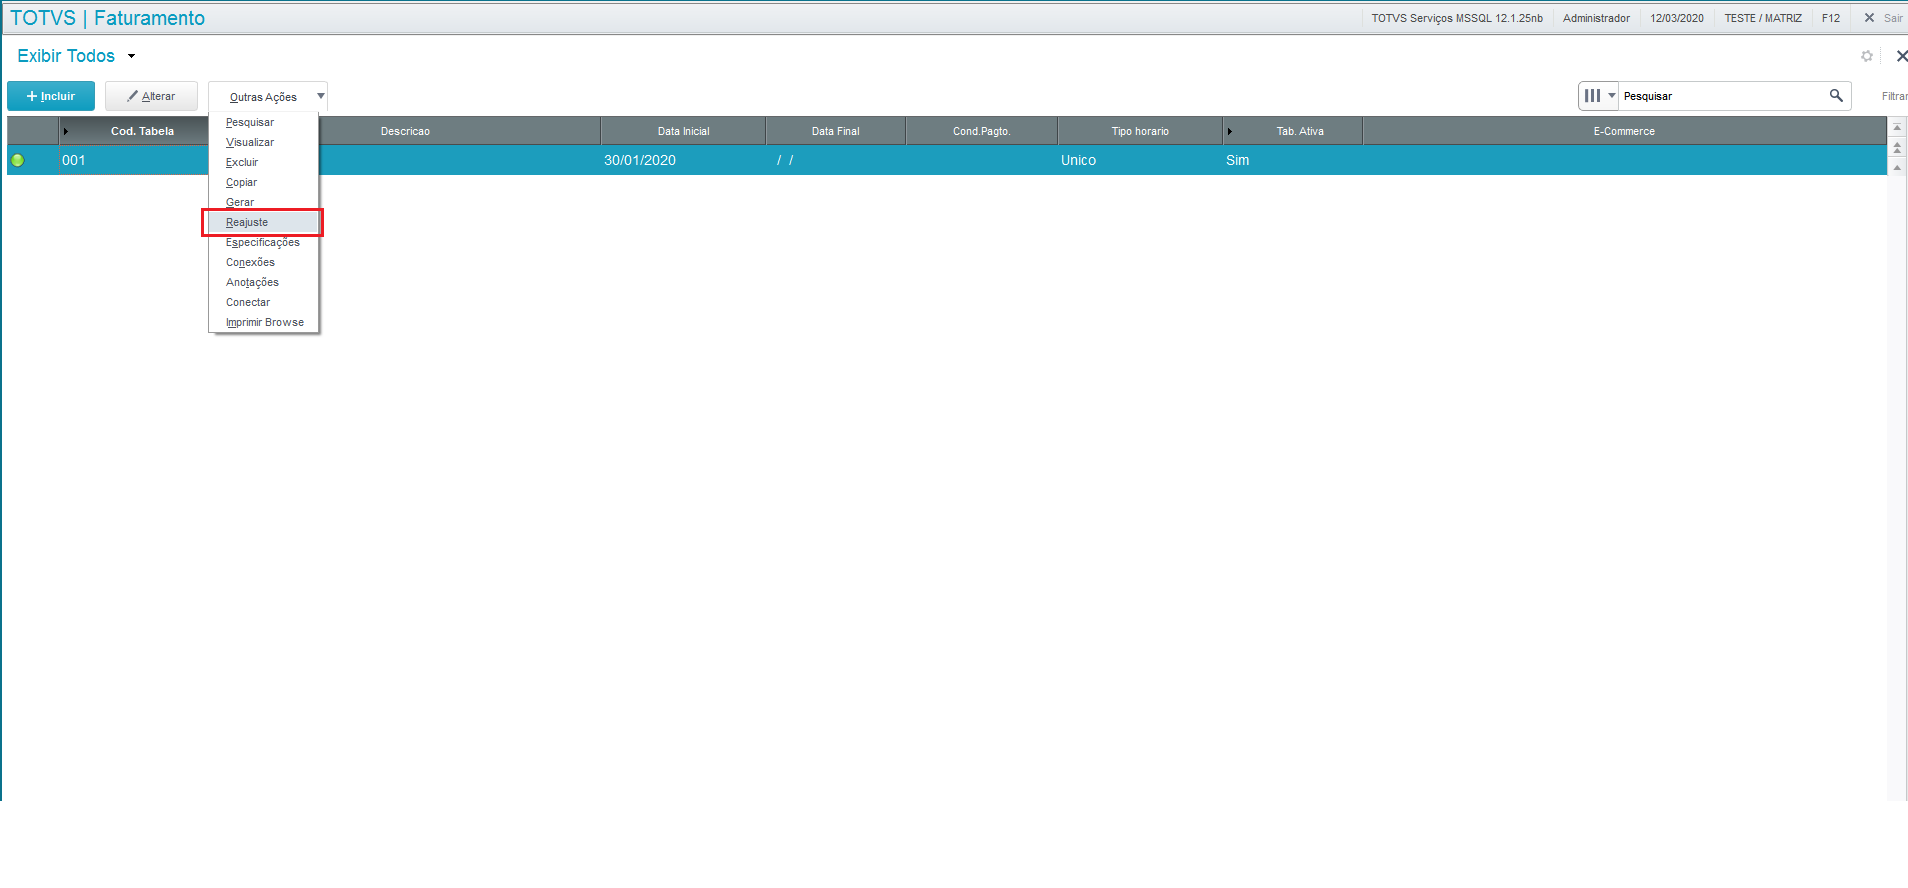
Adjusting the Price List
- On the Price List screen, click Other Actions / Adjustment.
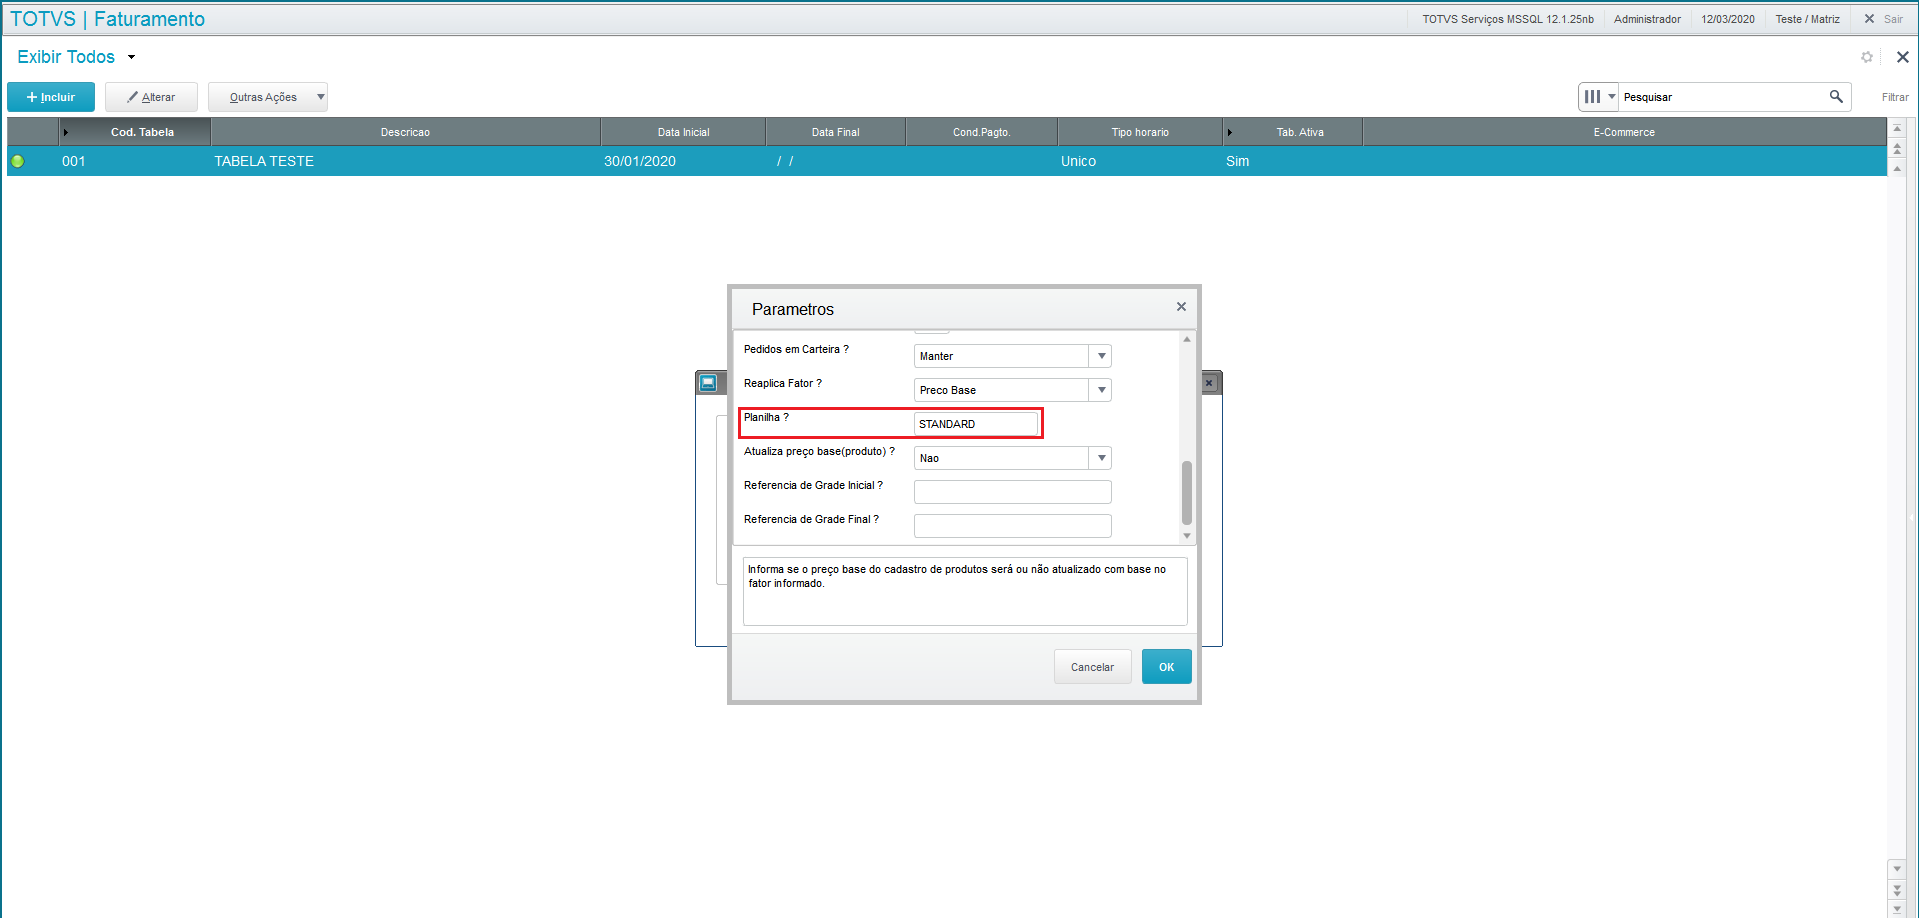
- Click Parameters.
- Setting the parameters displayed on the Parameters screen is self-explanatory; however, you should pay attention to the following data.
- Adjustment Factor?: enter the price adjustment factor. You get the new values by applying this factor.
- Number of Decimal Places?: enter the quantity of decimal places to be used when saving the new price.
Example: if you enter 0 (zero) and the calculation of the new value is 46.74, the system saves 46.00 disregarding the cents. - Reapply Factor? Define how to apply the multiplication factor for the adjustment calculation:
- Option Base Price: applies the formula: Base Price x Multiplication Factor x Factor.
- Option Price List: applies the formula: Sales Price x Multiplication Factor.
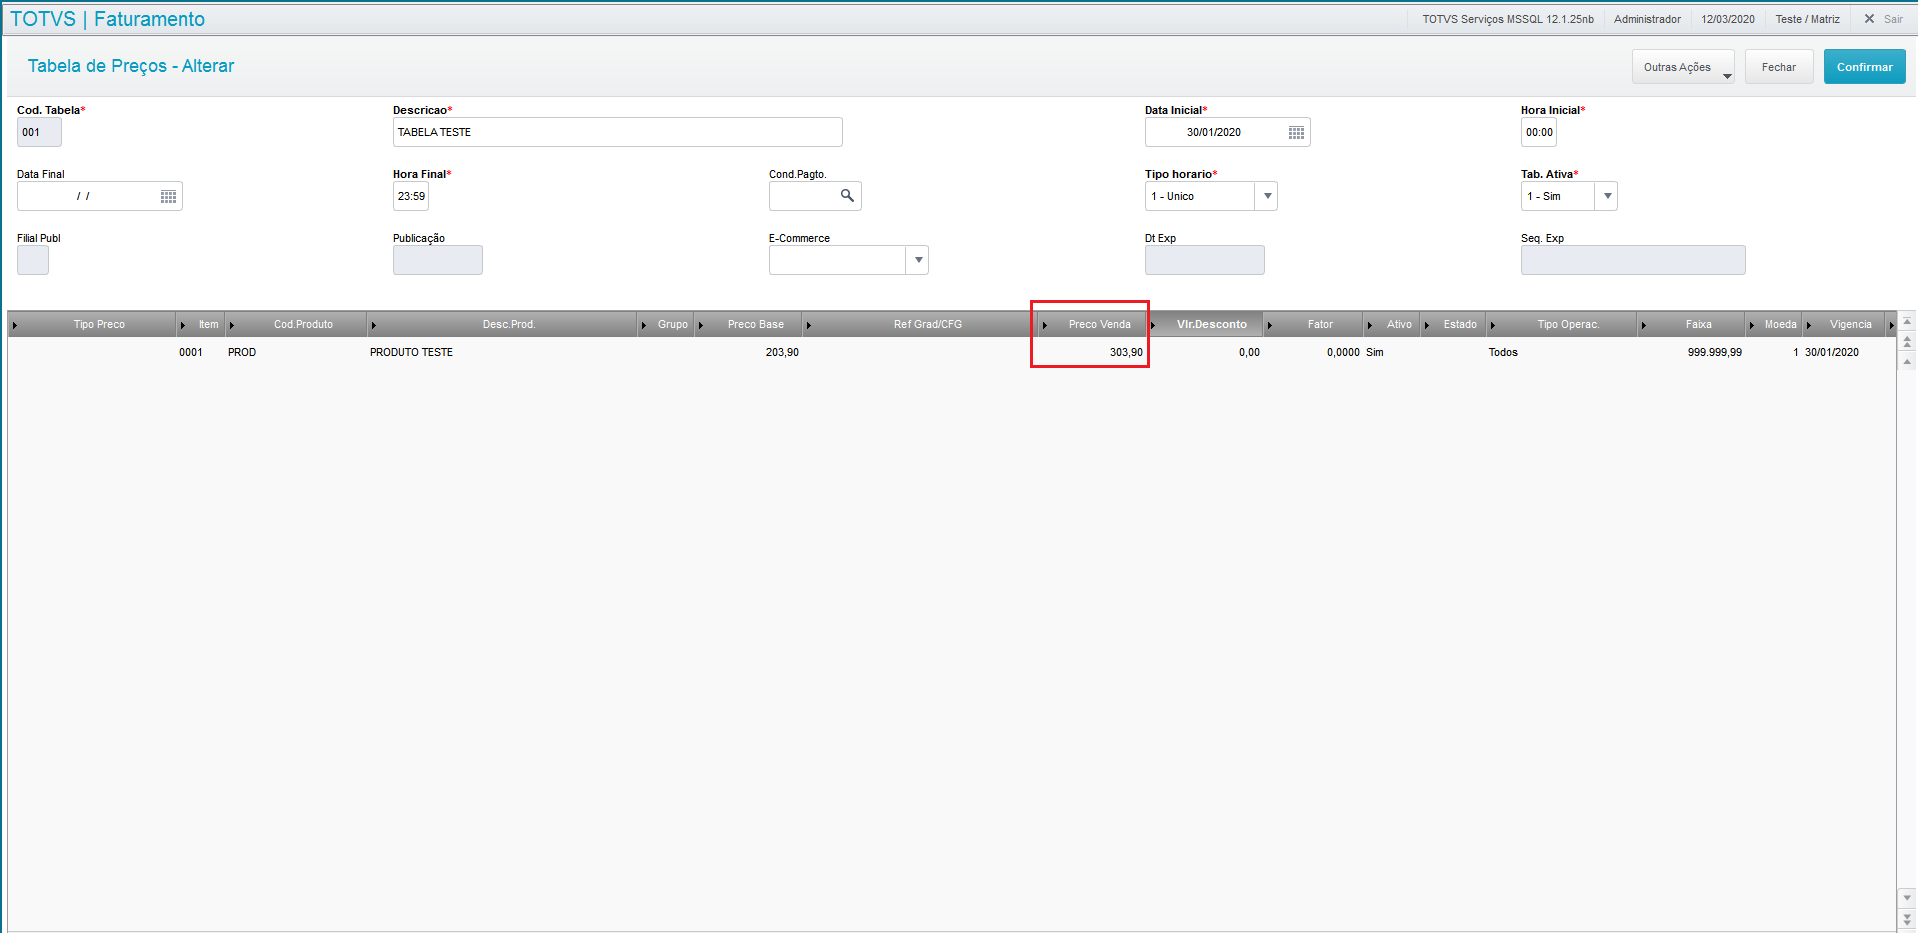
- Check and confirm the data.
- The lists are adjusted in accordance with parameter settings.
Configuring the Header of the Price List Registered in the CiaShop E-Commerce
- In Store Control, access Price List and register the Price List, filling out the following fields:
- List Code: enter the contents of field ERP Code registered in E-Commerce.
- E-Commerce: enter whether the list is active or inactive.
- Enter the other fields of the header
- On the grid, fill out the following fields:
- Product Code: enter the code of the E-Commerce product.
- Sales Price: enter the sales price.
- Validity: enter the date of price publication.
- Enter the other information and confirm it.
- Access CiaShop Services Monitor.
- Check whether the Variable Price List service was successfully executed.
- Select the option Log to view the history of the execution of the service and its results.
- Select the option Detail to view the products updated.
| Informações | ||
|---|---|---|
| ||
|
Using the Product Grid Resource in Sales Price List
- Select the option Price List and add a Price List for a grid reference product.
- To check the application of the Price List, select the option Sales Orders.
- Add a Sales Order for a product (full code) of the associated grid family.
- Enter the list code in the header of the Order.
| Informações | ||
|---|---|---|
| ||
| For further details, access: Product Grids (MATA550 - SIGAEST). |
Configuring the Note
- In Related Features, click Notes.
- On the upper menu, you can Filter, Search, Print and Configure.
- The lower menu displays five options: Edit, Add, View, Environment and Related Features.
- When you view a registered note, the data displayed are: Code of Note, Code of User who created the note, User Name, Note Edit Date, Note Addition Date, Title, Contents and Attachments.
Using the Product Grid Resource in Sales Price List
- Select the option Price List.
- Add a Price List for a grid reference product.
- To check the application of the Price List, select the option Sales Orders.
- Add a Sales Order for a product (full code) of the associated grid family.
- Enter the List code in the header of the Order.
| Informações | ||
|---|---|---|
| ||
| See also Product Grids (MATA550 - SIGAEST) |
Activating/Deactivating Records
- Field initialization is always as Active and shows the options Active and
- When the content of the field is set to Inactive, it means the record is blocked, and it is shown in the browser with a different color.
Configuring the Header of the Price List Registered in the CiaShop E-Commerce
- In Store Control, access Price List and register the price list, filling out the following fields:
- List Code: enter the contents of field ERP Code registered in E-Commerce.
- E-Commerce: enter whether the list is active or inactive.
- Fill out the other fields of the header
- On the grid, fill out the following fields:
- Product Code: Enter the code of the E-Commerce product;
- Sales Price: Enter the Point of Sale.
- Validity: Enter the date of price publication.
- Enter the other information and confirm it.
- Access CiaShop Services Monitor.
- Check whether the Variable Price List service was successfully executed.
- Select the option Log to view the history of the execution of the service and its results.
- Select the option Detail to view the products updated.
Configuring the Connection
- In Related Features, click Add.
- On the Connections Register screen, the data on entity, code and name of the connector are loaded automatically.
- Fill out the fields Connection Function, Function Description, Connected Entity Type, Entity Type Description, Connected Entity Code, Entity Description, Note and Start and End Dates.
- The field Connection Functions is filled out through a standard query.
- After filling out the function, the field Corresponding Function is automatically filled out. If there is more than one, select the one that best meets your needs.
- If you need to register a new function, click Edit.
- The function code is automatically loaded in sequential form.
- Fill out the fields Name, Category, Note, Status, Relationship with the Entity and Association of Corresponding Function.
- In the corresponding functions register, there is a standard query listing the functions already registered.
- The connections query browser has a Disconnect option, which undoes the relationship links of registro.END.
03. PRICE LIST SCREEN
Other Actions / Related Features
Action | Description |
Add | Allows access to the screen Price List - Add, in which you can add a new record. |
Edit | Allows access to the screen Price List - Edit, in which you can edit the parameters set for the record selected. |
Search Product in List | Use this feature to search a given record in Lists having a large number of items, through any field of the screen. |
Notes | Use this feature to add, edit or delete comments or notes related to records of the following entities: |
Other Actions > View | Allows access to the screen Price List - View, which displays the parameters set for the record selected in detail. |
Other Actions > Delete | Use this feature to delete the record selected. |
Other Actions > Copy | You can access the Price List - Copy, in which you can create new Price Lists from the List selected, when these have items in common. This option enables registration of Lists with similar characteristics like common items, to avoid having to retype them. The system displays all the fields that were configured for a specified list, earlier selected in the maintenance Price List screen, thereby enabling registration of a new list. In this option you may duplicate List items, which requires adjusting the List header at each duplication. |
Other Actions > Generate | Use this feature to access the screen Price List - Generate, in which you can use a record as reference to create another. When you select products on the routine's Parameters screen, the System displays, in Price List items, all product data already entered; however, you must enter the List header items. In the Validity field you can set the date from which the item on the list is valid, though this field is not required. For price list validity purposes, the System always takes into account the data found in fields Start Date/Time and End Date/Time; however, the List items may have later validity dates. |
Other Actions > Adjustment | Use this option to apply a multiplication factor to adjust the prices of products from lists specified in parameters. |
04. PRICE LIST SCREEN - ADD
Main Fields and Parameters
| Field | Description | |||||
|---|---|---|---|---|---|---|
| List Code | Use this code to identify the Price List you are registering. | |||||
| Description | Use this description to identify the Price List you are registering. | |||||
Start Date/Time | These fields determine the Price List validity schedule and are often used in companies that have Flash Sales. Example:
| |||||
| Paymt Term | Payment term valid for application to the Price List being registered. Thus, when you add the Sales Order, only the payment term entered in the Price List is used. Otherwise, a warning is issued notifying that the term is not valid for the List selected. | |||||
| Schedule Type | Type of schedule to be applied to the Price List, which can be: 1-Single: the Price List is valid from the start date (start time) to the end date (end time). 2-Recurring: the Price List is valid between the two dates only between the start time and the end time. | |||||
| Active List | Enter whether the List is active in the system: 1 - Yes2 - No | |||||
| E-Commerce | Enter whether multiple lists will be sent to the CiaShop E-commerce, by marking this field: 1 - Active
| |||||
| Product Code | Product Code for Price List composition. | |||||
| Group | Use this field to control the Price List by product or by product group. To control it by group, in the Product register, enter the group to which the product belongs. If you enter, in the List, the price of the product as well as the price for the group to which it belongs, the System assumes the price of the product, not that of the group. | |||||
Base Price | The base sale price of a product is defined in its register, through field Sales Price. When you add a Price List, the system offers the base price entered, and fields Sales Price and Discount Value always use the base price of the product as reference. However, you can fill out field Sales Price directly, if it has not been registered already. | |||||
| Grid Ref./CFG | Code of grid reference family, which lets you use the routine practically, reducing the need to repeatedly register products with the same reference of grid/configurator. | |||||
| Sales Price | Sales price used for a product in the Price List, from the applied factors and discounts. Example:
| |||||
| Discount Val. | Discount value to be applied on the base price of the product. Example:
The discount value determines the sales price, because it is calculated on the base price of the product.
| |||||
| Factor | Specifies the factor to be applied on the base price of the product and can be entered or calculated by the system when the field Discount Value is filled out. When entered, the System calculates the Sales Price based on the Factor. | |||||
| Active | Enter whether the factor at issue is: 1 - Active | |||||
| State | Federation Unit in which the Price List registered is in effect.
| |||||
| Tipo Operac. | The type of operation in which the price is valid: 1 - State: the Price List is valid only for customers within the State, as set in parameter MV_ESTADO.
| |||||
| Range | Maximum quantity of products for which the Price List is valid. Example:
| |||||
| Currency | Code of valid currency for the Price List. | |||||
| Validity | Validity date of item that composes the Price List. | |||||
| Maximum Price | Maximum price of product. | |||||
| Price Type | Identification of price type, which can be: 1 - Sales Price2 - Consumer Sale |
05. PARAMETERS
Billing Environment
- MV_ESTADO
Product Grid
- MV_GRADE
06. TABLES
- DA0 - Price List
- DA1 - Price List Items
- SB1 – Products
- SE4 - Payment Terms
| Informações | ||
|---|---|---|
| ||
|
Interface Para a Grade de Produtos
O recurso de grade agiliza o trabalho de cadastramento de produtos que variam em apenas alguns aspectos, mantendo a sua característica principal.
...
| Informações | ||
|---|---|---|
| ||
| Para utilizar o recurso de Grade de Produtos é necessário configurar o parâmetro MV_GRADE= T, ativando assim, o uso da grade de produtos. |
Ativação e Inativação de Registros
O objetivo do campo reservado denominado Status é permitir a ativação ou a desativação de registros, evitando que os inativos permaneçam em uso na aplicação.
E-Commerce
Implementada a opção de envio de múltiplas tabelas de preço para E-commerce CiaShop, mediante a sinalização do campo E-commerce.
| Informações | ||
|---|---|---|
| ||
|
Conexões
Permite identificar o relacionamento entre cadastros efetuados no CRM, sendo eles de Suspect, Prospect, Cliente, Contatos, Concorrentes, Fornecedores, Parceiros, Oportunidades, Propostas, Pedidos de vendas, Notas Fiscais, Produtos, Tabelas de Preço, Processo de Vendas, Vendedores, Unidade de Negócio, Equipe de Vendas, Campanhas e Eventos.
A conexão centraliza informações sobre o relacionamento de uma entidade com outra e facilita as consultas. Por meio dessa funcionalidade, é possível, por exemplo, atrelar informações de um Cliente para o outro, informando qual a função da conexão, por exemplo: parceiro, sócio, influenciador, entre outros.
Caso não encontre uma função que se enquadre à sua necessidade é possível realizar o cadastro de outras funções de conexão e relacioná-las com as funções correspondentes, ou seja, ao cadastrar a função “Tio/Tia”, a função correspondente será “Sobrinho/Sobrinha”.
No Cadastro de Conexões também é possível delimitar as datas de início e fim da conexão.
02. EXEMPLO DE UTILIZAÇÃO
Incluir uma Tabela de Preços
No SIGAOMS, acesse Atualizações > Cenários de Vendas > Tabelas de Preços.
Na tela Tabela de Preços, pressione a tecla F12 para acessar a tela Parâmetros.
Na tela Parâmetros, observe o parâmetro Demonstrar Por?. Este parâmetro indica se a demonstração da tela será efetuada por:
Produto: serão apresentadas todas as tabelas que contém o produto selecionado. Isto facilita a manutenção, caso seja necessário alterar/visualizar em quais tabelas o produto está contido.
É importante ressaltar que esta opção permite apenas a alteração/visualização da tabela.Tabela: quando selecionada esta opção poderão ser incluídos vários produtos na Tabela de Preços.
Confira os dados e confirme.
Em seguida, na tela Tabela de Preços, clique em Incluir.
Informe os dados necessários para a inclusão da Tabela.
Confira os dados e confirme.
Pressione a seta para baixo para incluir outros produtos nesta Tabela de Preços.
O mesmo produto pode ser relacionado diversas vezes na Tabela de Preços, gerando as faixas de aplicação de preços e critérios diferenciados.
Utilize a tecla DEL para marcar/desmarcar um item para exclusão.
Alterar a Tabela de Preços
A alteração da Tabela de Preço pode ser efetuada para agilizar a edição de preços de um produto específico.
- Na tela Tabela de Preços, pressione a tecla F12 para acessar a tela Parâmetros.
- Na tela Parâmetros, informe os parâmetros necessários, observando:
- Demonstrar por?: define se a opção Alterar deve ser por produto ou tabela. Se selecionado Tabela, na alteração serão apresentados todos os dados da tabela posicionada para edição (opção padrão). Se selecionado Produto, na alteração serão relacionadas todas as tabelas que possuírem este produto.
- Produto? - se selecionada a opção Demonstrar por Produto, informe o código do produto que deve ser apresentado para alteração.
Confira os dados e confirme.
Clique em Alterar.
Será apresentada a tela para alteração, conforme a parametrização definida.
Se a alteração foi parametrizada por Produto serão relacionadas todas as tabelas com as quais este está associado.
Configure as alterações e confirme.
Copiar a Tabela de Preços
Na tela Tabela de Preços, selecione a Tabela que será copiada.
- Clique em Outras Ações > Copiar.
- Em seguida é apresentada a tela Tabela de Preços - Copiar, na qual constam todos os campos preenchidos, da mesma forma como foram preenchidos para a Tabela selecionada.
- Informe o Código e a Descrição da nova Tabela a ser incluída.
- Os demais campos também podem ser alterados, se necessário.
- Confira os dados e confirme.
Gerar a Tabela de Preços a Partir do Cadastro de Produtos
- Na tela Tabela de Preços, clique em Outras Ações > Gerar.
- Na tela Parâmetros, selecione as informações para a geração da Tabela.
- Confira os dados e confirme.
Reajustar a Tabela de Preço
Na tela Tabela de Preços, clique em Outras Ações > Reajuste.
Clique em Parâm.
Os parâmetros apresentados na tela Parâmetros possuem preenchimento autoexplicativo, no entanto, devem ser observados os dados descritos a seguir.
Fator de Reajust?: informe o fator de reajuste dos preços. Os novos valores serão obtidos a partir da aplicação deste fator.
Número de Decimais?: informe a quantidade de número de decimais que deve ser considerada na gravação do novo preço.
Exemplo: se informado 0 (zero) e o cálculo do novo valor for 46,74, será gravado 46,00, desconsiderando os centavos.Reaplica Fator? Define como deve ser aplicado o fator de multiplicação para o cálculo do reajuste:
Opção Preço Base: será aplicada a fórmula: Preço Base x Fator de Multiplicação x Fator.
Opção Preço Tabela: será aplicada a fórmula: Preço Venda x Fator de Multiplicação.
Confira os dados e confirme.
As tabelas serão reajustadas de acordo com a parametrização configurada.
Configurar o Cabeçalho da Tabela de Preço Cadastrada no E-Commerce CiaShop
No Controle de Lojas, acesse Tabelas de Preço e efetue o cadastro da Tabela de Preço, preenchendo os seguintes campos:
Cód Tabela: informe o conteúdo do campo Código ERP cadastrado no E-Commerce.
E-Commerce: informe se a tabela está ativa ou inativa.
Informe os demais campos do cabeçalho
Na grade, preencha os seguintes campos:
Cód. Produto: informe o código do produto E-Commerce.
Preco Venda: informe o preço de venda.
Vigência: informe a data de publicação do preço.
Informe os demais dados e confirme.
Acesse Monitor Serviços CiaShop.
Verifique se o serviço de Tabela de Preço Variante foi executado com sucesso.
Selecione a opção Log, para visualizar o histórico de execuções do serviço e seu resultado.
Selecione a opção Detalhe para visualizar os produtos que foram atualizados.
| Informações | ||
|---|---|---|
| ||
|
Utilizar o Recurso Grade de Produtos na Tabela de Preços de Vendas
- Selecione a opção Tabela de Preço e inclua uma Tabela de Preço para um produto referência de grade.
- Para verificar a aplicação da Tabela de Preços, selecione a opção Pedidos de Venda.
- Inclua um Pedido de Venda para um produto (código completo) da família de grade relacionada.
- Informe o código da tabela no cabeçalho do Pedido.
| Informações | ||
|---|---|---|
| ||
| Para obter mais detalhes, acesse: Grades de Produtos (MATA550 - SIGAEST). |
Configurar a Anotação
Em Ações Relacionadas, clique em Anotações.
No menu superior é possível Filtrar, Pesquisar, Buscar, Imprimir e Configurar.
O menu inferior apresenta cinco opções: Alterar, Incluir, Visualizar, Ambiente e Ações Relacionadas.
Ao visualizar uma anotação cadastrada, as informações exibidas são: Código da Anotação, Código do Usuário que gerou a anotação, Nome do Usuário, Data de Modificação da Anotação, Data de Inclusão da Anotação, Título, Conteúdo e Anexos.
Utilizar o Recurso Grade de Produtos na Tabela de Preços de Vendas
- Selecione a opção Tabela de Preço.
- Inclua uma Tabela de Preço para um produto referência de grade.
- Para verificar a aplicação da Tabela de Preços, selecione a opção Pedidos de Venda.
- Inclua um Pedido de Venda para um produto (código completo) da família de grade relacionada.
- Informe o código da Tabela no cabeçalho do Pedido.
| Informações | ||
|---|---|---|
| ||
| Veja também Grades de Produtos (MATA550 - SIGAEST) |
Ativar/Inativar os Registros
- A inicialização do campo é sempre como Ativo e apresenta as opções Ativo e Inativo.
- Quando o conteúdo do campo estiver preenchido como Inativo, significa que o registro está bloqueado e é exibido no browse com uma cor diferente.
Configurar o Cabeçalho da Tabela de Preço Cadastrada no E-commerce CiaShop
No Controle de Lojas, acesse Tabelas de Preço e realize o cadastro da tabela de preço, preenchendo os seguintes campos:
Cód Tabela: informe o conteúdo do campo Código ERP cadastrado no E-commerce.
E-commerce: informe se a tabela está ativa ou inativa.
Preencha os demais campos do cabeçalho.
Na grade, preencha os seguintes campos:
Cod. Produto: Informe o código do Produto E-commece.
Preco Venda: Informe o Preço de Venda.
Vigência: Informe a data de publicação do preço.
Preencha os demais dados e confirme.
Acesse Monitor Serviços CiaShop.
Verifique se o serviço de Tabela de Preço Variante foi executado com sucesso.
Selecione a opção Log, para visualizar o histórico de execuções do serviço e seu resultado.
Selecione a opção detalhe para visualizar os produtos que foram atualizados.
Configurar a Conexão
Em Ações Relacionadas, clique em Incluir.
Na tela Cadastro de Conexões, os dados de entidade, código e nome do conector são carregados automaticamente.
Informe os campos Função da conexão, Descrição da função, Tipo da entidade conectada, Descrição do tipo da entidade, Código da entidade conectada, Descrição da entidade, Observação e Datas de início e fim.
O campo Funções da Conexão é preenchido por meio de uma consulta padrão.
Após o preenchimento da função, o campo Função Correspondente é preenchido automaticamente. Se houver mais de uma, selecione a que melhor atenda a sua necessidade.
Se for necessário cadastrar uma nova função, clique em Alterar.
O código da função é carregado automaticamente, de forma sequencial.
Informe os campos Nome, Categoria, Observação, Status, Relacionamento com a Entidade e Associação da Função Correspondente.
No cadastro de funções correspondentes há uma consulta padrão listando as funções que já estão cadastradas.
No browse de consulta de conexões há a opção Desconectar, que desfaz os links de relacionamento do registro.END
03. TELA TABELA DE PREÇOS
Outras Ações / Ações Relacionadas
...
Permite acessar a tela Tabela de Preços- Alterar, na qual podem ser alterados os parâmetros definidos para o registro selecionado.
Se parametrizada a alteração por Produto serão relacionadas todas as Tabelas com as quais o produto está associado.
...
Permite pesquisar um determinado registro em Tabelas que possuem um número grande de itens, sendo que esta pesquisa pode ser efetuada por qualquer campo da tela.
...
Permite incluir, alterar ou excluir os comentários ou observações relativas aos registros das seguintes entidades:
CRM Suspects, Clientes, Prospects, Contatos, Concorrentes, Vendedores, Oportunidades, Propostas, Pedidos, Fornecedores, Parceiros, Produtos, Tabela de Preço, Processo de Venda, Unidade de Negócio, Equipe de Vendas, Campanha e Eventos.
...
Permite eliminar o registro selecionado.
Esta operação não poderá ser desfeita após ser confirmada a exclusão.
...
Permite acessar a tela Tabela de Preços - Copiar, na qual é possível gerar novas Tabelas de Preços a partir da Tabela selecionada, quando estas possuírem itens em comum.
Esta opção facilita o cadastramento de Tabelas com características semelhantes, como itens em comum, para que não seja necessário redigitá-los.
O Sistema apresenta todos os campos de acordo com a configuração para uma determinada tabela, previamente selecionada na tela Tabela de Preços, possibilitando o cadastramento da nova tabela.
Nesta opção é efetuada a duplicação dos itens da Tabela, por isso é necessário ajustar o cabeçalho da Tabela a cada duplicação.
...
Permite acessar a tela Tabela de Preços - Gerar, na qual um registro pode ser utilizado como referência para a criação de outro.
A partir da seleção dos produtos na tela Parâmetros da rotina, o Sistema apresentará, nos itens da Tabela de Preços, todas as informações dos produtos já preenchidas, no entanto, os itens do cabeçalho da Tabela devem ser informados.
O campo Vigência tem como finalidade a informação da data a partir da qual o item da tabela será válido, no entanto, este não é um campo obrigatório.
O Sistema sempre considerará, para efeito de vigência da Tabela de Preços, a informação contida nos campos Data/Hora Inicial e Data/Hora Final, no entanto, os itens da Tabela podem ter datas de vigência posteriores.
...
04. TELA TABELAS DE PREÇOS - INCLUIR
Principais Campos e Parâmetros
...
Data / Hora Inicial
Data / Hora Final
...
Estes campos determinam os horários de vigência da Tabela de Preços e são muito utilizados em empresas que realizam Promoções Relâmpagos.
Exemplo:
- Caso uma empresa tenha determinado uma promoção cuja vigência é do dia 20/09/18, das 9h às 10h.
- O campo Hora Inicial deve ser preenchido com 09:00 e o campo Hora Final com 10:00. Com isso, as vendas efetuadas a partir das 10h01min do dia 20/09/18 não poderão mais participar da promoção desta Tabela de Preço.
| Informações | ||
|---|---|---|
| ||
| Na inclusão do Pedido de vendas, a data considerada para validação da Tabela de Preços é a data de emissão do Pedido de Vendas, e não a data base do Sistema. |
...
Condição de pagamento válida para aplicação na Tabela de Preços que está sendo cadastrada. Com isso, na inclusão do Pedido de Vendas será consistida apenas a condição de pagamento informada na Tabela de Preços.
Caso contrário, será emitido um aviso de que a condição é inválida para a Tabela selecionada.
...
Tipo de horário a ser aplicado na Tabela de Preços, o qual pode ser:
1 - Único: a Tabela de Preços será válida da data de início (hora inicial) até a data final (hora final).
Neste caso, supondo que a Tabela tenha sido cadastrada de 17/09 às 10h até 20/09 às 20h, todos os pedidos de venda que entrarem neste período poderão utilizar esta tabela.
2 - Recorrente: a Tabela de Preços é válida entre as duas datas, somente entre a hora inicial e a hora final.
Usando o exemplo acima, os pedidos somente poderão utilizar a Tabela nos dias do período, dentro do horário informado, ou seja, de 17/09 às 10:0010h até 20/09 às 20h.
Se um Pedido for emitido no dia 18/09 às 21h, o sistema não irá aceitá-lo para esta Tabela de Preços.
...
Indica se a Tabela está ativa no Sistema:
1 - Sim
2 - Não
...
Indica se serão enviadas múltiplas tabelas de preços para E-commerce CiaShop, mediante a sinalização deste campo:
1 - Ativo
2 - Inativo
| Informações | ||
|---|---|---|
| ||
|
...
Este campo permite controlar a Tabela de Preço por produto ou grupo de produtos.
Para efetuar o controle por grupo é necessário que tenha sido informado, no Cadastro de Produtos, o grupo ao qual o produto pertence.
Se for informado na Tabela o preço do produto e o preço para o grupo ao qual ele pertence, o Sistema assumirá o preço do produto e não o do grupo.
...
O preço base da venda de um produto é definido no seu cadastro, por meio do campo Preço Venda.
Na inclusão da Tabela de Preços o sistema disponibiliza o preço base preenchido, sendo que os campos Preço de Venda e Valor do Desconto sempre tomarão como referência o preço base do produto. No entanto, caso não tenha sido cadastrado, pode ser informado diretamente o campo Preço de Venda.
...
Código da família referência de grade, o qual permitirá que a rotina seja utilizada de forma mais prática, diminuindo a necessidade de cadastramento repetitivo para produtos da mesma referência de grade/configurador.
...
Preço de venda praticado para um produto na Tabela de Preços, a partir dos descontos e fatores aplicados.
Exemplo:
Cadastro de uma tabela de preços com a seguinte situação:
- Produto = Computador
- Preço Base = 1.000,00
- Valor do Desconto = 100,00
- Preço de Venda = 900,00 (Preço Base - Valor Desconto)
...
Valor do desconto a ser aplicado sobre o preço base do produto.
Exemplo:
Cadastro de uma tabela de preços com a seguinte situação:
- Produto = Computador
- Preço Base = 1.000,00
- Valor do Desconto = 100,00
- Fator = 0,90 (10% de desconto sobre o preço base)
- Preço de Venda = 900,00 (Preço Base - Valor Desconto)
O valor do desconto determinará o preço de venda, pois será calculado sobre o preço base do produto.
| Informações | ||
|---|---|---|
| ||
|
...
Determina o fator a ser aplicado sobre o preço base do produto e pode ser informado ou calculado pelo sistema quando o campo Valor do Desconto é preenchido.
Quando informado, o Sistema calcula o Preço de Venda baseado no Fator.
...
Indica se o fator em questão está:
1 - Ativo
2 - Inativo
...
Unidade da Federação na qual a Tabela de Preços cadastrada estará em vigor.
| Informações | ||
|---|---|---|
| ||
|
...
Tipo de operação na qual o preço é válido:
1 - Estadual: a Tabela de Preço será válida apenas para clientes dentro do Estado, conforme definido no parâmetro MV_ESTADO.
2 - Interestadual: a Tabela de Preço será válida para todos os Estados, exceto o Estado definido no parâmetro MV_ESTADO.
3 - Norte e Nordeste: a Tabela de Preços será válida apenas para as regiões Norte e Nordeste.
4 - Todos: a Tabela de Preço será válida para todos os Estados da tabela 12 - Unidade Federativa.
| Informações | ||
|---|---|---|
| ||
|
...
Quantidade máxima de produtos para a qual a Tabela de Preços é válida.
Exemplo:
Quanto maior a quantidade de produtos vendidos, menor o preço.
| Informações | ||
|---|---|---|
| ||
| Esta informação é útil quando se deseja vincular o preço a uma quantidade de venda. |
...
Identificação do tipo de preço, que pode ser:
1 - Preço venda
2 - Venda consumidor
3 - Atacado
4 - Varejo
5 - Venda consumidor
05. PARÂMETROS
Ambiente Faturamento
MV_ESTADO
Grade de Produtos
MV_GRADE
06. TABELAS UTILIZADAS
DA0 - Tabela de Preços
DA1 - Itens da Tabela de Preço
SB1 - Produtos
- SE4 - Condição de Pagamento
Visão Geral
Import HTML Content
Conteúdo das Ferramentas
Tarefas