| Card |
|---|
| default | true |
|---|
| id | 1 |
|---|
| label | Price List Maintenance |
|---|
| Find the area specified for price list maintenance at the top of the screen. Click the down arrow to view and/or select from the options: - Display All;
- Active Price Lists;
- Inactive Price Lists;
When you select one of the options above, the system updates the data registered onscreen. The following options are also available, which depend on settings upon activation. - Create View;
- Manage Views.
On this page, click F12 to set the following parameters: - Display by? Select between List or Product;
- Product? Use the magnifying glass next to the field or the F3 key to access the default query and select the product;
- Save list by? Enter whether the list should be saved by product code or by grid reference, when lists are displayed by product (MV_PAR01=2);
|
| Card |
|---|
| Note that when you access the routine, all registered items are displayed. When you select this option at the top of the main screen, the system displays the branch selection screen. Select the branch and click OK to continue. Fill out the data in accordance with the instructions described in Main Fields. The system will not let you duplicate the list code. See also the features available in Other Actions. | Nota |
|---|
| For each Register export, a control sequence is generated in field Exp. Seq. and saved in Field Exp Dt (the date of the last export). Only follow this procedure to register price lists not of types Standard and Promotional. |
|
| Card |
|---|
| Press the [F12] key to perform maintenance in Price Lists. Set parameters in accordance with completion instructions: - Display by? - The options are Product, or List.
When you choose List, all the data on the list selected for editing is displayed (default option). When you choose Product, all the lists containing this product are displayed. - Product? If the option is Display Product, enter the code of the product you wish to view when editing.
Confirm parameter settings and click Edit to continue. A window is displayed for editing, in accordance with parameter settings. Configure and confirm the changes. Adjust the information according to the instructions described in Main Fields. See also the features available in Other Actions. |
| Card |
|---|
| default | true |
|---|
| id | 4 |
|---|
| label | Search |
|---|
| Other Actions / Search Allows the use of filters to order data based on the index selected, considering, for example, branch+code. 
|
| Card |
|---|
| Other Actions / View Place the cursor in the item, then click View to continue. See also the features available in Other Actions. |
| Card |
|---|
| default | true |
|---|
| id | 6 |
|---|
| label | Delete |
|---|
| Other Actions / Delete To delete a registered item, place the cursor to continue and access Other Actions / Delete. View the screen with the message on top saying Are you sure you want to delete the item below? You cannot reverse the confirmation for this action. To complete the deletion, click Confirm. |
| Card |
|---|
| Other Actions / Copy Use this option to create new price lists that have items in common, as well as to register lists with similar characteristics, such as items in common, to avoid retyping them. The system displays all fields in accordance with the settings of a given list, already selected in the maintenance window, so you can copy it. When you activate this option, the system automatically fills out the field List Code with the next numbering available, only duplicating the items on the list, so you need to adjust the header at each duplication. In the search window, enter the item to be copied and confirm it. The system displays the addition screen showing all the fields filled in the same manner as in the list selected. Enter the code and description of the new list and edit/fill out any fields if needed. Check the data and confirm the addition. |
| Card |
|---|
| default | true |
|---|
| id | 8 |
|---|
| label | Generate |
|---|
| Other Actions / Generate Use this option to create a price list based on the Product Register. Select the branch and confirm it. Select the Products, the Groups and also the Types. In the price list items, the system fetches all the data on products already entered; however, you must also enter the list header items. In the Validity parameter you can set the date from which the item on the list is valid, though this field is not required. For price list validity purposes, the system always takes into account the data found in fields Start Date and End Date; however, the list items may have later validity dates. Check and confirm the data. |
| Card |
|---|
| default | true |
|---|
| id | 9 |
|---|
| label | Adjustment |
|---|
| Other Actions / Adjustment Use this option to apply a multiplication factor to adjust the prices of products from lists specified in parameters. Access the option, view the message from the system and click Parameters. Although setting this option's parameters is self-explanatory, you should pay attention to the following data: - Initial Product and Final Product. Use the magnifying glass next to the field or the F3 key to access the default query and define the products.
- Initial Group and Final Group. Likewise, access default query and select the groups.
- Initial Type and Final Type. Access default query and select the types.
- Initial List and Final List. Access default query and select the lists.
- Adjustment Factor? In this field, enter the adjustment factor to be applied.
- Number of decimal places? Enter how many decimal places will be used when saving the new price.
Example: If you enter 0 and the calculation of the new value is 46.74, the system saves 46,00 disregarding the cents. - Orders in Portfolio? Select between Maintain or Update (option Update lets you update all pending Sales Orders).
- Reapply Factor? Define between Base Price or List Price, given that:
In base price, the following formula is applied: Base Price x Multiplication Factor x Factor (base price multiplied by the multiplication factor and multiplied by the factor). In list price, the following formula is applied: Sales Price x Multiplication Factor (sales price multiplied by the multiplication factor). - Update Base Price (product)? Select between Yes or No.
- Initial Grid Reference and Final Grid Reference? Define the initial and final grids to be considered.
Check the data and confirm the list adjustment. The system adjusts the lists in accordance with parameter settings. Use of Price Spreadsheet in Adjustment: - Price list products to be adjusted (Initial Product / Final Product);
- Price list product groups to be adjusted (Initial Group / Final Group);
- Price list product types to be adjusted (Initial Type / Final Type);
- Price Lists to be adjusted (Initial List / Final List);
- Adjustment Factor to be used (Adjustment Factor). - Adjustment to be applied
- Number of decimal places for rounding of adjustment calculation (Number of Decimal Places);
- Your orders already saved must be adjusted (Orders in Portfolio);
- If the adjustment is applied to the base list (Product Register) or the Price List (Reapply Factor).
- Name of pricing spreadsheet in which the adjustment takes place (Spreadsheet).
- Whether the base price of the product register is updated or not (Update Base Price (product))
- Product Grids of the price list to be adjusted (Initial Grid Reference / Final Grid Reference).
In parameter "Spreadsheet" you need to enter the code of the Pricing Spreadsheet you want to use. If you need to adjust prices in the list, you can make the Automatic Adjustment from a Pricing Spreadsheet (MATC010) by executing the following process:
PRICING SPREADSHEET (MATC010) In the Pricing Spreadsheet (MATC010), there must be a line referencing the code and description of the Price List (OMSA010) to be adjusted:

You also need to add the formula to set the price to be moved to the Price List (OMSA010): *The Description field of the Pricing line must contain: #code, space and the name of the pricelist. 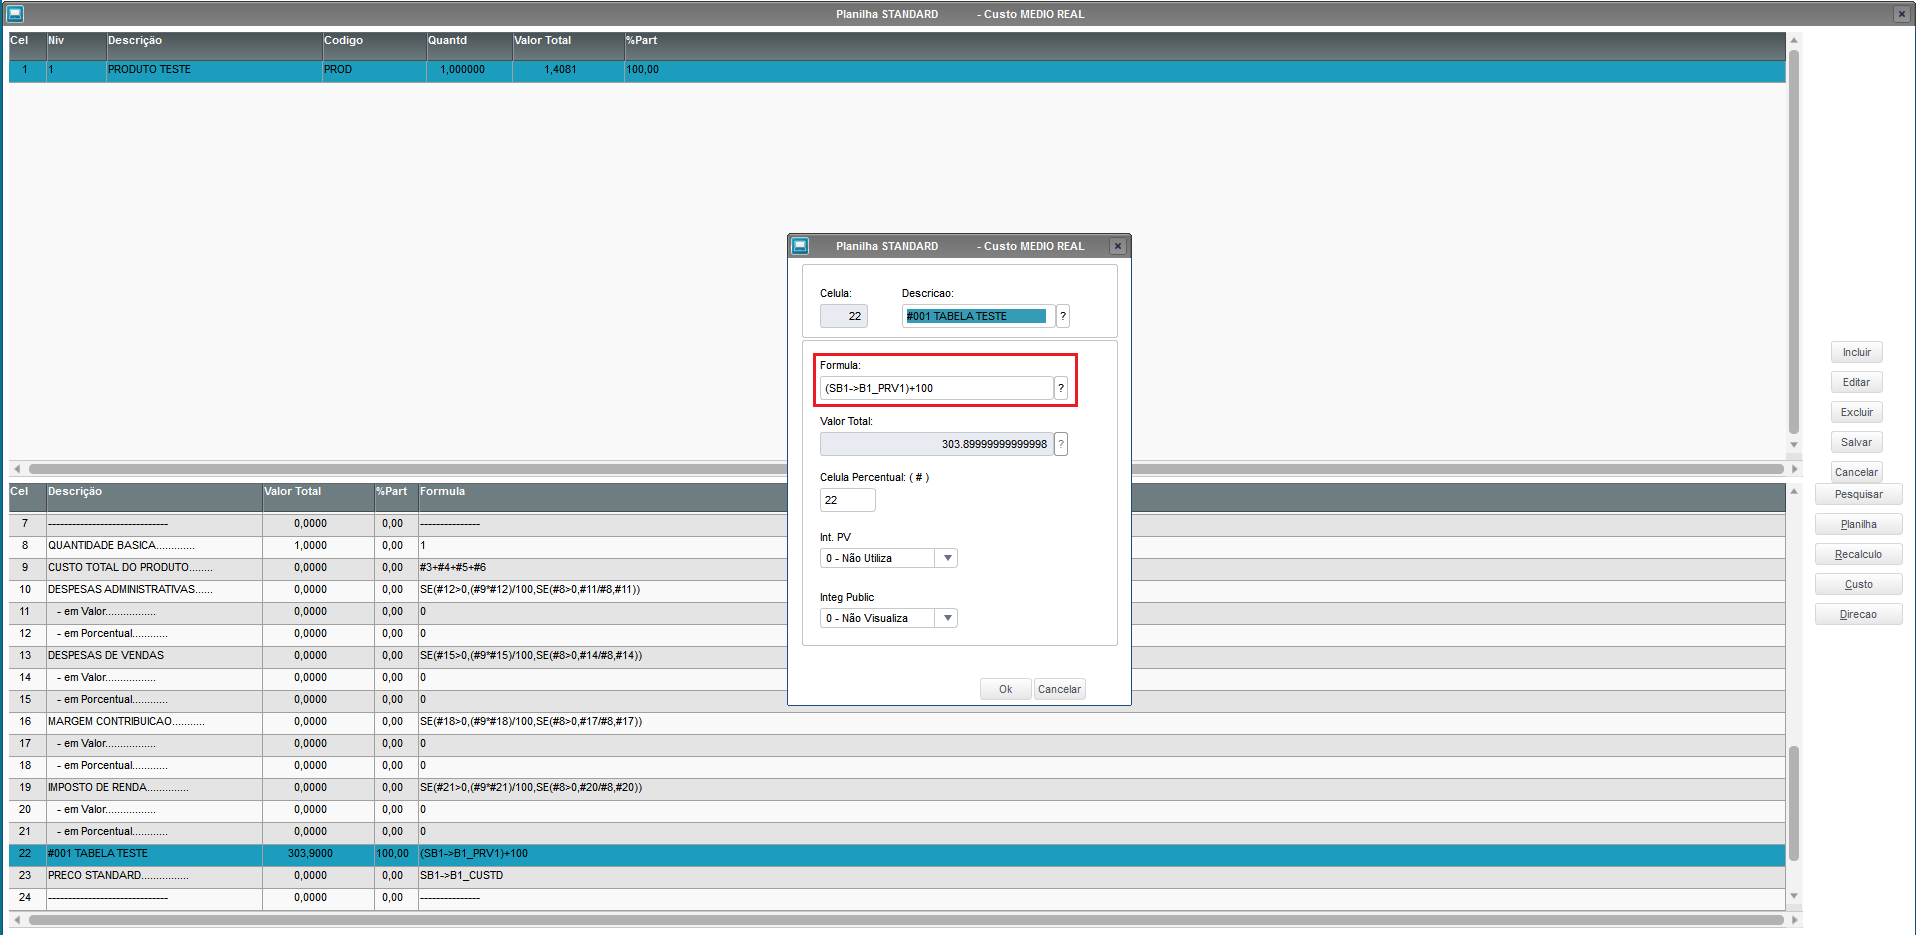
NOTE: If you need Help to register the Pricing Spreadsheet (MATC010), contact the TOTVS Stock/Costs Support.
PRICELIST (OMSA010) Access the routine Price List (OMSA010), select the Price List you want to adjust and access "Other Actions" → "Adjustment": 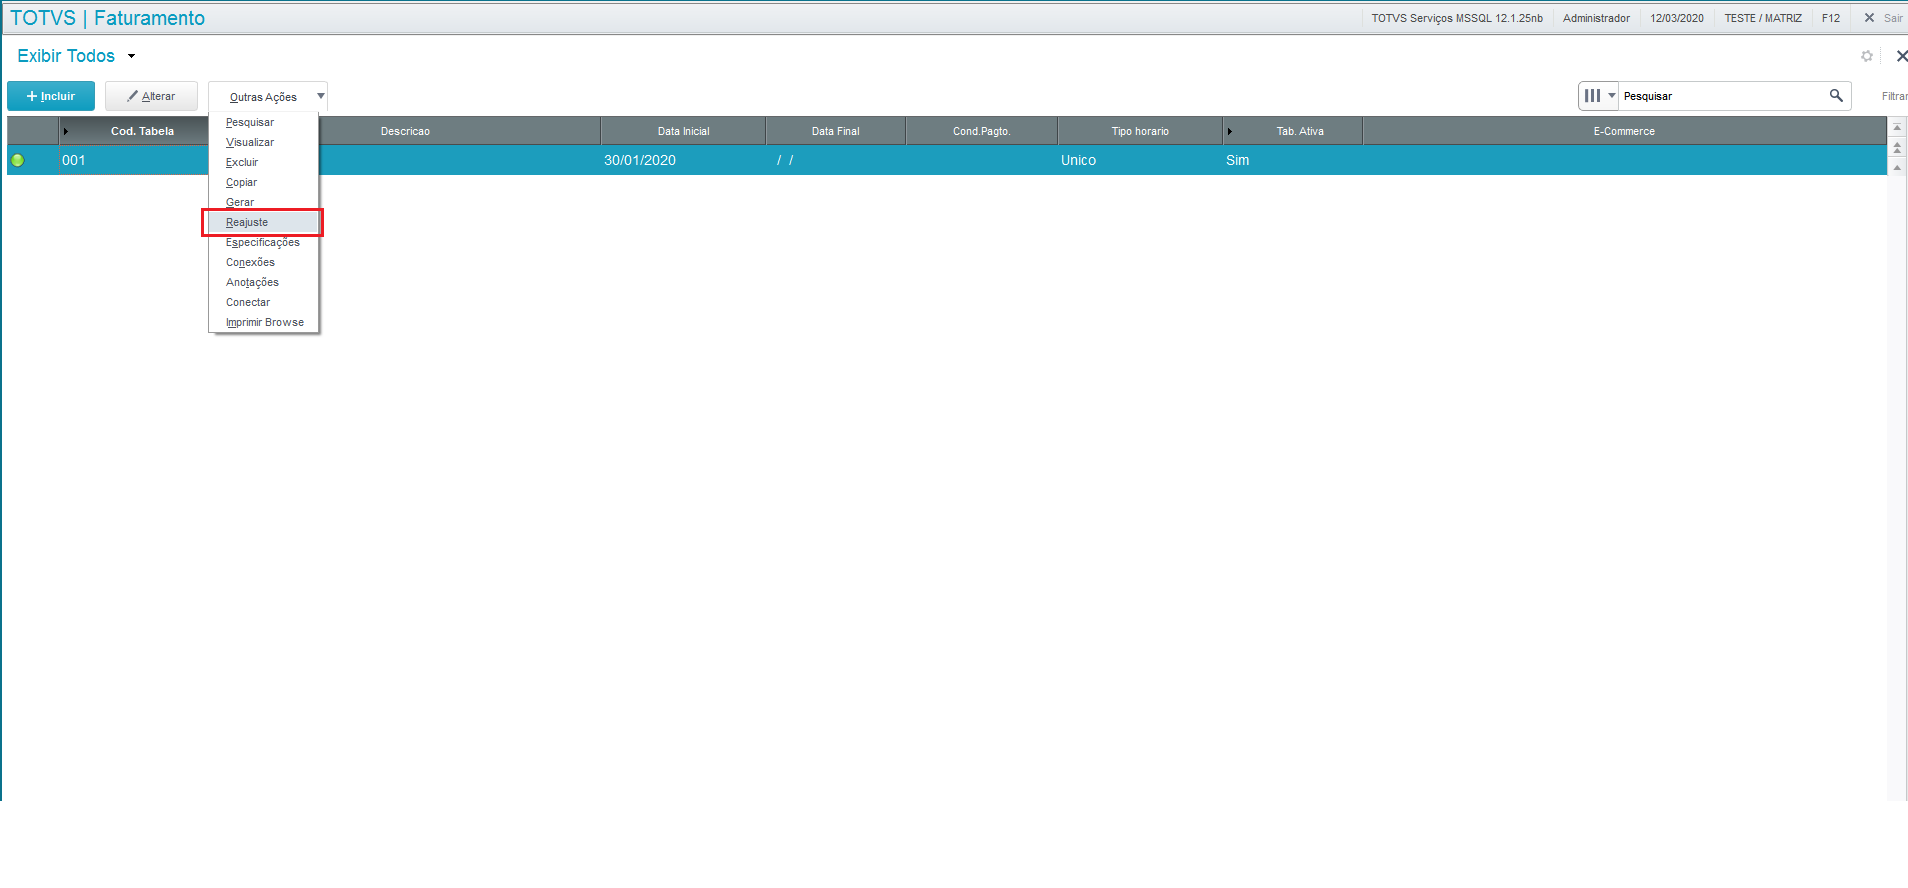
After clicking "Adjustment", select the option "Parameters" to configure the adjustment:
Among the parameters, you can select: - Price list products to be adjusted (Initial Product / Final Product);
- Price list product groups to be adjusted (Initial Group / Final Group);
- Price list product types to be adjusted (Initial Type / Final Type);
- Price Lists to be adjusted (Initial List / Final List);
- Adjustment Factor to be used (Adjustment Factor). - If you do not enter the adjustment value, the system will only update the sales price of the price list in case the values found between the price list and the price spreadsheet are different, and parameter (Reapply Factor) is set to List Price. If parameter (Reapply Factor) is set to Base Price, the system does not make any adjustment, also disregarding the parameter (Update Base Price (product)).
- in accordance with the value found in the Spreadsheet if they are different.
- Number of decimal places for rounding of adjustment calculation (Number of Decimal Places);
- Your orders already saved must be adjusted (Orders in Portfolio);
- If the adjustment is applied to the base list (Product Register) or the Price List (Reapply Factor).
- Name of pricing spreadsheet in which the adjustment takes place (Spreadsheet).
- Whether the base price of the product register is updated or not (Update Base Price (product))
- Product Grids of the price list to be adjusted (Initial Grid Reference / Final Grid Reference).
In parameter "Spreadsheet", enter the code of the Pricing Spreadsheet you want to use. In this example, we use the code "STANDARD": 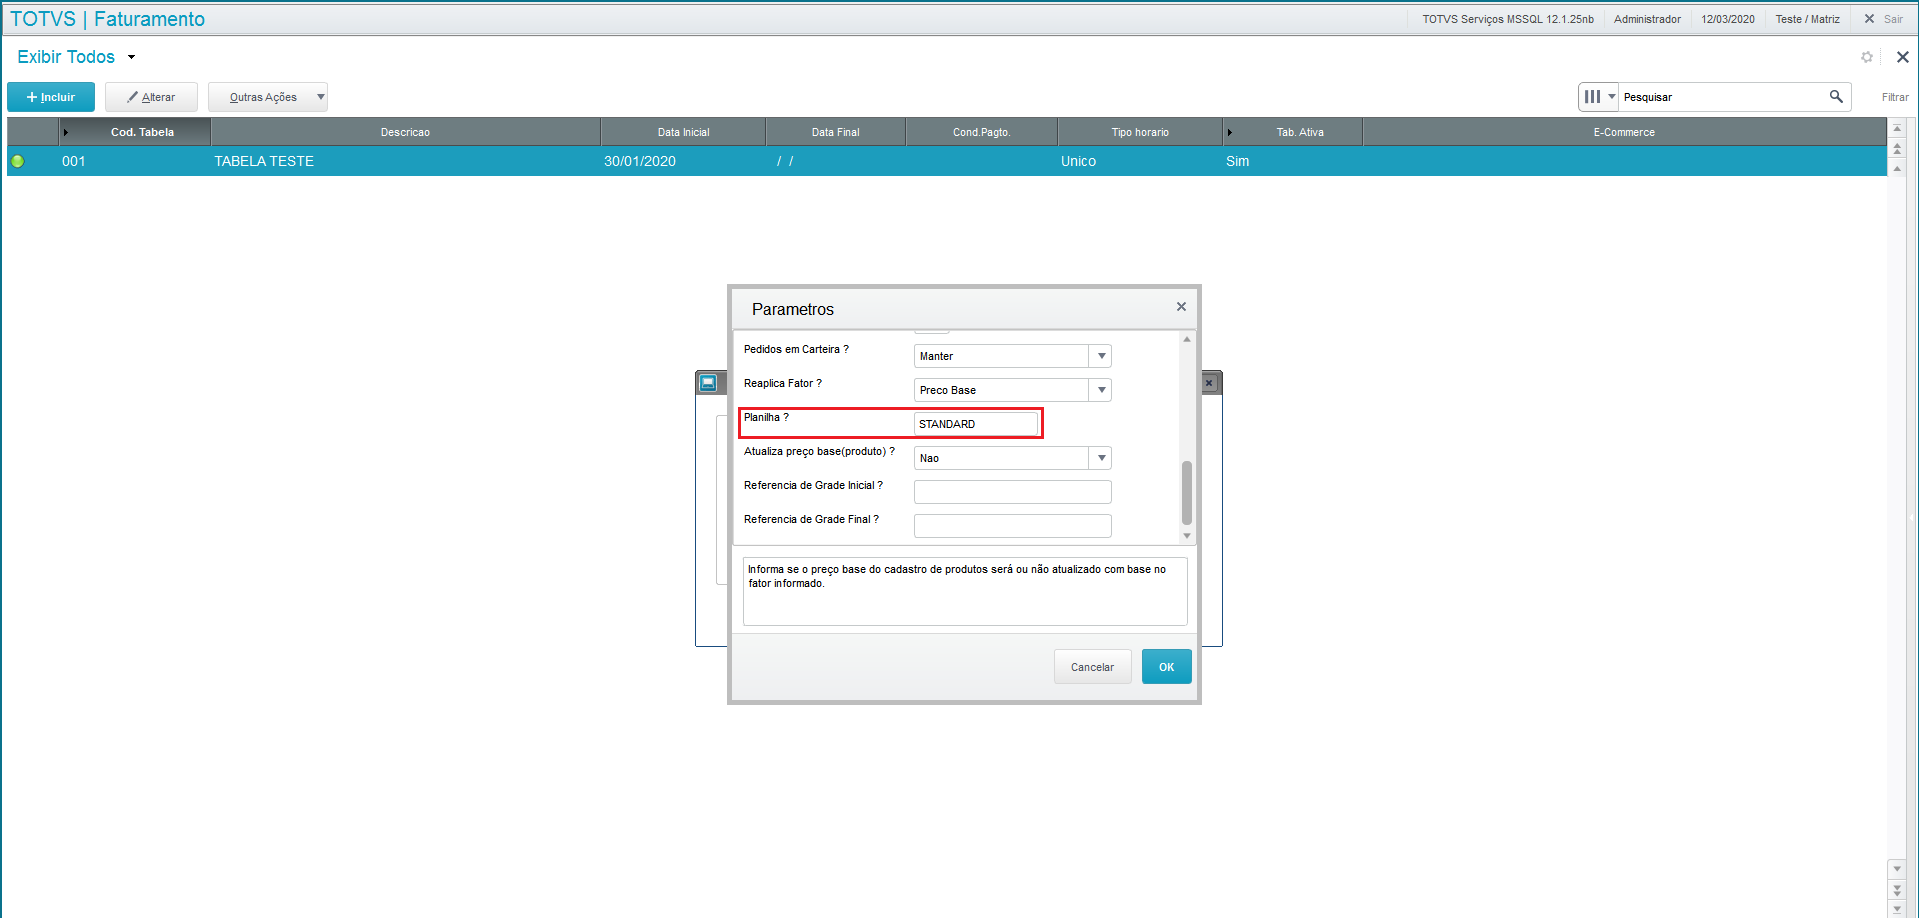
After entering the data, click "OK". The system will make the adjustment and fill out the adjusted price: 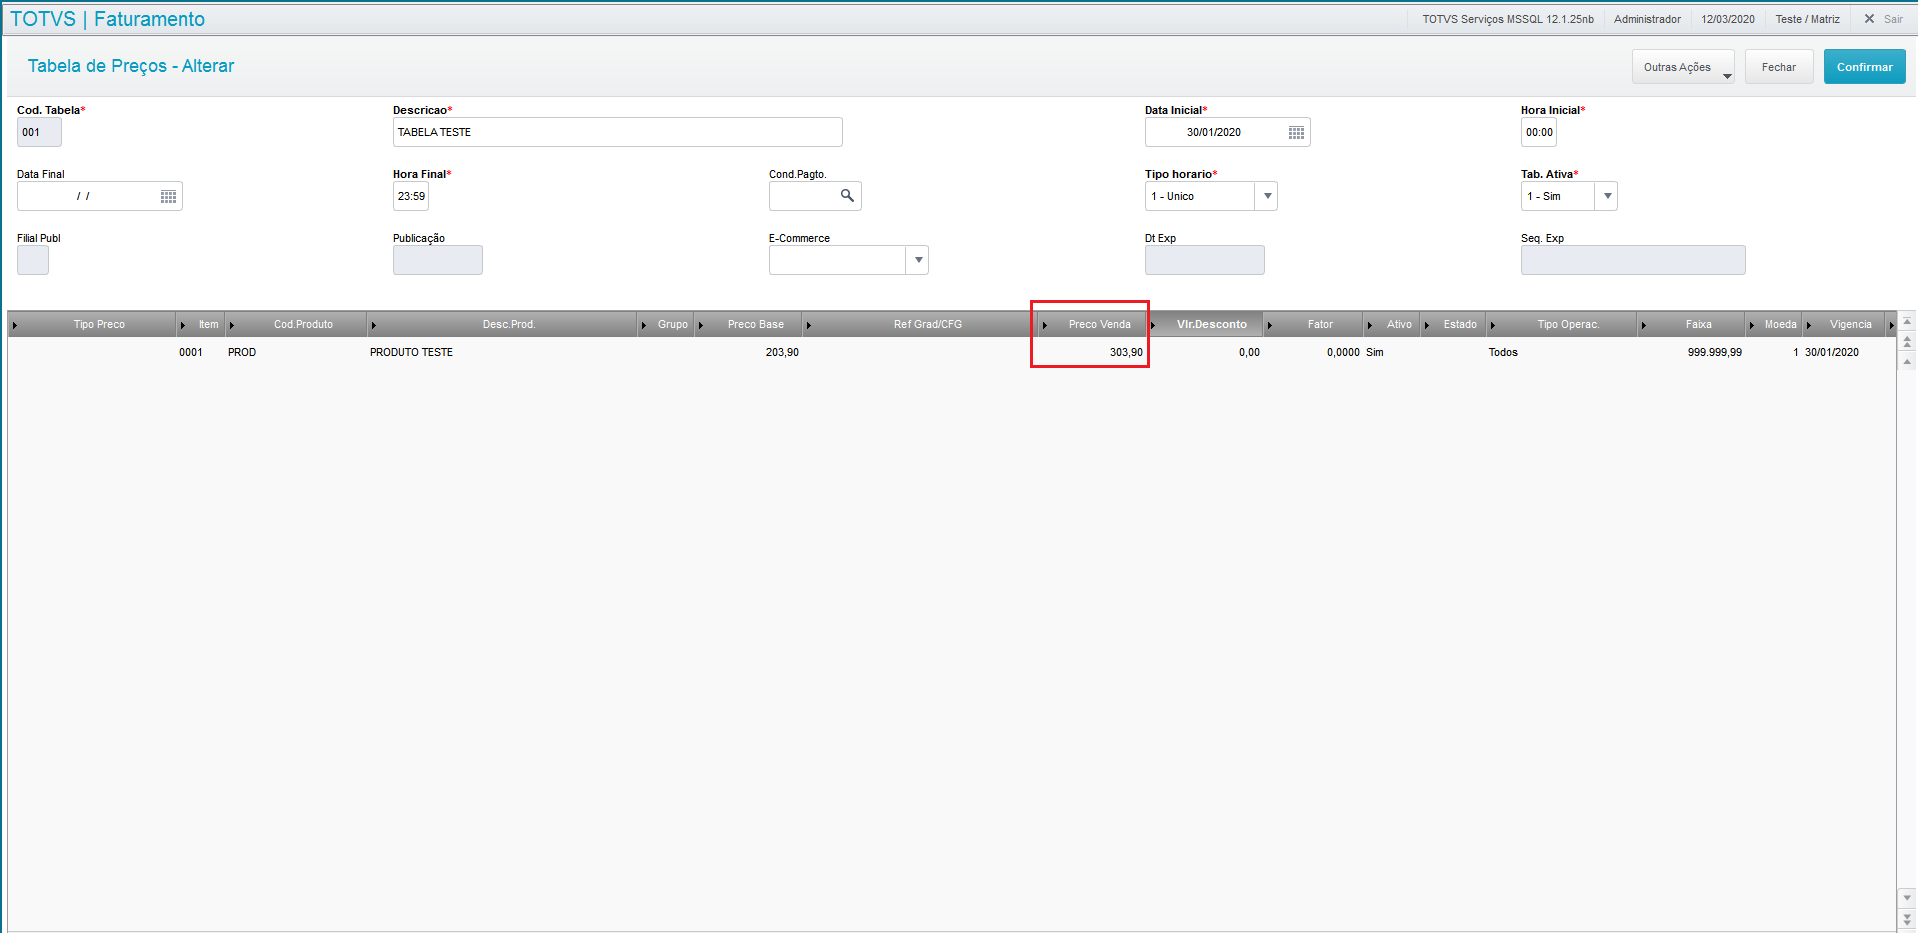
|
| Card |
|---|
| default | true |
|---|
| id | 10 |
|---|
| label | EspecificaçõesSpecifications |
|---|
| | Outras Ações Other Actions / EspecificaçõesAo acessar esta opção o sistema exibe as especificações cadastradas. As opções no alto da tela são: Clique nesta opção e visualize a tela. Os grids são: Especificações e Entidades (nesta área apresenta-se a estrutura com formato em árvore). Esta opção não permite efetuar alterações. Specifications When you access this option, the system displays the specifications registered. The options at the top of the screen are: Click this option and view the screen. The grids are: Specifications and Entities (in this area, the structure is displayed in tree format). This option does not allow editing. - Other Actions
- Search
- Outras Ações
- Pesquisar
|
| Card |
|---|
| default | true |
|---|
| id | 11 |
|---|
| label | ConexõesConnections |
|---|
| | Outras Ações Other Actions / ConexõesConnections Use this feature to identify the relationship between the records created in CRM, which are Esta funcionalidade permite identificar o relacionamento entre os cadastros efetuados no CRM, sendo eles de suspect, prospect, clientecustomer, contatoscontacts, concorrentescompetitors, fornecedoressuppliers, parceirospartners, oportunidadesopportunities, propostas, pedidos de vendas, notas fiscais, produtos, tabelas de preço, processo de vendas, vendedores, unidade de negócio, equipe de vendas, campanhas e eventos. A conexão centraliza informações sobre o relacionamento de uma entidade com outra e facilita as consultas. Uma vez acionada esta opção em Outras Ações / Conexões visualize as opções na tela, sendo: - Incluir, ao optar por incluir uma nova conexão, o sistema exibe primeiro a tela para seleção da filial.
Selecione a filial e confirme para prosseguir. A próxima tela é a de Cadastro de Conexões com os dados de entidade, código e nome do conector são carregados automaticamente. No grid Conectar a informe: | | Campo | Descrição |
|---|
| Entidade | Utilize a lupa ao lado do campo ou utilize a tecla F3 para ter acesso à consulta padrão e assim poder selecionar este item. Exemplo: AC3 - Concorrentes | | Código | Utilize a lupa ao lado do campo ou utilize a tecla F3 para ter acesso à consulta padrão e assim poder selecionar este item. Informa o código da entidade Conectada. | | Função | Utilize a lupa ao lado do campo ou utilize a tecla F3 para ter acesso à consulta padrão e assim poder selecionar este item. | | Status | Utilize a seta para baixo ao lado do campo para visualizar as opções disponibilizadas entre: 1-Inativo ou 2- Ativo. | proposals, sales orders, invoices, products, price lists, sales process, sales representatives, business unit, sales team, promotions and events. The connection centralizes data on the relationship between an entity and another, making it easier to query them. Once you activate this option in Other Actions / Connections, you can view the options onscreen, as follows: - Add, when you choose to add a new connection, the system first displays the screen for you to select the branch.
Select the branch and confirm it to continue. The next screen pertains the Connections Register, with data on entity, code and name of the connector, which are loaded automatically. In the grid Connect To, enter: Field | Description | Entity | Use the magnifying glass next to the field or the F3 key to access the default query and select the item. Example: AC3 - Competitors | Code | Use the magnifying glass next to the field or the F3 key to access the default query and select the item. Enter the code of the entity Connected. | Function | Use the magnifying glass next to the field or the F3 key to access the default query and select the item. | Status | Use the down arrow next to the field to view the options available, which are: 1-Inactive or 2-Active. |
In the grid Connect From, enter: Field | Description | Function | Use this option to link data from one customer to another, entering the function of the connection. Example: Partner, Associate, Influencer, etc. When you cannot find a feature that best represents your needs, register other connection features and associate them with the corresponding features; that is, when you register the feature Uncle/Aunt, the corresponding feature will be Nephew/Niece. | Initial Date | Use the calendar option next to the field or enter the date in DDMMYYYY format. | Final Date | Use the calendar option next to the field or enter the date in DDMMYYYY format. |
No grid Conectar de informe: | Campo | Descrição |
|---|
| Função | Esta opção permite atrelar informações de um cliente para outro, informando a função da conexão. Exemplo: Parceiro, Sócio, Influenciador, etc. Quando não localize uma função que melhor represente a sua necessidade, efetue o cadastro de outras funções de conexão e relacione-as com as funções correspondentes, ou seja, ao cadastrar a função Tio/Tia a função correspondente será Sobrinho/Sobrinha. | | Data Inicio | Utilize a opção calendário ao lado do campo ou digite a data no formato DDMMAAAA. | | Data Final | Utilize a opção calendário ao lado do campo ou digite a data no formato DDMMAAAA. | - Alterar
- Visualizar
- Outras Ações
| Card |
|---|
| | Outras Ações Other Actions / AnotaçõesEste cadastro possibilita a inclusão, a alteração e a exclusão de comentários ou observações relativas aos registros das seguintes entidades do CRM: Suspects, Clientes, Prospects, Contatos, Concorrentes, Vendedores, Oportunidades, Propostas, Pedidos, Fornecedores, Parceiros, Produtos, Tabela de Preço, Processo de Venda, Unidade de negócio, Equipe de Vendas, Campanha e Eventos. A anotação é composta por título, conteúdo e permite anexar arquivos. O menu apresenta estas opções: - Incluir, ao clicar nesta opção, primeiramente selecione a filial e confirme para visualizar a tela inclusão.
E preencha os campos a seguir: | | Campo | Descrição |
|---|
| Proprietário | Utilize a lupa ao lado do campo ou a tecla F3 para ter acesso à consulta padrão e assim selecionar o proprietário do registro. | | Título | Informe um título para a anotação em execução. | | Status | Utilize a seta para baixo ao lado do campo e selecione entre: 1-Inativo ou 2-Ativo. | | Conteúdo | Informe uma informação neste campo relacionada com a anotação. | Notes Use this register to add, edit and delete comments or notes related to records of the following CRM entities: Suspects, Customers, Prospects, Contacts, Competitors, Sales Representatives, Opportunities, Proposals, Orders, Suppliers, Partners, Products, Price List, Sales Process, Business Unit, Sales Team, Promotion and Events. The note is comprised of its title, contents, and you can attach files to it. The menu offers these options: - Add. Click this option to select and confirm the branch before viewing the add screen.
Then fill out the following fields: Field | Description | Owner | Use the magnifying glass next to the field or the F3 key to access the default query and select the owner of the record. | Title | Enter a title for the note at issue. | Status | Use the down arrow next to the field and select between: 1-Inactive or 2-Active. | Contents | In this field, enter information pertaining the note. |
- Edit,
- Search, and
- Other Actions.
- View;
- Delete;
- Copy;
- Attach;
- View Attachment
- Visualizar;
- Excluir;
- Copiar;
- Anexar;
Visualizar Anexo
| Card |
|---|
| default | true |
|---|
| id | 13 |
|---|
| label | Conectar |
|---|
| Outras Ações / Conectar A próxima tela é a de Cadastro de Conexões com os dados de entidade, código e nome do conector são carregados automaticamente. No grid Conectar a informe:
| Campo | Descrição |
|---|
| Entidade | Utilize a lupa ao lado do campo ou utilize a tecla F3 para ter acesso à consulta padrão e assim poder selecionar este item. Exemplo: AC3 - Concorrentes | | Código | Utilize a lupa ao lado do campo ou utilize a tecla F3 para ter acesso à consulta padrão e assim poder selecionar este item. Informa o código da entidade Conectada. | | Função | Utilize a lupa ao lado do campo ou utilize a tecla F3 para ter acesso à consulta padrão e assim poder selecionar este item. | | Status | Utilize a seta para baixo ao lado do campo para visualizar as opções disponibilizadas entre: 1-Inativo ou 2- Ativo. |
No grid Conectar de informe: | Campo | Descrição |
|---|
| Função | Esta opção permite atrelar informações de um cliente para outro, informando a função da conexão. Exemplo: Parceiro, Sócio, Influenciador, etc. Quando não localize uma função que melhor represente a sua necessidade, efetue o cadastro de outras funções de conexão e relacione-as com as funções correspondentes, ou seja, ao cadastrar a função Tio/Tia a função correspondente será Sobrinho/Sobrinha. | | Data Inicio | Utilize a opção calendário ao lado do campo ou digite a data no formato DDMMAAAA. | | Data Final | Utilize a opção calendário ao lado do campo ou digite a data no formato DDMMAAAA. |
Para confirmar clique em Salvar. |
| Card |
|---|
| default | true |
|---|
| id | 14 |
|---|
| label | Criar Visões |
|---|
| Esta opção estádisponível na tela de acesso à rotina em Manutenção da Tabela de Preços, clique com a seta para baixo para selecionar esta opção. À esquerda - Configurações, esta tela está dividida pelos grids que descrevemos a seguir
- Nome da Visão - Atribua um nome para a visão que se está criando.
- Ordem dos Registros - Selecione entre os índices:
Cod. Tabela Tabela Ativa + Data Inicial + Data Final Marque com duplo clique se deseja tornar publica a visão. Para prosseguir clique em Confirmar ou para sair e/ou retornar à tela anterior,clique em Fechar. - Campos, visualize duas caixas assim denominadas:
Campos disponíveis para a sua visão - à esquerda Posicione o cursor nos campos que deseja visualizar na visão em configuração e com a seta > movimente-o para a direita. As setas < e > permitem movimentar os campos de um lado para o outro dos quadros. Campos sendo utilizados atualmente - à direita Quando movimentados os campos, a visualização é feita neste quadro. Para prosseguir clique em Confirmar ou para sair e/ou retornar à tela anterior,clique em Fechar. Selecione os filtros para aplicar à tabela. Para criar um novo filtro, clique na opção Criar Filtro. Acesse Outras Ações e visualizee/ou selecione entre as opções: - Copiar
- Expressão
- Relacionar
O sistema nesta mesma tela permite Excluir e/ou Copiar um filtro existente. Para prosseguir clique em Confirmar ou para sair sem ajustes clique em Fechar. |
| Card |
|---|
| default | true |
|---|
| id | 15 |
|---|
| label | Gerenciar VIsões |
|---|
| Esta opção estádisponível na tela de acesso à rotina em Manutenção da Tabela de Preços, clique com a seta para baixo para selecionar esta opção. Visualize a tela apresentada pelo sistema, tendo na parte inferior as opções: Outras Ações / Restaurar Visão Padrão Configurar Alterar Utilize esta opção quando desejar alterar alguma Visão existente. Excluir - Utilize esta opção para excluir alguma visão existente. Incluir - Utilize esta opção para incluir uma nova visão. Siga as orientações descritas em Criar Visões. Definir como Padrão - Para selecionar uma visão como padrão, selecione entre as visões existentes e confirme nesta opção. Para sair sem salvar clique em Fechar ou para manter esta configuração clique em Confirmar. |
| Card |
|---|
| default | true |
|---|
| id | 16 |
|---|
| label | Cadastramento de promoções relâmpago |
|---|
| As rotinas envolvidas no cadastramento de promoções relâmpago são: Regras de Descontos e Bonificação. | Nota |
|---|
| Ao abrir uma venda, o sistema verifica todas as Tabelas de Preço ativas naquele momento, excluindo a necessidade de consulta às Tabelas ativas sempre que um novo produto for lançado. Somente após a abertura de uma nova venda, o sistema consultará novamente a existência de outras Tabelas de Preço ativas. Para tanto, o parâmetro MV_LJRETVL e um índice na Tabela DA0. Este novo parâmetro é configurado somente com os valores 1 ou 2, sendo o valor 1 para o sistema captar o menor preço de um produto entre as Tabelas de Preço ativas, e o valor 2, para o maior preço. |
A tabela de preço tem a possibilidade de registrar as seguintes informações: DA0 – Cabeçalho - Data e hora inicial / Data de hora final de validade
- Tipo de hora – Único / Recorrente
- Tab. Ativa – Sim / Não
DA1 – Itens - Produto ou Grupo de Produtos
- Preço Base (retorna automaticamente o valor praticado no campo Preço Venda)
- Preço de Venda (valor que efetivamente será praticado na venda)
- Desconto / Fator (serão aplicados no campo Preço de Venda)
- Ativo (se este produto está ativo na grade)
- Estado
- Tipo de Operação (Estadual / Interestadual e etc)
- Faixa / Moeda
- Vigência
Devido à condição e forma de pagamento serem definidas apenas no final do processo da venda concomitante, nos módulos Controle de Loja e Front Loja, somente as tabelas de preço que não possuem estas informações definidas são consideradas. Os campos de forma e condição de pagamento ficam inibidos no módulo Controle de Loja para a tela de cadastro de Tabela de Preços. Na Venda Assistida e Front Loja é tratado apenas o tipo de operação Estadual. Possíveis cenários | Descrição | Ação | Uma única tabela de preço, que tenha produto informado na venda. | É utilizada a regra definida na tabela de preço e aplicada ao valor do item do produto. | O produto existe em mais de uma tabela de preço ativa. | É definido pelo parâmetro que identifica se o valor do produto deve ser escolhido com o critério do maior ou menor valor encontrado na busca e aplicado ao valor do item do produto. | Não encontrar nenhuma tabela de preço ativa para o produto. | O valor de venda do produto é o cadastrado no produto (campo Preço Venda). | Não existe nenhuma tabela de preço disponível para o produto e o valor de venda cadastrado no produto é ZERO. | O aplicativo informa que este produto não pode ser registrado, pois, não tem valor de venda definido. |
|
| Card |
|---|
| default | true |
|---|
| id | 17 |
|---|
| label | Interface para Grade de Produtos |
|---|
| O recurso de grade agiliza o trabalho de cadastramento de produtos que variam em apenas alguns aspectos, mantendo a sua característica principal. Desta forma, não é preciso cadastrar o mesmo produto diversas vezes apenas pelo produto ter uma variedade de características, ou seja, o usuário apenas precisa cadastrar o produto principal e todas as suas variáveis, tais como: cor, modelo etc. Isso permitirá que o Protheus gere automaticamente todos os cadastramentos dos produtos variáveis. | Nota |
|---|
| Para utilizar o recurso de Grade de Produtos, é necessário configurar o parâmetro MV_GRADE= T, ativando assim, o uso da grade de produtos.
|
|
| Card |
|---|
| default | true |
|---|
| id | 18 |
|---|
| label | Grade de Produtos na Tabela de Preços de Vendas |
|---|
| Selecione a opção Tabela de Preço e inclua uma tabela de preço para um produto referência de grade. Para verificar a aplicação da tabela de preços, selecione a opção Pedidos de Venda e inclua um pedido de venda para um produto (código completo) da família de grade relacionada. Informe o código da tabela no cabeçalho do pedido. |
| Card |
|---|
| default | true |
|---|
| id | 19 |
|---|
| label | Legenda |
|---|
| Posicione em uma das Tabelas de Preço cadastrada, faça duplo clic sobre a esfera colorida à esquerda e o sistema exibe o quadro com o significado da legenda, sendo:  Tabela de Preços Inativa; Tabela de Preços Inativa;
 Tabela de Preços Ativa; Tabela de Preços Ativa;
 Tabela de Preços Ativa Especial. Tabela de Preços Ativa Especial.
|
|