Histórico da Página
...
| Deck of Cards | ||||||||||||||||||||||||||||||||||||||||||||||||||||||||||||||||||||||||||||||||||||||||||||||||||||||||||||||||||||||||||||||||||||||||||||||||||||||||||||||||||||||||||||||||||||||||||||||||||||||||||||||||||||||||||||||||||||||||||||||||||
|---|---|---|---|---|---|---|---|---|---|---|---|---|---|---|---|---|---|---|---|---|---|---|---|---|---|---|---|---|---|---|---|---|---|---|---|---|---|---|---|---|---|---|---|---|---|---|---|---|---|---|---|---|---|---|---|---|---|---|---|---|---|---|---|---|---|---|---|---|---|---|---|---|---|---|---|---|---|---|---|---|---|---|---|---|---|---|---|---|---|---|---|---|---|---|---|---|---|---|---|---|---|---|---|---|---|---|---|---|---|---|---|---|---|---|---|---|---|---|---|---|---|---|---|---|---|---|---|---|---|---|---|---|---|---|---|---|---|---|---|---|---|---|---|---|---|---|---|---|---|---|---|---|---|---|---|---|---|---|---|---|---|---|---|---|---|---|---|---|---|---|---|---|---|---|---|---|---|---|---|---|---|---|---|---|---|---|---|---|---|---|---|---|---|---|---|---|---|---|---|---|---|---|---|---|---|---|---|---|---|---|---|---|---|---|---|---|---|---|---|---|---|---|---|---|---|---|---|---|---|---|---|---|---|---|---|---|---|---|---|---|---|---|
| ||||||||||||||||||||||||||||||||||||||||||||||||||||||||||||||||||||||||||||||||||||||||||||||||||||||||||||||||||||||||||||||||||||||||||||||||||||||||||||||||||||||||||||||||||||||||||||||||||||||||||||||||||||||||||||||||||||||||||||||||||
| ||||||||||||||||||||||||||||||||||||||||||||||||||||||||||||||||||||||||||||||||||||||||||||||||||||||||||||||||||||||||||||||||||||||||||||||||||||||||||||||||||||||||||||||||||||||||||||||||||||||||||||||||||||||||||||||||||||||||||||||||||


...
Main Fields
| Âncora | ||||
|---|---|---|---|---|
|
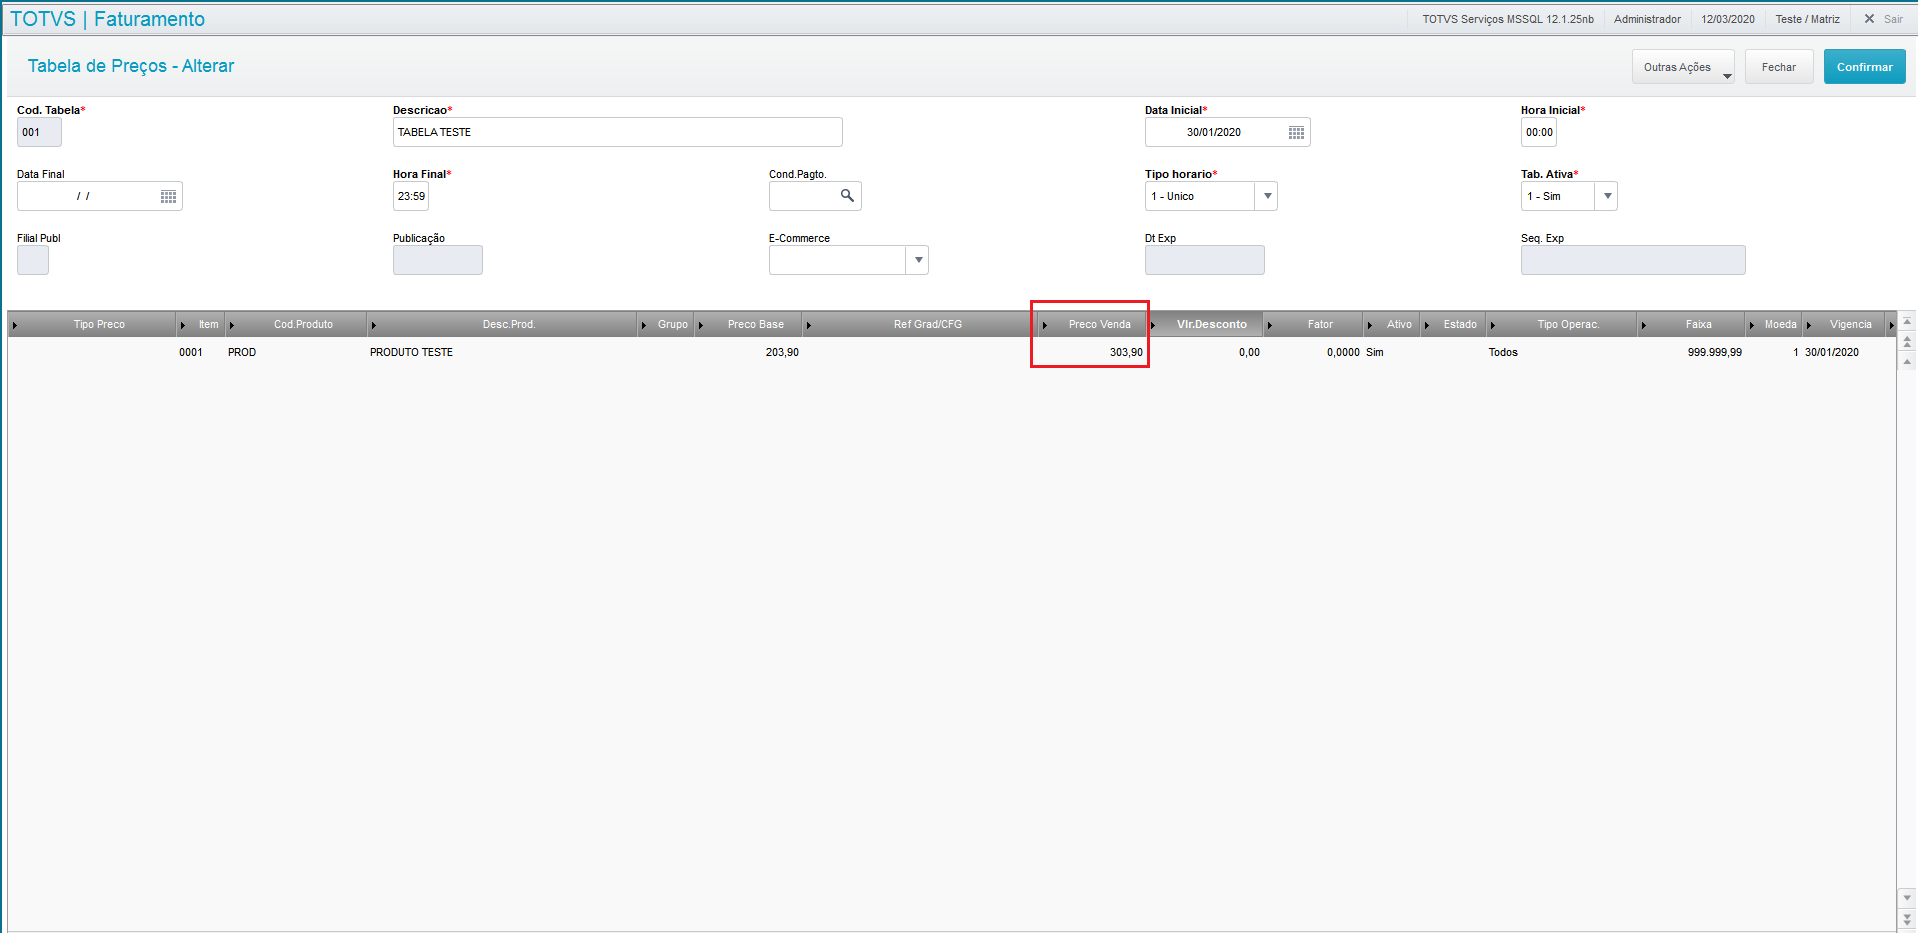
CampoField: | Descrição | Cód. Tabela | ||||
| Descrição | Campo descritivo que identifica a tabela incluída e/ou a incluir. Exemplo: Tabela padrão do mês. | |||||
| Data Inicial / Data Final | Defina nestes campos quais são as datas de início e de término da vigência da tabela de preços. Exemplo: 01/01/2016 a | |||||
| Hora Inicial/Hora Final | Informe nestes campos os horários de vigência da Tabela de Preços cadastrada. Esta informação é bastante utilizada por empresas que realizam Promoções Relâmpago. Exemplo: Uma empresa tenha determinado uma promoção que vale no dia 20/09/03, das 9h às 10h, deve ter o campo Hora Inicial preenchido com 09:00 e o campo Hora Final com 10:00. As vendas efetuadas a partir das 10h 01min não participam mais da promoção desta Tabela de Preço. | |||||
| Cond. Pagto | Informe a condição de pagamento válida para aplicação desta tabela de preços. Desta forma, na inclusão do Pedido de Vendas, o sistema somente verificará a condição de pagamento informada na Tabela de Preços, caso contrário, emite um aviso de que a condição é inválida para a Tabela selecionada. Utilize a lupa ao lado do campo ou a tecla F3 para acessar a consulta padrão e deste modo selecionar a condição de pagamento. Exemplo: A vista. | |||||
Grupo | Este campo permite o controle da tabela de preço por produto, ou grupo de produtos. Para fazer o controle por grupo é necessário que tenha sido informado, no Cadastro de Produtos, o grupo ao qual ele pertence. Se for informado na tabela, o preço do produto e o preço para o grupo ao qual ele pertence, o sistema assume o preço do produto, e não o do grupo. Lembrando que o campo possui gatilho, e se informado grupo o produto é apagado. Tendo que informar um ou outro.
| |||||
Tipo de Horário | Utilize a seta para baixo posicionada ao lado do campo, para selecionar entre: 1-Único - A Tabela de Preços vale da data de início (hora inicial), até a data final (hora final). Neste caso, supondo que a Tabela foi cadastrada para vigorar de 17/09 às 10:00 até 20/09 até as 20:00 hs, todos os pedidos de venda que entrarem neste período podem utilizar esta tabela. 2-Recorrente - A tabela vale entre as duas datas somente entre a hora inicial e a hora final. Usando o exemplo anterior, os pedidos somente podem utilizar a tabela nos dias do período, dentro do horário informado, ou seja, de 17/09 10:00 até 20/09 às 20:00. Se a emissão do pedido for dia 18/09 às 21:00 hs, o sistema não aceita para esta Tabela de Preços. | |||||
| Tab.Ativa | Utilize a seta para baixo para selecionar entre:
| |||||
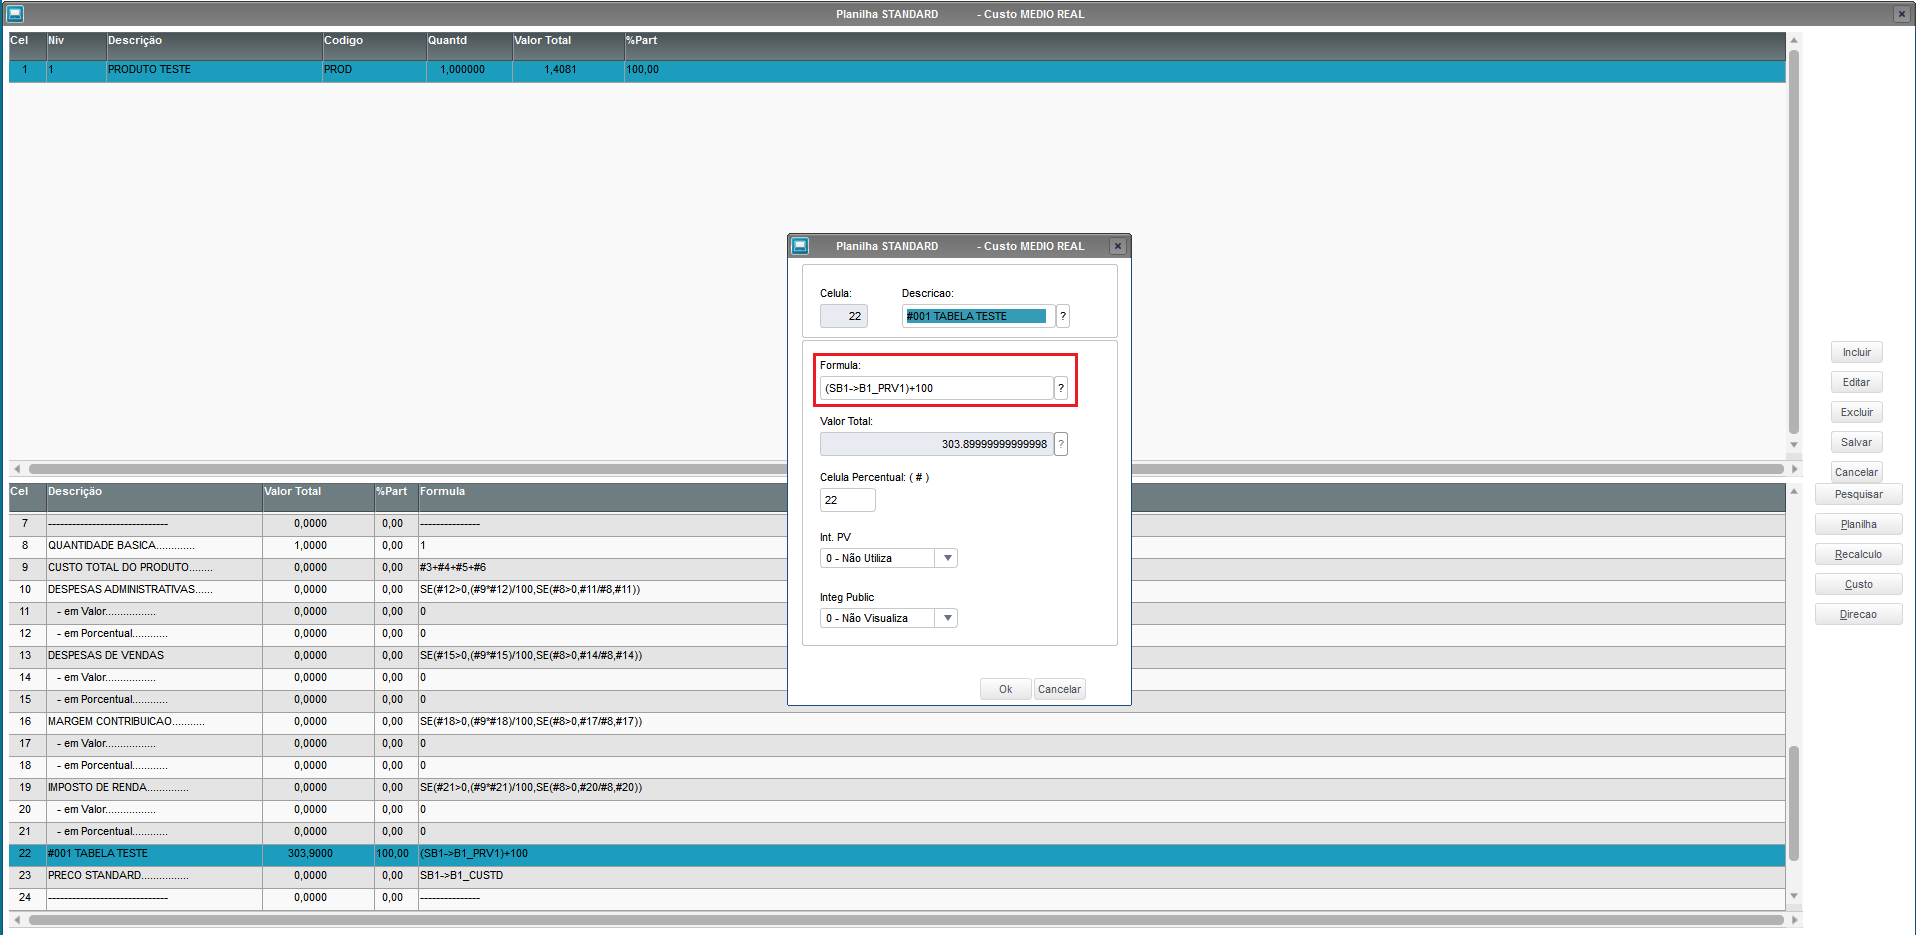
| Preço Base | O preço base da venda de um produto é definido no seu cadastro, por meio do campo Preço Venda. Na inclusão da Tabela de Preços o sistema disponibiliza o preço base preenchido, sendo que os campos Preço de Venda e Valor do Desconto sempre tomam como referência, o preço base do produto. No entanto, caso não esteja cadastrado, informe-o diretamente no campo Preço de Venda. | |||||
| Preço de Venda | Informe o preço de venda praticado para um produto na Tabela de Preços, a partir dos descontos e fatores aplicados. Exemplo: O cadastro de uma tabela de preços com a seguinte situação: Produto Computador; Preço Base $ 1.000,00 e Valor do Desconto $100,00, nesta situação o Preço de Venda é $ 900,00 (Preço Base - Valor Desconto) | |||||
Valor Desconto | Informe o valor do desconto para aplicar sobre o Preço Base do produto. Ao informar este campo o sistema calcula automaticamente o campo Preço de Venda.
Exemplo: O cadastro de uma tabela de preços com a seguinte situação: Produto Computador; Preço Base $1.000,00; Valor do Desconto $ 100,00; Fator 0,90 (10% de desconto sobre o preço base); Preço de Venda $ 900,00 (Preço Base - Valor Desconto) O valor do desconto determina o preço de venda, pois é calculado sobre o Preço Base do produto. | |||||
| Fator | Este campo determina o fator sobre o Preço Base do produto; é informado ou calculado pelo sistema quando o campo Valor do Desconto é preenchido.Quando informado, o sistema calcula o preço de venda baseado no fator. Ao informar o fator é calculado o preço de venda. | |||||
Estado | Informe o Estado no qual a Tabela de Preços cadastrada tem vigência.
| |||||
| Tipo de Operação | Neste campo selecione o tipo de operação realizada: 1-Estadual - Indica que a Tabela de Preço vale apenas para clientes dentro do Estado definido no parâmetro MV_ESTADO. 2-Interestadual - Indica que a Tabela de Preço vale para todos os Estados, exceto o Estado definido no parâmetro MV_ESTADO. 3-Norte e Nordeste Indica que a Tabela de Preços vale apenas para as regiões Norte e Nordeste. 4-Todos - Indica que a Tabela de Preço vale para todos os Estados da tabela 12 - Unidade Federativa.
| |||||
| Faixa | Informe qual a quantidade máxima de produtos para uma determinada tabela de preços. Esta informação é útil quando se quer vincular o preço a uma quantidade definida de venda. Exemplo: Quanto maior a quantidade de produtos vendidos, menor o preço. | |||||
| Ativação e Inativação de Registros | O objetivo do campo reservado denominado Status, é permitir a ativação ou a desativação de registros, evitando que os inativos fiquem em uso na aplicação. 1. A inicialização do campo é sempre como Ativo e apresenta as opções Ativo e Inativo. 2. Quando o conteúdo do campo está definido como Inativo, significa que o registro está bloqueado e é exibido no browse com uma cor diferente. | |||||
| E-commerce | Implementada a opção de envio de múltiplas tabelas de preço para E-commerce CiaShop, mediante a sinalização do campo e-commerce
| |||||
| Cód.Produto | Utilize a lupa ou a tecla F3 para visualizar a consulta padrão e assim definir o código do produto. Exemplo: Produto Padrão | |||||
| Grupo | Utilize a lupa ou a tecla F3 para visualizar a consulta padrão e assim definir o código do produto. Exemplo: 0002 Lembrando que o campo possui gatilho, e se informado grupo o produto é apagado. Tendo que informar um ou outro.
| |||||
| Ref. Grad/CFG | O código da família Referência de grade permite uso prático da rotina, diminuindo a necessidade de cadastramento repetitivo para produtos com a mesma Referência de Grade / Configurador. | |||||
| Vigência | Utilize o calendário ao lado do campo ou informe a data no formato DD/MM/AAAA com a data de vigência da tabela de preço utilizada. | |||||
Description | ||||||
| List Code | Alphanumeric field for specifying a code for the Price List being added. When the option is Copy using the option by Others Actions, the system assumes the next available code for the copy. Example: A12 | |||||
| Description | Descriptive field that identifies the list added and/or yet to be added. Example: Default list for the month. | |||||
| Start Date / End Date | In these fields, set the start and end dates of price list validity. Example: 1/1/2016 to | |||||
| Start Time/End Time | In these fields, enter validity schedule of the Price List registered. This information is often used by companies that practice Flash Sales. Example: A given company has decided on a promotion valid on 9/20/2003, from 9:00 AM to 10:00 AM, must set field Start Time to 09:00 and field End Time to 10:00. Sales made from 10:01 AM forward would no longer use this Price List. | |||||
| Paymt Term | Enter the payment term valid for applying this price list. Thus, when adding the Sales Order, the system only checks the payment terms entered in the Price List; otherwise, it notifies that the terms are not valid for the List selected. Use the magnifying glass next to the field or the F3 key to access the default query and thus select the payment term. Example: Prompt payment. | |||||
Group | Use this field to control the price list by product or by product group. To control it by group, in the Product register, enter the group to which the product belongs. If you enter, in the list, the price of the product as well as the price for the group to which it belongs, the system assumes the price of the product, not that of the group. Be mindful that the field has a trigger. If you fill out the group, the product is erased. You must enter either one or the other.
| |||||
Type of Schedule | Use the down arrow beside the field to select between: 1-Single - The Price List is valid from the start date (start time) to the end date (end time). In this case, if you register the Price List to be valid from 10:00 AM on 9/17 to 8PM on 9/20, then all sales orders entered in this period can use this list. 2-Recurring - The list is valid between the two dates only between the start time and the end time. Using the previous example, the orders can only use the list during the days of the period, within the time entered; that is, from 10:00 AM on 9/17 to 8:00 PM on 9/20. If the order is issued for 9/18 at 9:00 PM, the system does not accept it for this Price List. | |||||
| Active List | Use the down arrow to select between:
| |||||
| Base Price | The base sale price of a product is defined in its register, through field Sales Price. When you add a Price List, the system offers the base price entered, and fields Sales Price and Discount Value always use the base price of the product as reference. However, if it has not been registered, enter it directly in field Sales Price. | |||||
| Sales Price | Enter the sales price used for a product in the Price List, from the applied factors and discounts. Example: A price list is registered in the following situation: Product Computer; Base Price $1,000.00 and Discount Value $100.00. In this situation the Sales Price is $900.00 (Base Price - Discount Value) | |||||
Discount Value | Enter the discount value to be applied to the Base Price of the product. When you fill out this field, the system automatically calculates the Sales Price field.
Example: A price list is registered in the following situation: Product Computer; Base Price $1,000.00; Discount Value $100.00; Factor 0.90 (10% discount on the base price); Sales Price $900.00 (Base Price - Discount Value) The discount value determines the sales price, because it is calculated on the Base Price of the product. | |||||
| Factor | This field determines the factor on the Base Price of the product. The system enters or calculates it when you fill out the field Discount Value. When entered, the system calculates the sales price based on the factor. When the factor is entered, the sales price is calculated. | |||||
State | Enter the State in which the Price List registered is valid.
| |||||
| Type of Operation | In this field, select the type of operation performed: 1-State - Determines that the Price List is only valid for customers inside the State defined in parameter MV_ESTADO. 2-Interstate - Determines that the Price List is valid for all States, except the State set in parameter MV_ESTADO. 3-North and Northeast Indicates that the Price List is valid only for regions North and Northeast. 4-All - Indicates that the Price List is valid for all States of table 12 - Federative Unit.
| |||||
| Range | Enter the maximum quantity of products for a given price list. This information is useful to link the price to a given sales quantity. Example: The higher the number of products sold, the lower the price. | |||||
| Activation and Deactivation of Records | The purpose of the reserved field called Status is to allow the activation or deactivation of records, preventing the application from using the inactive ones. 1. Field initialization is always as Active and shows the options Active and Inactive. 2. When the content of the field is set to Inactive, it means the record is blocked, and it is shown in the browser with a different color. | |||||
| E-commerce | The option to send multiple price lists to CiaShop E-commerce, is implemented by marking the field e-commerce
| |||||
| Product Code | Use the magnifying glass or the F3 key to view the default query and set the product code. Example: Default Product | |||||
| Group | Use the magnifying glass or the F3 key to view the default query and set the product code. Example: 0002 Be mindful that the field has a trigger. If you fill out the group, the product is erased. You must enter either one or the other.
| |||||
| Grid Ref./CFG | The Grid Reference family code lets you use the routine practically, reducing the need to repeatedly register products with the same Grid Reference / Configurator. | |||||
| Validity | Use the calendar next to the field or enter the date in format DD/MM/YYYY with the validity date of the pricelist in use. | |||||
| Maximum Price | Enter the maximum price for the specified price list | Preço Máximo | Informe o preço máximo para a tabela de preço indicada. |

CONTEÚDO
| Índice | ||||||||
|---|---|---|---|---|---|---|---|---|
|
...
Visão Geral
Import HTML Content
Conteúdo das Ferramentas
Tarefas