Identity supports linking to Active Directory for importing accounts and authenticating with AD credentials.
The synchronization of users between the Identity company and the Active Directory is accomplished using an application called SmartSync. Installation and configuration procedures are available in the SmartSync documentation.
Users and groups imported from the Active Directory integration must be approved in order for their access to the company in Identity to be granted.
01. Click the ![]() Settings icon in the top right corner.
Settings icon in the top right corner.
02. Select the Active Directory option.
This allows existing directories to be displayed. The Status column shows whether the directory is Active or Inactive. The SmartSync column shows the status of synchronization with SmartSync, where:
|
01. Click the ![]() Settings icon in the top right corner and select the Active Directory option.
Settings icon in the top right corner and select the Active Directory option.
02. Click Add and select the local Active Directory option.
03. Under Information, fill in the information related to the directory to be created.
Name Migrate from SmartSync?
Enable automatic user acceptance?
User filter Groups filter
|
04. Click Add.
A confirmation message is displayed, and the created directory appears in the directory list. The status Not configured is displayed in the SmartSync column, indicating that the configuration of the application that synchronizes with the Active Directory server needs to be completed. To install the application, download the SmartSync installer as follows. |
This option is only necessary to configure the local Active Directory.
01. Click the ![]() Settings icon in the top right corner and select the Active Directory option.
Settings icon in the top right corner and select the Active Directory option.
02. In the Manage directories section, click the Download SmartSync button and save the file with the .msi extension.
Windows versions compatible with SmartSync can be found in the TOTVS Identity Portability Matrix. To learn more about the installation, visit the SmartSync technical documentation. |
This action is only allowed for directories for which the SmartSync configuration has not yet been completed.
01. Click the ![]() Settings icon in the top right corner and select the Active Directory option.
Settings icon in the top right corner and select the Active Directory option.
02. Locate the desired directory and click the Generate token button, available in the Token column.
The generated token is displayed in the Token column of the respective directory. To copy it, click the generated token. This token must be provided when adding Active Directory to SmartSync. For more information, refer to the Add Active Directory item in the SmartSync documentation.
|
|
01. Click the ![]() Settings icon in the top right corner and select the New accounts option, then switch to the Active Directory tab (located right next to it).
Settings icon in the top right corner and select the New accounts option, then switch to the Active Directory tab (located right next to it).
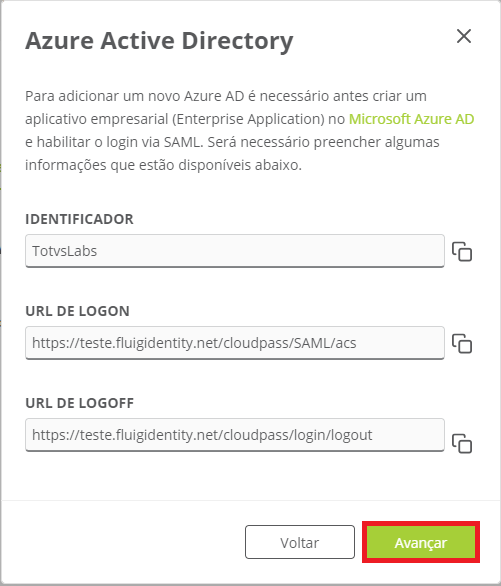
02. Click Add and select the Azure Active Directory option.
03. Under Name, fill in the directory name.
04. Click Next.
05. In the next step, copy the value from the Logon URL field.
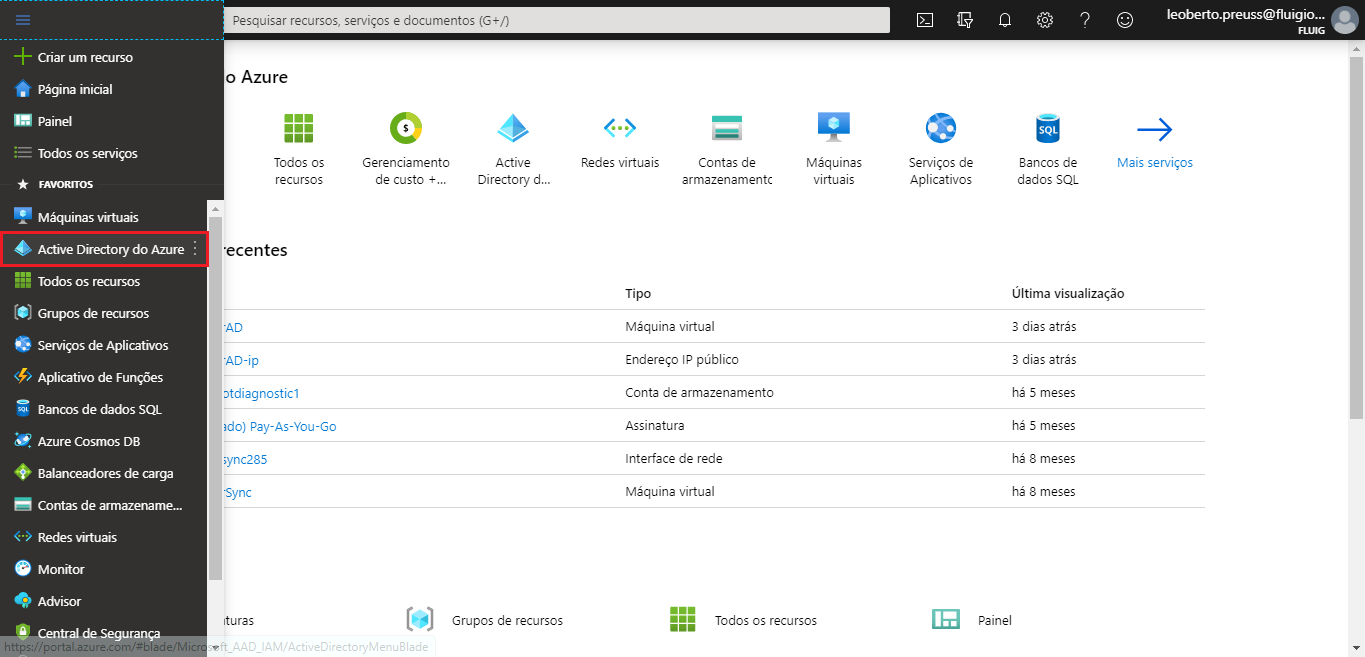
06. Open a new tab to run the settings in Microsoft Azure.
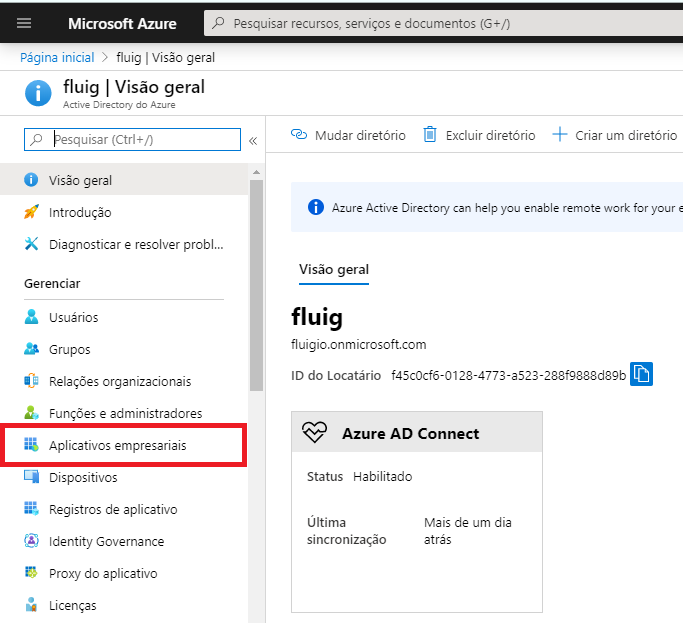
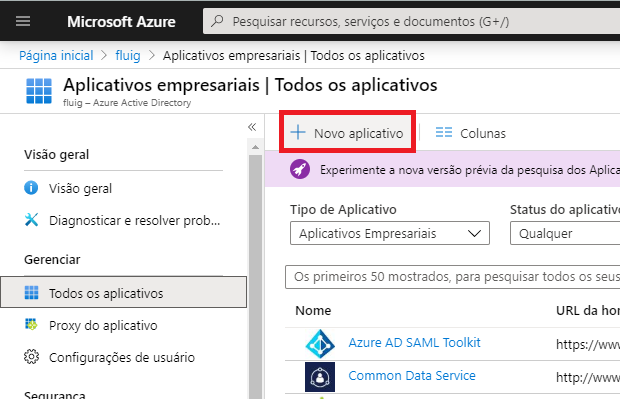
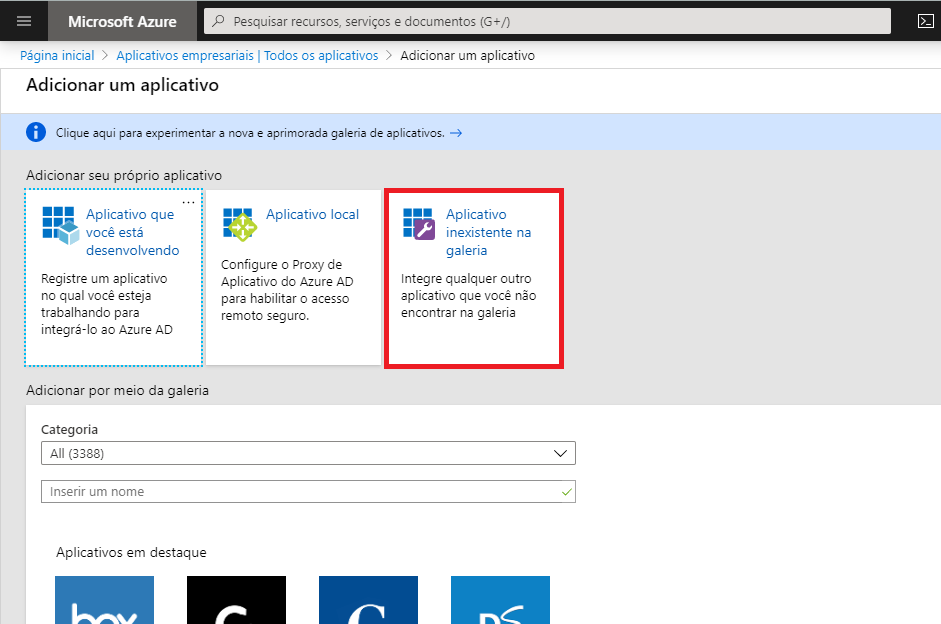
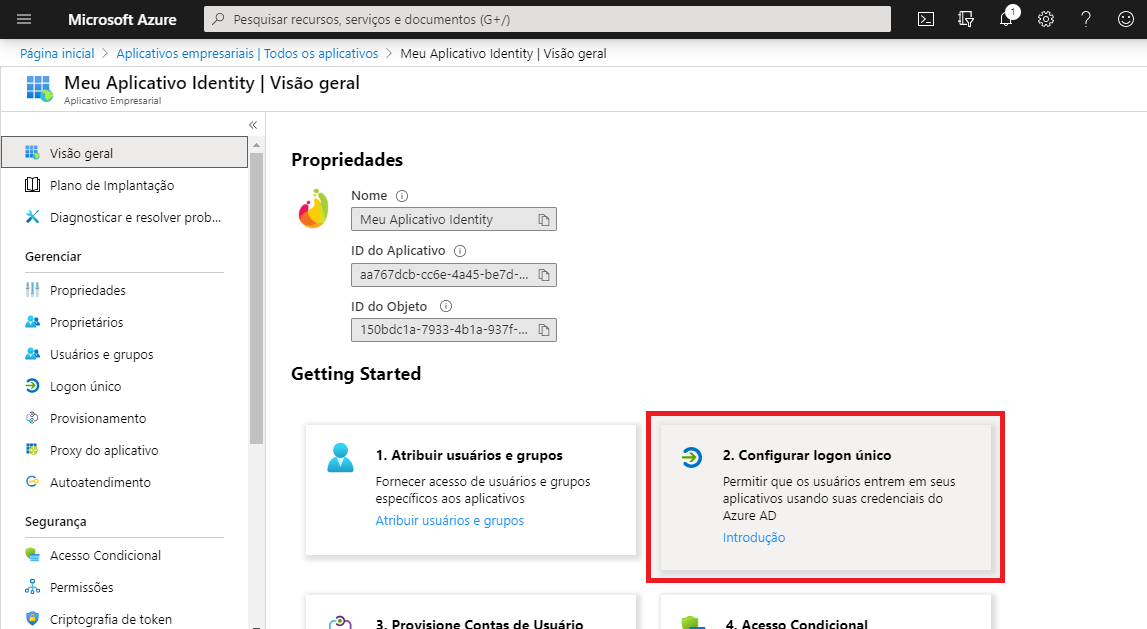
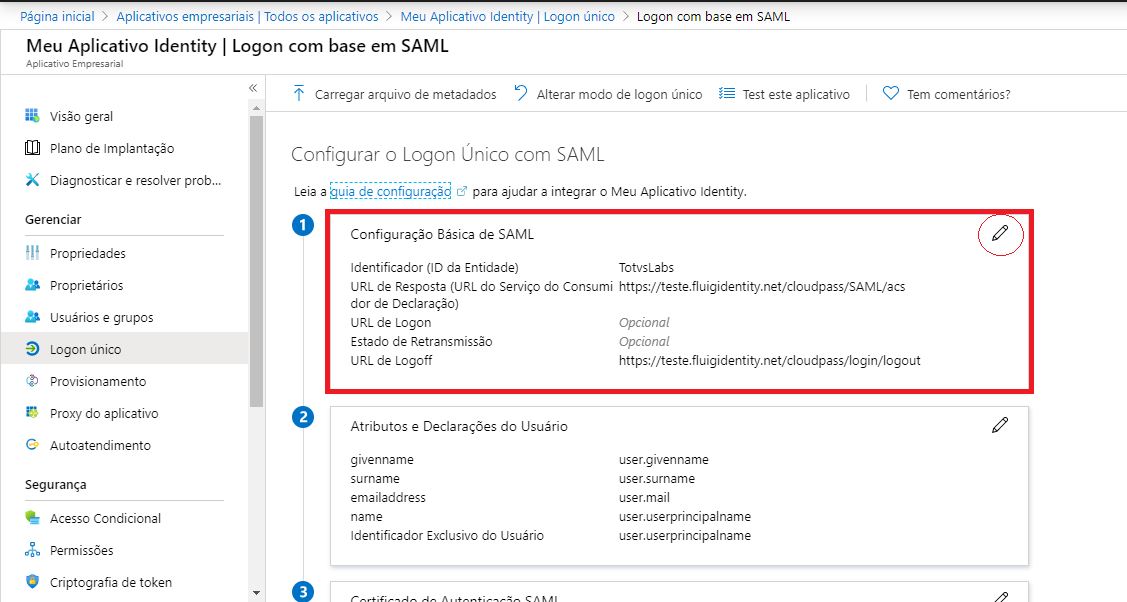
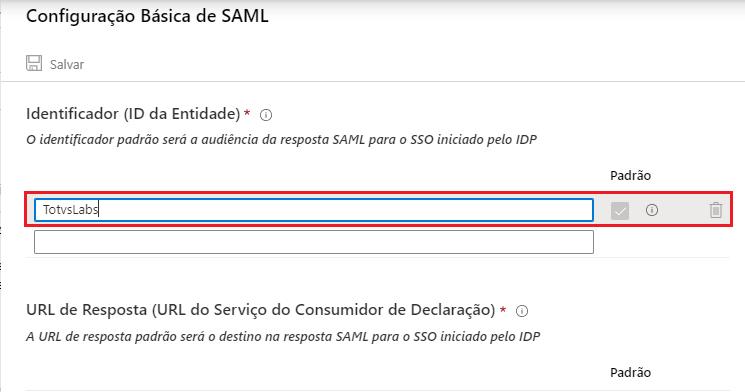
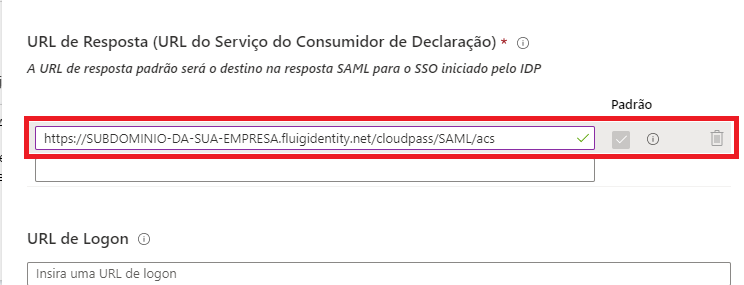
1. Sign in to the Microsoft Azure portal with an administrator account. 2. Open the Menu (three lines in the top left corner) and click the Azure Active Directory service. 3. On the left side options, click Enterprise Applications. 4. Click em + New Application. 5. Choose the Application not found in the Gallery option. 6. Choose a name and create the app. 7. Select Configure single sign-on (mandatory). 8. Select SAML. 9. In the Basic SAML Configuration section, click the pencil icon to edit. 10. In the Identifier (Entity ID) field, type TotvsLabs. 11. In the Response URL (Assertion Consumer Service URL) field, enter the copied value that was obtained in Identity.
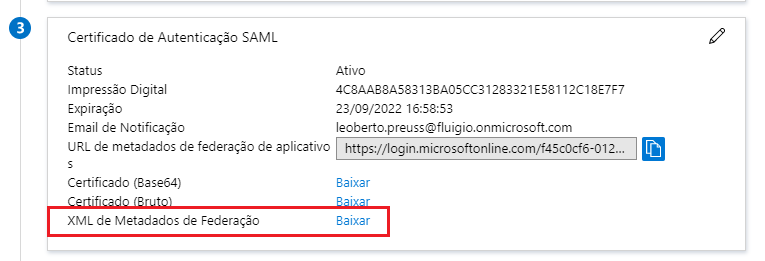
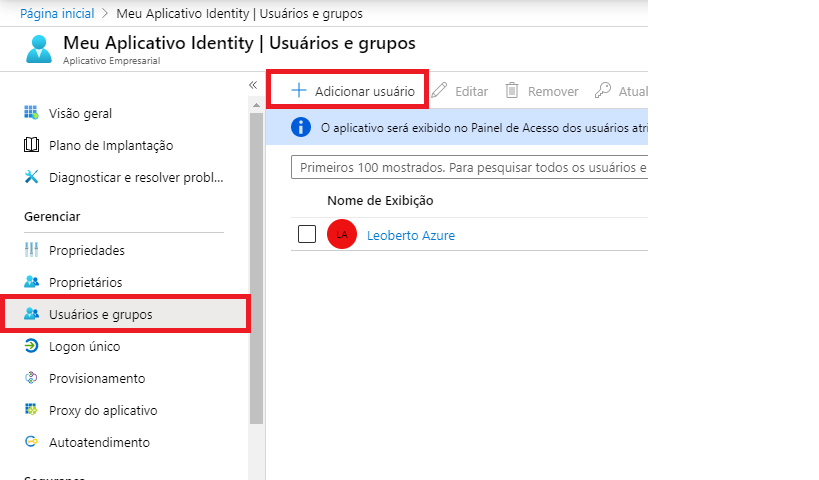
12. In the SAML Authentication Certificate section, download the Federation Metadata XML file and save it. 13. On the left side menu, access Users and Groups and assign this app to the desired users/groups. |
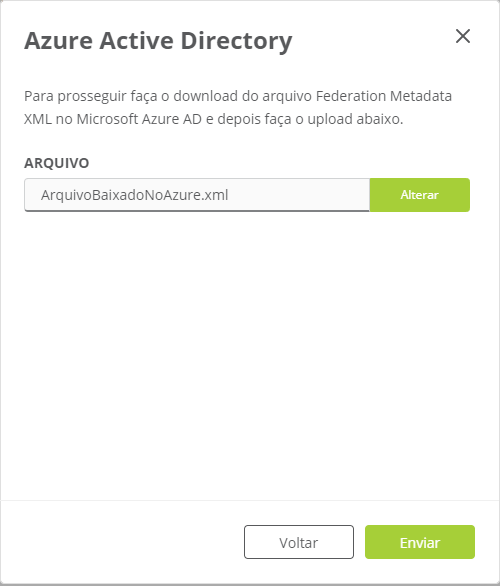
07. After completing the configuration of step 06 in Azure, return to Identity, and, in the Azure Active Directory settings, click Next.![]() See image
See image
08. Drag the Federation Metadata XML file which you previously downloaded from Microsoft Azure to the indicated space and click Send. ![]() See image
See image
09. Fill in the Azure AD Identifier field with the certificate ID sent and click Next.
With this, Identity is ready to receive SSO login requests from the previously created Microsoft Azure SAML application. |
10. Go back to Microsoft Azure, as shown below.
Log in with any of the users you added to the SAML application and access the user applications page. In the application list, the previously created application that is configured for SSO login into Identity will be displayed. Click the previously created application and you will be logged in to Identity. On the initial login, this Microsoft Azure user will be created in Identity.
|
01. Click the ![]() Settings icon in the top right corner and select the Active Directory option.
Settings icon in the top right corner and select the Active Directory option.
02. Locate the directory you want to change.
03. Click ![]() Edit located to the right of the Token column.
Edit located to the right of the Token column.
04. Adjust the desired information according to the type of AD.
Name Enable automatic user acceptance? Yes: By enabling this option, all users imported from this Active Directory by SmartSync will be automatically accepted and provisioned into this Identity context. No: By keeping the option disabled, all users imported from this Active Directory by SmartSync will be added to the Pending list until they are manually approved for context by the company's management. User filter Groups filter
Name Azure AD Identifier |
05. Click Save.
These settings are valid for all registered ADs.
01. Click the ![]() Settings icon in the top right corner and select the Active Directory option.
Settings icon in the top right corner and select the Active Directory option.
02. In the General settings section, click Configure general parameters to open the settings.
03. In the Account options section, configure the required settings.
The available settings are: Allow Active Directory credentials Save Active Directory credentials in TOTVS Identity |
04. In the Sync Options section, configure the required settings.
The available settings are: Synchronize changes in Active Directory user status Synchronize changes in the user status of TOTVS Identity
|
05. In the Password options section, define the required settings.
The available settings are: Allow password change Save Active Directory password cache |
This option is only available for the local Active Directory.
01. Click the ![]() Settings icon in the top right corner and select the Active Directory option.
Settings icon in the top right corner and select the Active Directory option.
02. In the desired directory, click ![]() More options – located on the right side.
More options – located on the right side.
03. Click Disable.
04. As a form of confirmation, before disabling the directory, Identity prompts you to confirm your personal password. Enter your personal password and click Disable.
With deactivation, user synchronization is halted, and imported users are unable to use their Active Directory credentials to log in to Identity. Inactive directories are identified by the status Inactive. You can reactivate inactive directories at any time. |
It is recommended that you disable the Synchronize changes in the Active Directory user status parameter that is in the general settings before deleting the AD.
01. Click the ![]() Settings icon in the top right corner and select the Active Directory option.
Settings icon in the top right corner and select the Active Directory option.
02. In the desired directory, click More options ![]() – located on the right side.
– located on the right side.
03. Click Delete.
04. As a form of confirmation, before deleting the directory, Identity prompts you to confirm your personal password. Enter your personal password and click Delete.
With the deletion, user synchronization is permanently halted, and imported users are unable to use their Active Directory credentials for authentication in TOTVS Identity.
|
This option is only available for the local Active Directory.
01. Click the ![]() Settings icon in the top right corner and select the Active Directory option.
Settings icon in the top right corner and select the Active Directory option.
02. Click the desired directory to see the information.
At the top, there is a section providing information about the synchronization between TOTVS Identity and SmartSync: Last sync with SmartSync SmartSync version Active Directory Server Root DN Next, the Users and Groups tabs are presented, which allow you to view imported users and groups in the chosen directory. |
The requirements for importing users are: 1. Have active users registered in Active Directory with the following fields filled in first name, last name, and e-mail; 2. SmartSync installed, configured, and running; 3. Directory in Active Directory configured in the Identity company.
After the information about the synchronization between Identity and SmartSync, the Users tab is presented, which lists all the users imported in the selected directory. The tables below indicate the number of users pending, processing, accepted, and rejected. You can click on each status to view the users.
Users imported from Active Directory via SmartSync are presented in a list of pending users and need to be accepted before they can be effectively created in TOTVS Identity.
|
You cannot reverse the acceptance procedure, but the accepted user can be disabled on the Users screen. Contextually-deleted users that are re-imported from Active Directory will automatically be included in the Rejected list.
01. On the directory information preview screen, ensure you are on the Users tab.
02. Locate the Search field and enter the name or e-mail address of the user you want to search.
This action is only available in the list of pending and rejected users.
01. On the directory information preview screen, ensure you are on the Users tab.
There are three ways to accept users into Identity: one by one, by selected users, or by all users in the list. |
02. Locate the user you wish to accept.
03. Click Accept ![]() – located on the right side.
– located on the right side.
02. Locate each user you wish to accept.
03. Click ![]() to select each user.
to select each user.
04. Click the Accept selected button.
02. Click the Accept all button.
With this, the users will appear in the Processing list until the user acceptance is finalized. After completing the action, if all is in order, the user is added to the list of accepted users with the Accepted identifier. Once accepted, the imported user is set as Active, and access to the company in TOTVS Identity is released. Users are now listed on the User Management page. In the user profile, the first name, last name, e-mail, job title, and department fields are automatically filled in with the data imported from Active Directory. At the time of user acceptance, Identity checks to see if the imported e-mail is already registered. If the e-mail already exists in Identity, said user will be sent to the list of rejected users with the Error identifier, where the user's e-mail can be changed. For more details, see the Fix User item in this documentation. |
This action is only available in the list of pending users.
01. On the directory information preview screen, ensure you are on the Users tab.
There are two ways to reject users in Identity: one by one or selected users. |
02. Locate the user you wish to reject.
03. Click Reject ![]() – located on the right side.
– located on the right side.
02. Locate each user you wish to reject.
03. Click![]() to select each user.
to select each user.
04. Click the Reject selected button.
After completing the action, the user is added to the list of rejected users with the Rejected identifier. |
This action is only available in the list of rejected users.
01. On the directory information preview screen, ensure you are on the Users tab.
There are two ways to delete imported users: one by one or selected users. |
02. Locate each user that you wish to delete.
03. Click Delete ![]() – located on the right side.
– located on the right side.
02. Locate each user that you wish to delete.
03. Click ![]() to select each user.
to select each user.
04. Click the Delete selected button.
After the action is complete, the deleted user will no longer appear in the list of rejected users and will not be re-imported. |
This action is only available in the list of rejected users. The user to be fixed is listed in the user list with an Error status.
01. On the directory information preview screen, ensure you are on the Users tab.
02. Locate the user you wish to fix.
03. Click Fix ![]() – located on the right side.
– located on the right side.
When you hover over the Fix button, a tooltip will appear with the error that occurred. |
04. In the fields indicated, fix the necessary user information.
All the fields relating to the user are displayed for editing (first name, last name, e-mail address and status). |
05. Click Fix.
After the fix, the user is shown in the list of pending users with the fixed information, and can now be accepted for the user to be created in Identity. |
The requirements for importing groups are: 1. Have groups registered in Active Directory; 2. SmartSync installed, configured, and running; 3. Directory in Active Directory configured in the Identity company.
After the information about the synchronization between Identity and SmartSync, the Groups tab is presented, which lists all the permission groups imported in the selected directory. The tables below indicate the number of groups pending, processing, accepted, and rejected. You can click on each status to view the groups.
Like users imported from Active Directory via SmartSync, groups are also presented in a list of pending groups and need to be accepted in order to be associated with Identity applications.
01. On the directory information preview screen, ensure you are on the Groups tab.
02. Locate the Search field and enter the name of the group you want to search.
This action is only available in the list of pending groups.
01. On the directory information preview screen, ensure you are on the Groups tab.
There are two ways to accept groups in Identity: one by one or in selected groups. |
02. Locate the group you wish to accept.
03. Click Accept ![]() – located on the right side.
– located on the right side.
02. Locate each group that you wish to accept.
03. Click ![]() to select each group.
to select each group.
04. Click the Accept selected button.
With this, the groups will appear in the Processing list until the group acceptance is finalized. After completing the action, if all is in order, the group is added to the list of accepted groups with the Accepted identifier. Groups imported from Active Directory and accepted are listed alongside Identity's own groups on the Group Management page. |
This action is only available in the list of pending groups.
01. On the directory information preview screen, ensure you are on the Groups tab.
There are two ways to reject groups in Identity: one by one or selected groups. |
02. Locate the group you wish to reject.
03. Click Reject ![]() – located on the right side.
– located on the right side.
02. Locate each group that you wish to reject.
03. Click ![]() to select each group.
to select each group.
04. Click the Reject selected button.
After completing the action, the group is added to the list of rejected groups with the Rejected identifier. |
This action is only available in the list of pending groups.
01. On the directory information preview screen, ensure you are on the Groups tab.
02. Locate the group you wish to edit.
03. Click Edit ![]() – located on the right side.
– located on the right side.
04. Type the new name in the indicated field and click Save.
The name of a group from the imported Active Directory can be changed in Identity so that when this group is accepted, it will be created with this new display name. |
This document is valid from 5.0.0 update. Previous updates may contain different information than what you see on your SmartSync. |
<!-- Hotjar Tracking Code for http://help.fluig.com -->
<script>
    (function(h,o,t,j,a,r){
        h.hj=h.hj||function(){(h.hj.q=h.hj.q||[]).push(arguments)};
        h._hjSettings={hjid:743684,hjsv:6};
        a=o.getElementsByTagName('head')[0];
        r=o.createElement('script');r.async=1;
        r.src=t+h._hjSettings.hjid+j+h._hjSettings.hjsv;
        a.appendChild(r);
    })(window,document,'https://static.hotjar.com/c/hotjar-','.js?sv=');
</script>

<script>
	$("b:contains('oculto')").parent().parent().hide();
</script>

<style type="text/css">
    .lms * {
      -webkit-box-sizing: border-box;
      -moz-box-sizing: border-box;
      box-sizing: border-box;
    }

    .lms-text-center {
      text-align: center;
    }

    .lms-full-height {
      height: 100%;
    }

    /* Component LMS Callout */

    .lms-callout {
      border: none;
      padding: 0px;

      display: -moz-box;
      -moz-flex-flow: row wrap;
      -moz-justify-content: center;
      -moz-align-items: center;

      display: -ms-flexbox;
      -ms-flex-flow: row wrap;
      -ms-justify-content: center;
      -ms-align-items: center;

      display: -webkit-flex;
      display: -webkit-box;
      -webkit-flex-flow: row wrap;
      -webkit-justify-content: center;
      -webkit-align-items: center;

      display: flex;
      flex-flow: row wrap;
      justify-content: center;
      align-items: center;
    }

    .lms-callout .lms-callout-image {
      width: 24px;
    }

    .lms-callout .lms-callout-body {
      width: calc(100% - 24px);
      padding-left: 20px;
    }

	.lms-callout .lms-callout-citacao {
      border: 0px solid;
      border-left-width: 3px;
      border-left-color: #f36f21;
	  margin: 4px;
	  margin-left: 25px;
	  padding-left: 8px;
      font-size: 13px;
	}

    .lms-callout .lms-callout-thumb {
      width: 24px;
      height: 24px;
    }

    .lms-callout .lms-callout-text {
      color: #58595b;
      line-height: 1.75;
      margin: 0;
    }
</style> |