SmartSync is an application responsible for synchronizing data between Identity and Active Directory. The synchronized data includes creating new users and changing data such as first name, last name, e-mail, and linked groups.
Follow these steps to install SmartSync:
01. Check out the following requirements.
|
02. Download the installer as instructed in the item Download the SmartSync installer in the Active Directory documentation.
03. Right-click the SmartSync installer and select the option Run as administrator or Install (depending on the operating system version).
04. Click Next to finish the installation.
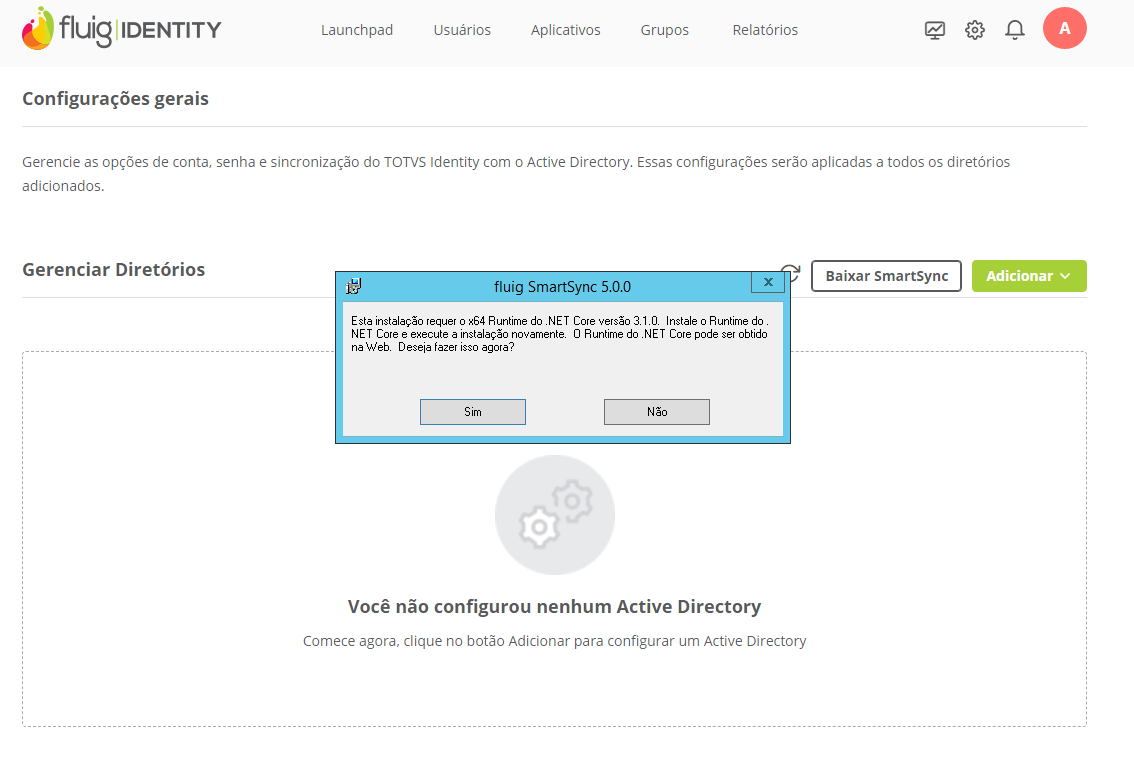
Once SmartSync is installed on the server, you must configure it with the Active Directory directories so that synchronization of users and/or groups can be initiated. There are two processes running for SmartSync:
After installing and configuring SmartSync, you must keep the SmartsyncApplication process running.
|
SmartSync creates Windows services automatically at the time of installation.
01. Access the Windows prompt (cmd) and enter the following command to install the Windows service.
sc create "SmartSync.Application" binpath="C:\Program Files\TOTVS\SmartSync\Application\SmartSync.Application.exe" |
02. Still at the Windows prompt, type the command below to start the service.
sc start "SmartSync.Application" |
To perform this action, SmartSync must be installed and running on the server..
|
01. Open the application and click the Configure button.
02. Include the protocol and environment information, which can be production or customerfi. Click Test to ensure that communication is occurring.
03. Click Next to continue configuring SmartSync. Proxy settings are not yet available in the current version of SmartSync.
04. Click Next and enter the Active Directory information registered in TOTVS Identity.
IP/Server name User and Password Domain Token |
05. Click Finish.
If the data is correct, after the configuration is complete, the main SmartSync screen will be displayed with the configured AD information. If the data is incorrect, an error message will be displayed, and a new token must be generated to attempt configuration again. |
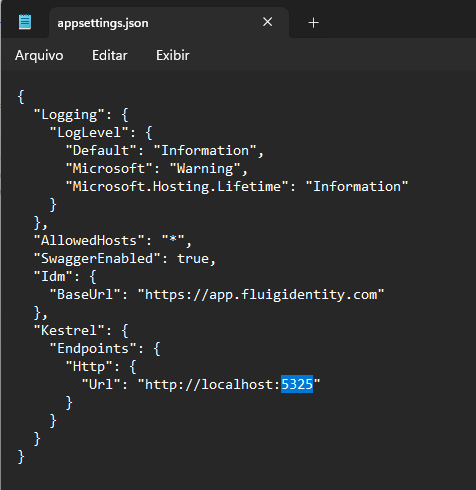
To perform this action, SmartSync must be stopped and closed. The port can be changed at any time.
01. Open the appsettings.json file with the help of a text editor. It can be opened in Windows Notepad
02. Locate the URL field and change the port. The default port is 5325. ![]() See image
See image
In order for access to be possible, the SmartsyncApplication and SmartsyncWebApi services must have been previously initialized. When you open the applications, the browser will launch, opening the SmartSync home page which is located at http://localhost:5000/home.
SmartSync is organized under the tabs Home and Active Directory. If this is the first access, you will need to configure SmartSync, which consists of the Proxy and Active Directory steps (explained in the items Proxy settings and Add Active Directory of this documentation). |
The Home tab presents the main information about SmartSync.
In this section, you will enter the environment to be connected to AD. The default setting is the production environment: https://app.fluigidentity.com/.
Edit environment: Make protocol and environment changes in the fields below to test the connection to Identity.
Test connection: Check whether the connection was established for each environment where the registered AD points.
Proxy settings are not yet available in the current version of SmartSync.
In the default system configuration, SmartSync uses the proxy settings defined in the operating system to connect to AD Sync.
Displays the logs recorded by SmartsyncWebApi and SmartsyncApplication. You can export this log in .txt format to see the details of the detected events.
Logs are stored according to the log level chosen:
Events that are logged include application date and start, connected environment, connection tests, filters used to find users and groups, and Active Directory inclusion errors.
01. In the Event Logs section, choose the desired log: SmartsyncWebApi or SmartsyncApplication.
02. Check the period you wish to track.
03. Click Export.
04. Locate the log to be exported.
05. Click Export.
With this, the event log is downloaded and can be viewed in Notepad or your preferred text file reader. |
01. In the Event logs section, click the Edit logs button.
02. Choose the log level you want: info, debug, warning or error.
03. Click Save.
After saving the change, the chosen level will only be valid for the next logs generated. |
On this tab, you can add the Active Directory directories that will be managed by SmartSync.
The Identity Status column identifies when the directory is active, enabling the import of users and permission groups
You can also see when a user/group import is in progress and when it is finished in each Active Directory.
01. In SmartSync, make sure you are in the Active Directory tab.
02. Click the Add button.
03. In the open screen, fill in the information related to the Active Directory to be synchronized with Identity.
IP Domain Token |
04. Click Add.
If all the information is correct, the Active Directory will be added to the list and will start synchronizing information with Identity. If there are any inconsistencies in the data entered, the Active Directory will not be added to the list. To identify the problem, check the log for the Event Logs item in this documentation. |
01. In SmartSync, make sure you are in the Active Directory tab.
02. Locate the Active Directory to change.
03. Click Edit ![]() located to the right of the Identity Status column.
located to the right of the Identity Status column.
04. Update the necessary information on the open screen.
IP Domain |
05. Click Edit to save the changes.
01. In SmartSync, make sure you are in the Active Directory tab.
02. Locate the Active Directory to be deleted.
03. Click Delete![]() located to the right of the Identity Status column.
located to the right of the Identity Status column.
04. In the confirmation message, check the confirmation box.
05. Click Delete.
When deleting the Active Directory configuration, the process of synchronizing users and groups will permanently cease. |
This document is valid from 5.0.0 update. Previous updates may contain different information than what you see on your SmartSync. |
<!-- Hotjar Tracking Code for http://help.fluig.com -->
<script>
    (function(h,o,t,j,a,r){
        h.hj=h.hj||function(){(h.hj.q=h.hj.q||[]).push(arguments)};
        h._hjSettings={hjid:743684,hjsv:6};
        a=o.getElementsByTagName('head')[0];
        r=o.createElement('script');r.async=1;
        r.src=t+h._hjSettings.hjid+j+h._hjSettings.hjsv;
        a.appendChild(r);
    })(window,document,'https://static.hotjar.com/c/hotjar-','.js?sv=');
</script>

<script>
	$("b:contains('oculto')").parent().parent().hide();
</script>

<style type="text/css">
    .lms * {
      -webkit-box-sizing: border-box;
      -moz-box-sizing: border-box;
      box-sizing: border-box;
    }

    .lms-text-center {
      text-align: center;
    }

    .lms-full-height {
      height: 100%;
    }

    /* Component LMS Callout */

    .lms-callout {
      border: none;
      padding: 0px;

      display: -moz-box;
      -moz-flex-flow: row wrap;
      -moz-justify-content: center;
      -moz-align-items: center;

      display: -ms-flexbox;
      -ms-flex-flow: row wrap;
      -ms-justify-content: center;
      -ms-align-items: center;

      display: -webkit-flex;
      display: -webkit-box;
      -webkit-flex-flow: row wrap;
      -webkit-justify-content: center;
      -webkit-align-items: center;

      display: flex;
      flex-flow: row wrap;
      justify-content: center;
      align-items: center;
    }

    .lms-callout .lms-callout-image {
      width: 24px;
    }

    .lms-callout .lms-callout-body {
      width: calc(100% - 24px);
      padding-left: 20px;
    }

	.lms-callout .lms-callout-citacao {
      border: 0px solid;
      border-left-width: 3px;
      border-left-color: #f36f21;
	  margin: 4px;
	  margin-left: 25px;
	  padding-left: 8px;
      font-size: 13px;
	}

    .lms-callout .lms-callout-thumb {
      width: 24px;
      height: 24px;
    }

    .lms-callout .lms-callout-text {
      color: #58595b;
      line-height: 1.75;
      margin: 0;
    }
</style> |